-
Imagery account:Create and access the account
How to register
To create an account on www.imagery.com, you can do it in two ways, by taking your first appointment or registering directly.
Join in making appointments
- Follow the steps for how to make an appointment online by clicking the link global.take appointment
- Click the link to access the section of the account creation : Confirm an appointment slot
Register Get directly without an appointment
- Click on the top right menu button to bring up the main menu
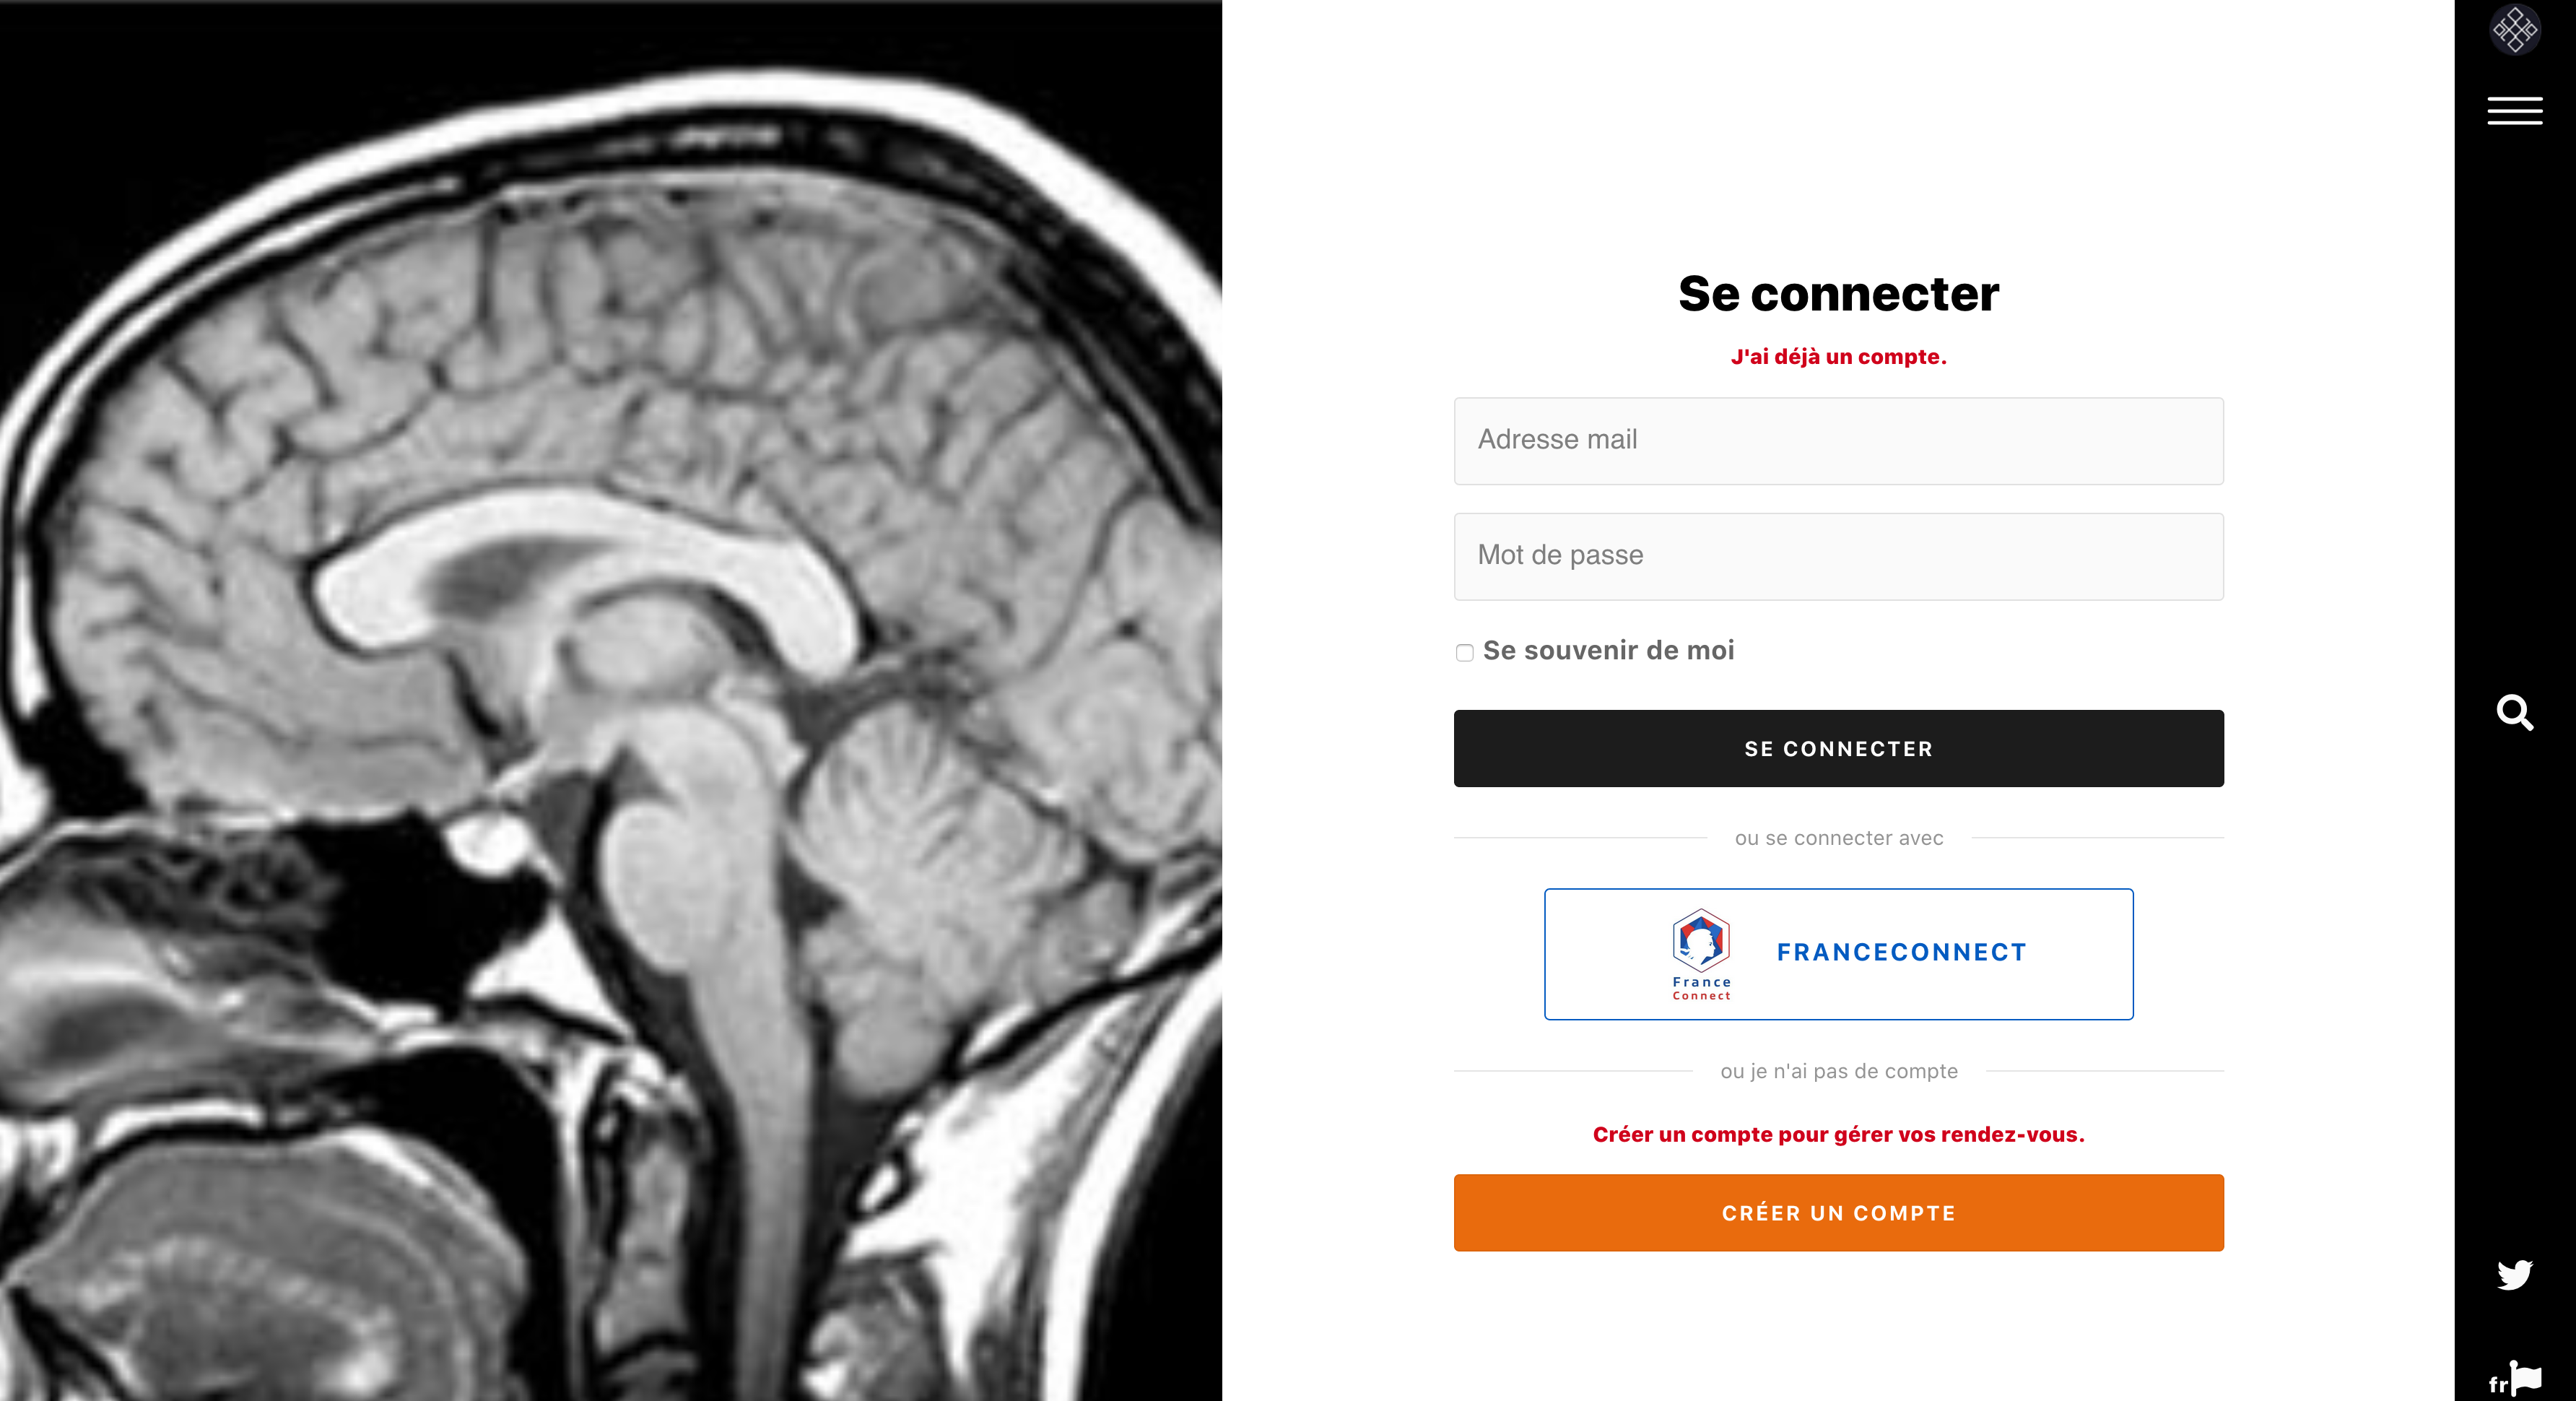
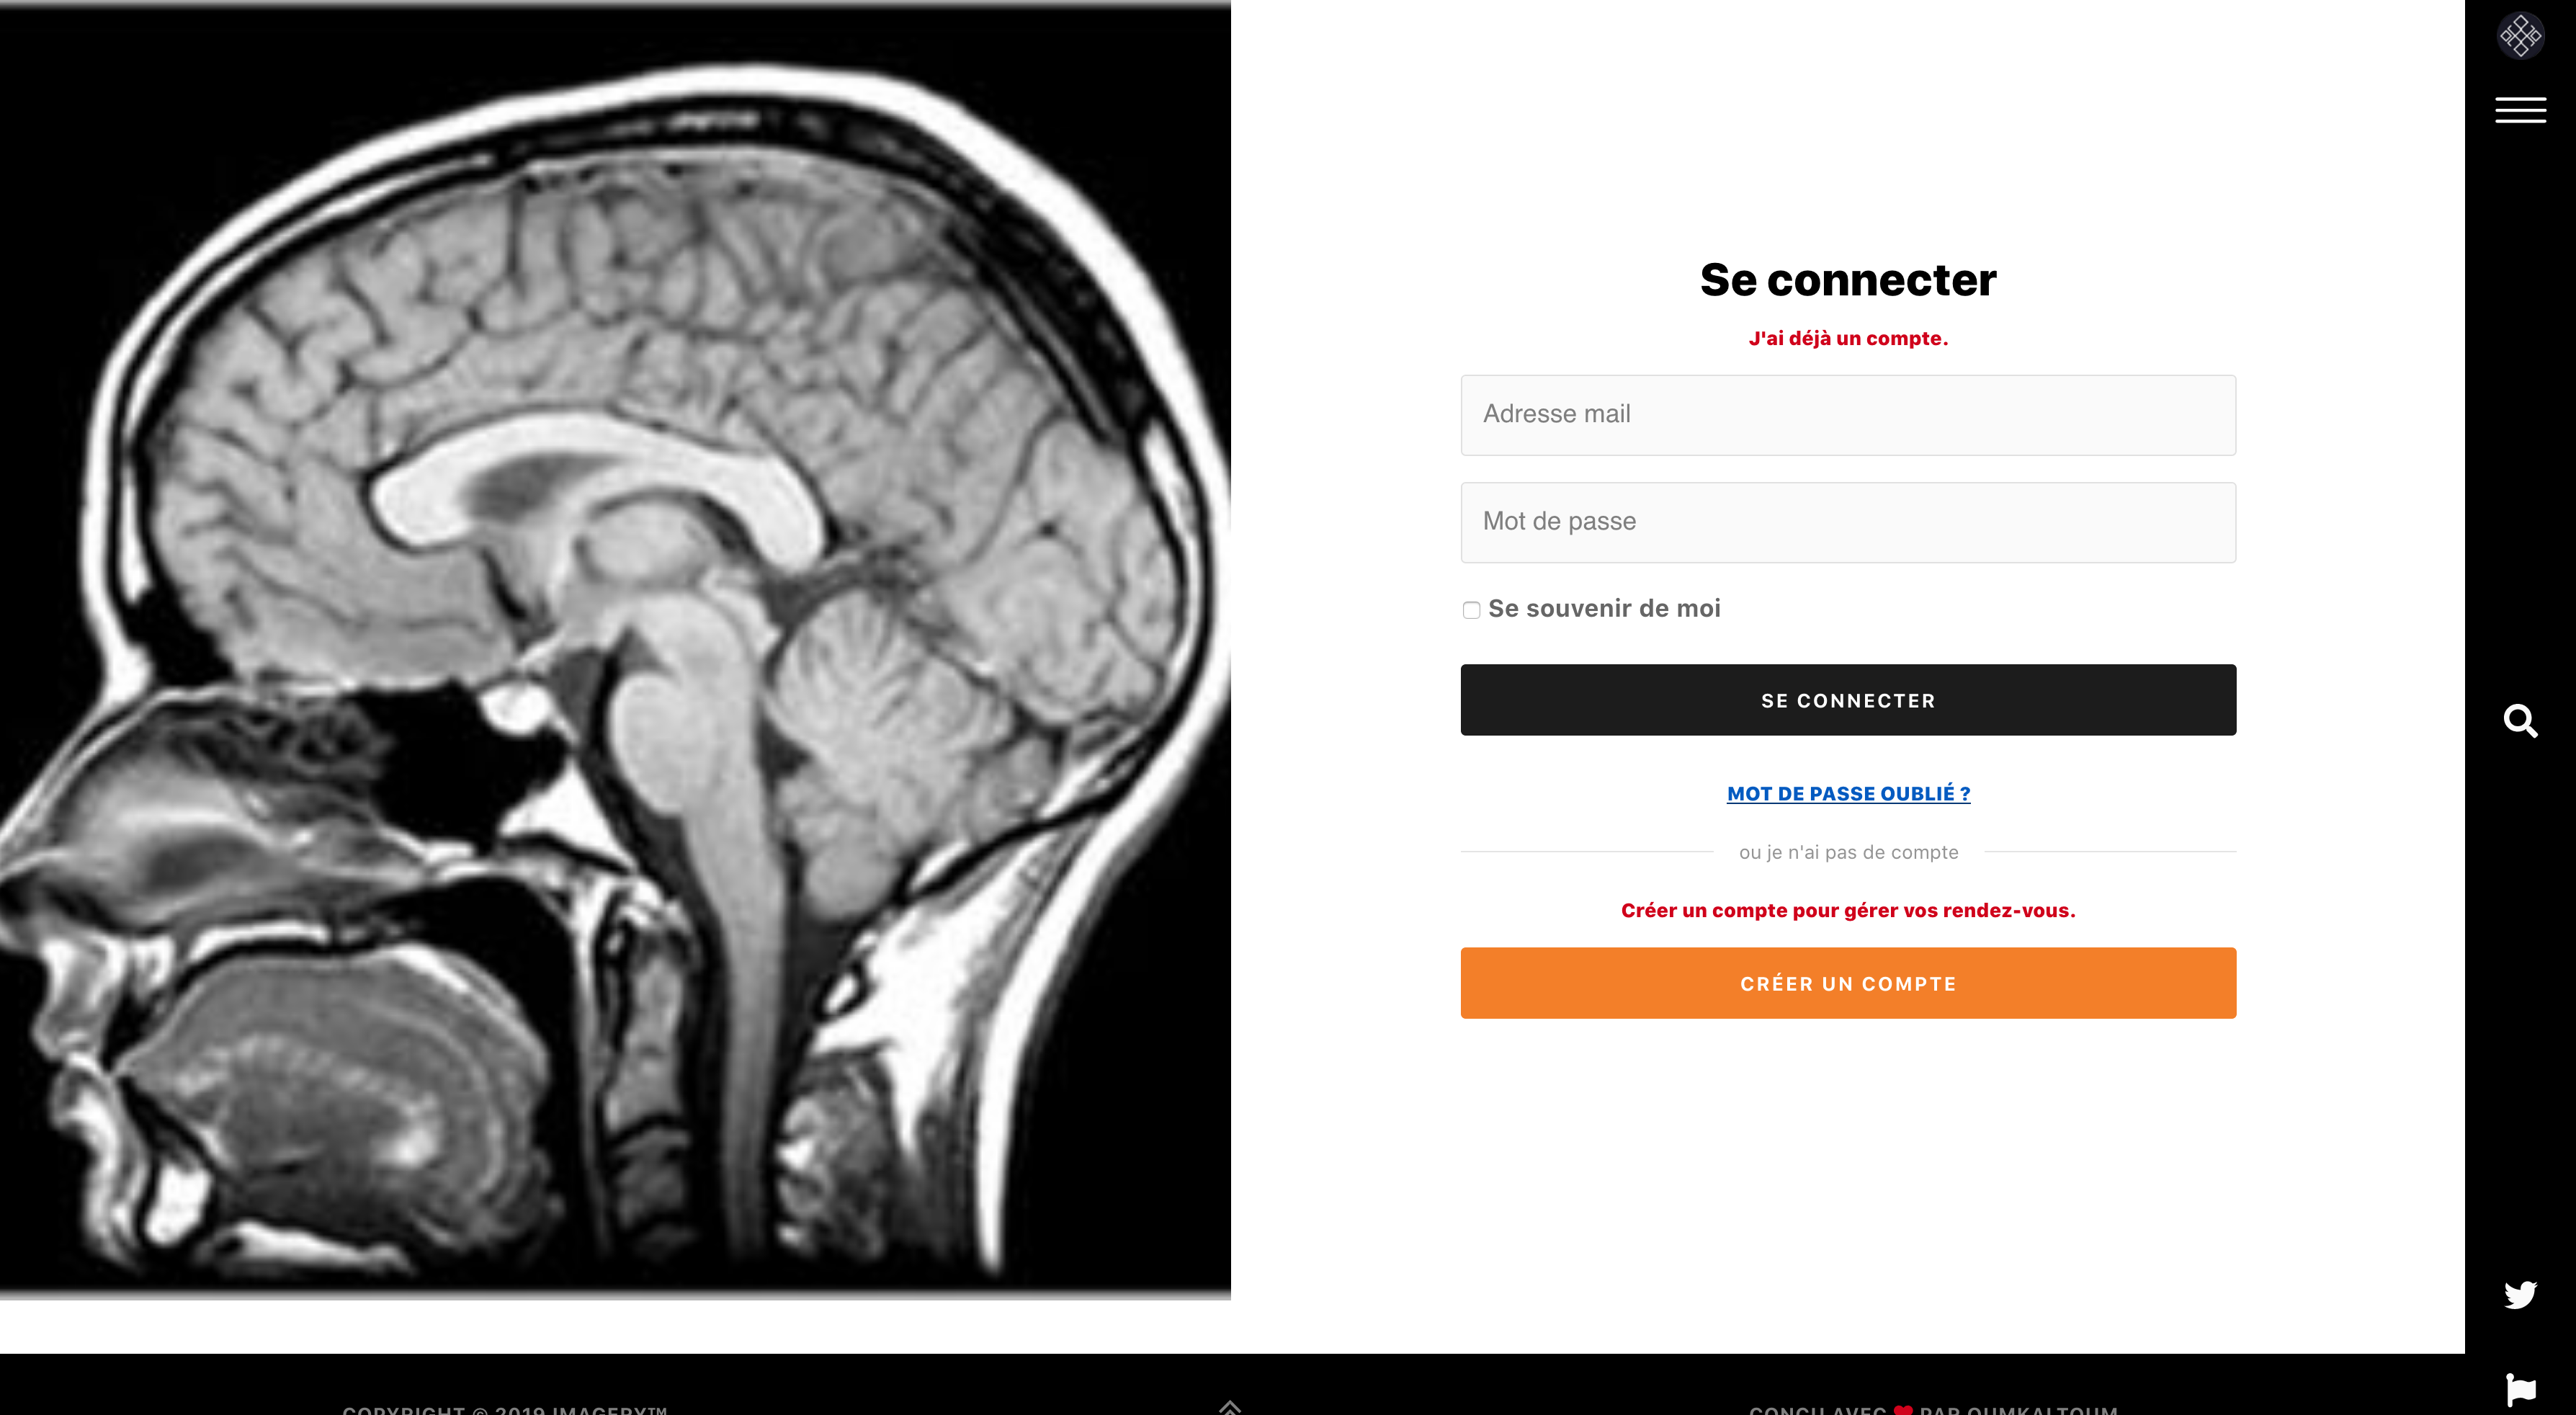
- Click on Patient connection

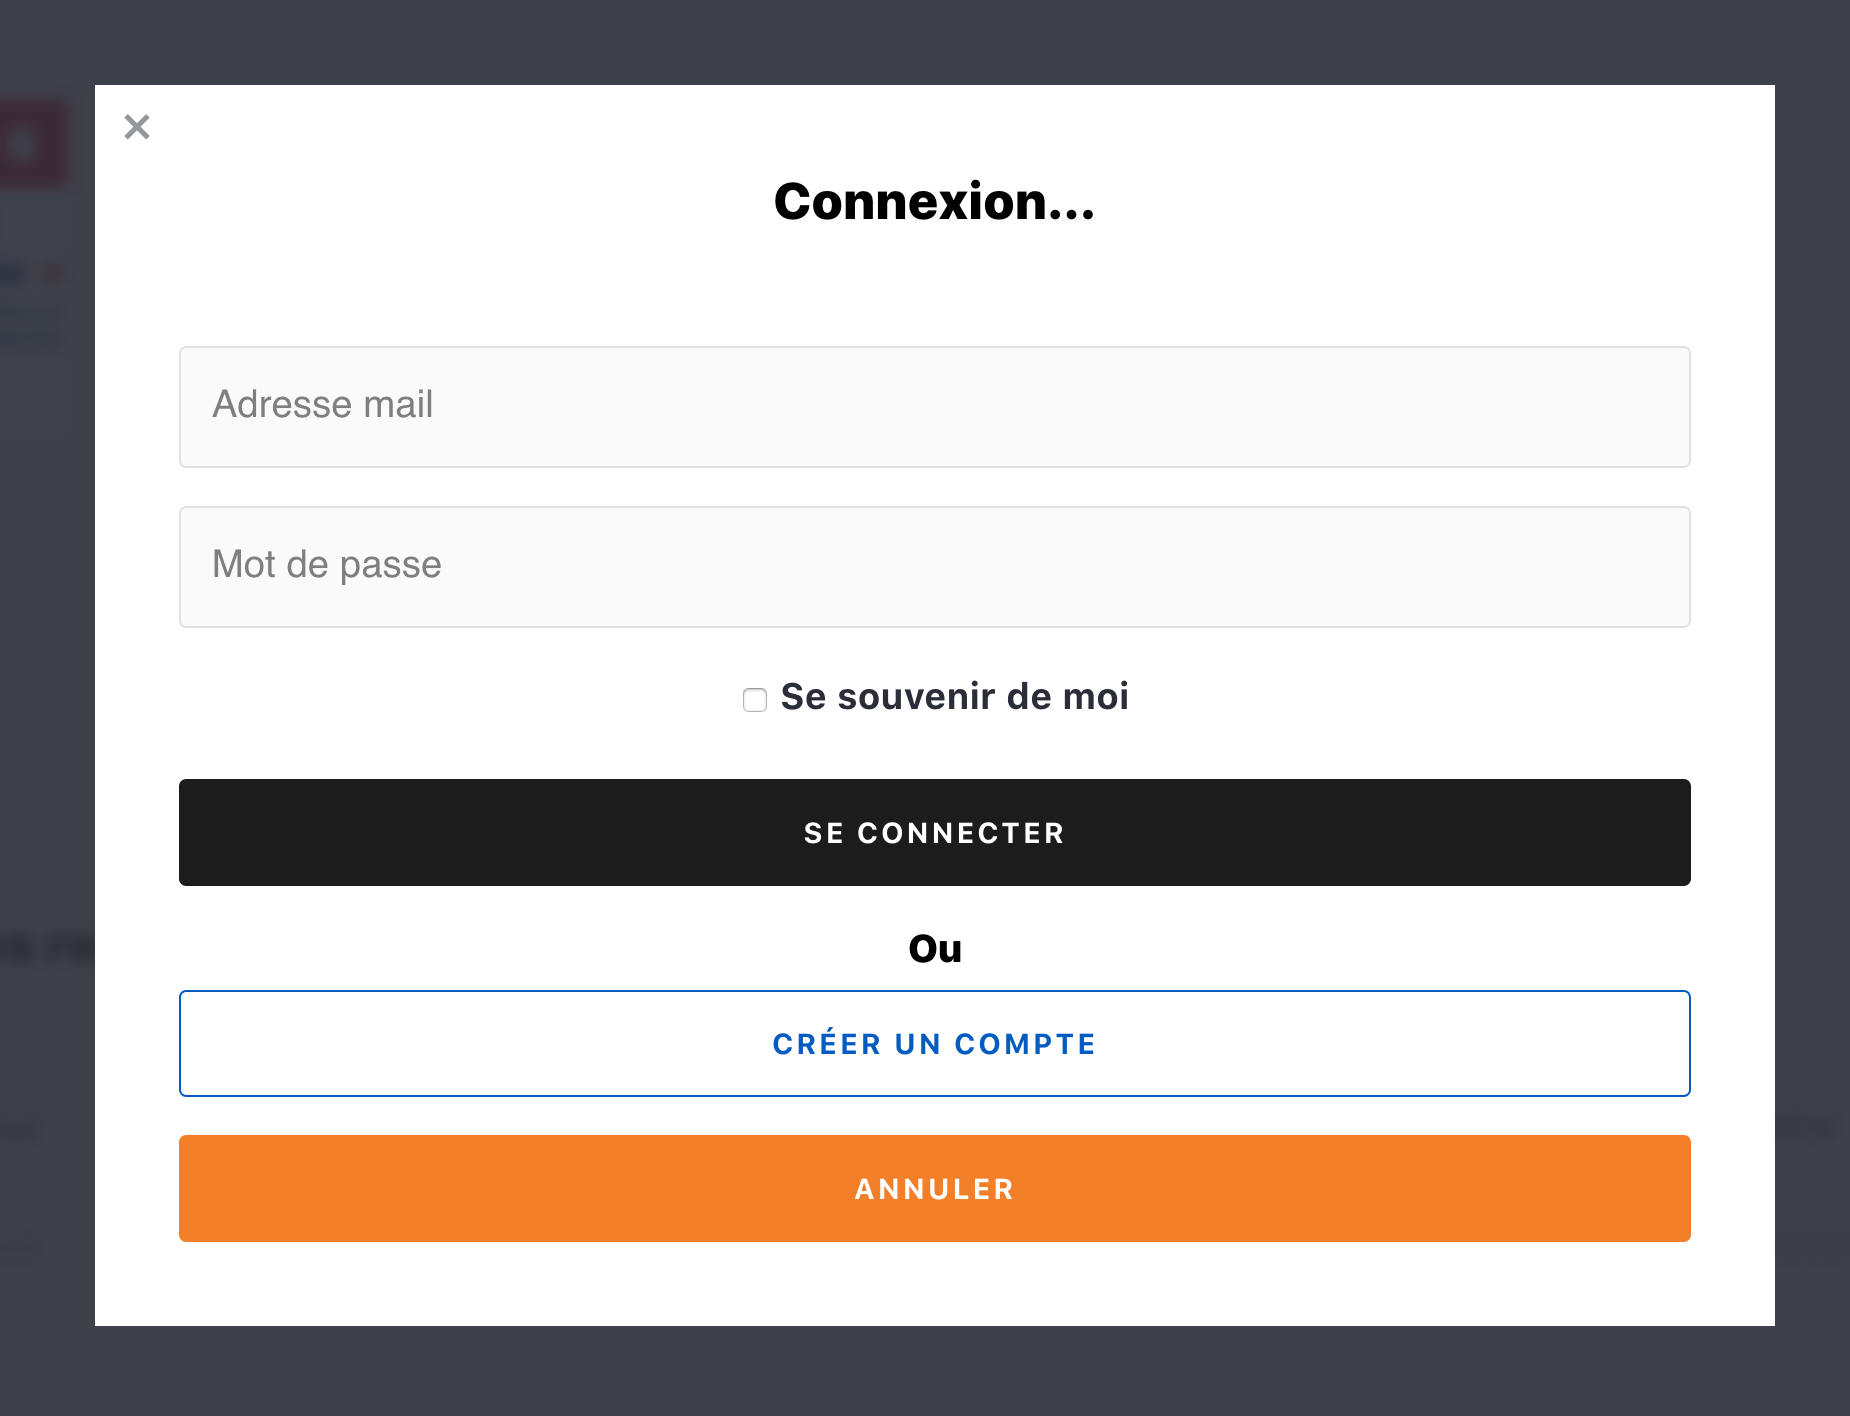
You are redirected to the login page.
- On the login page click Create an account
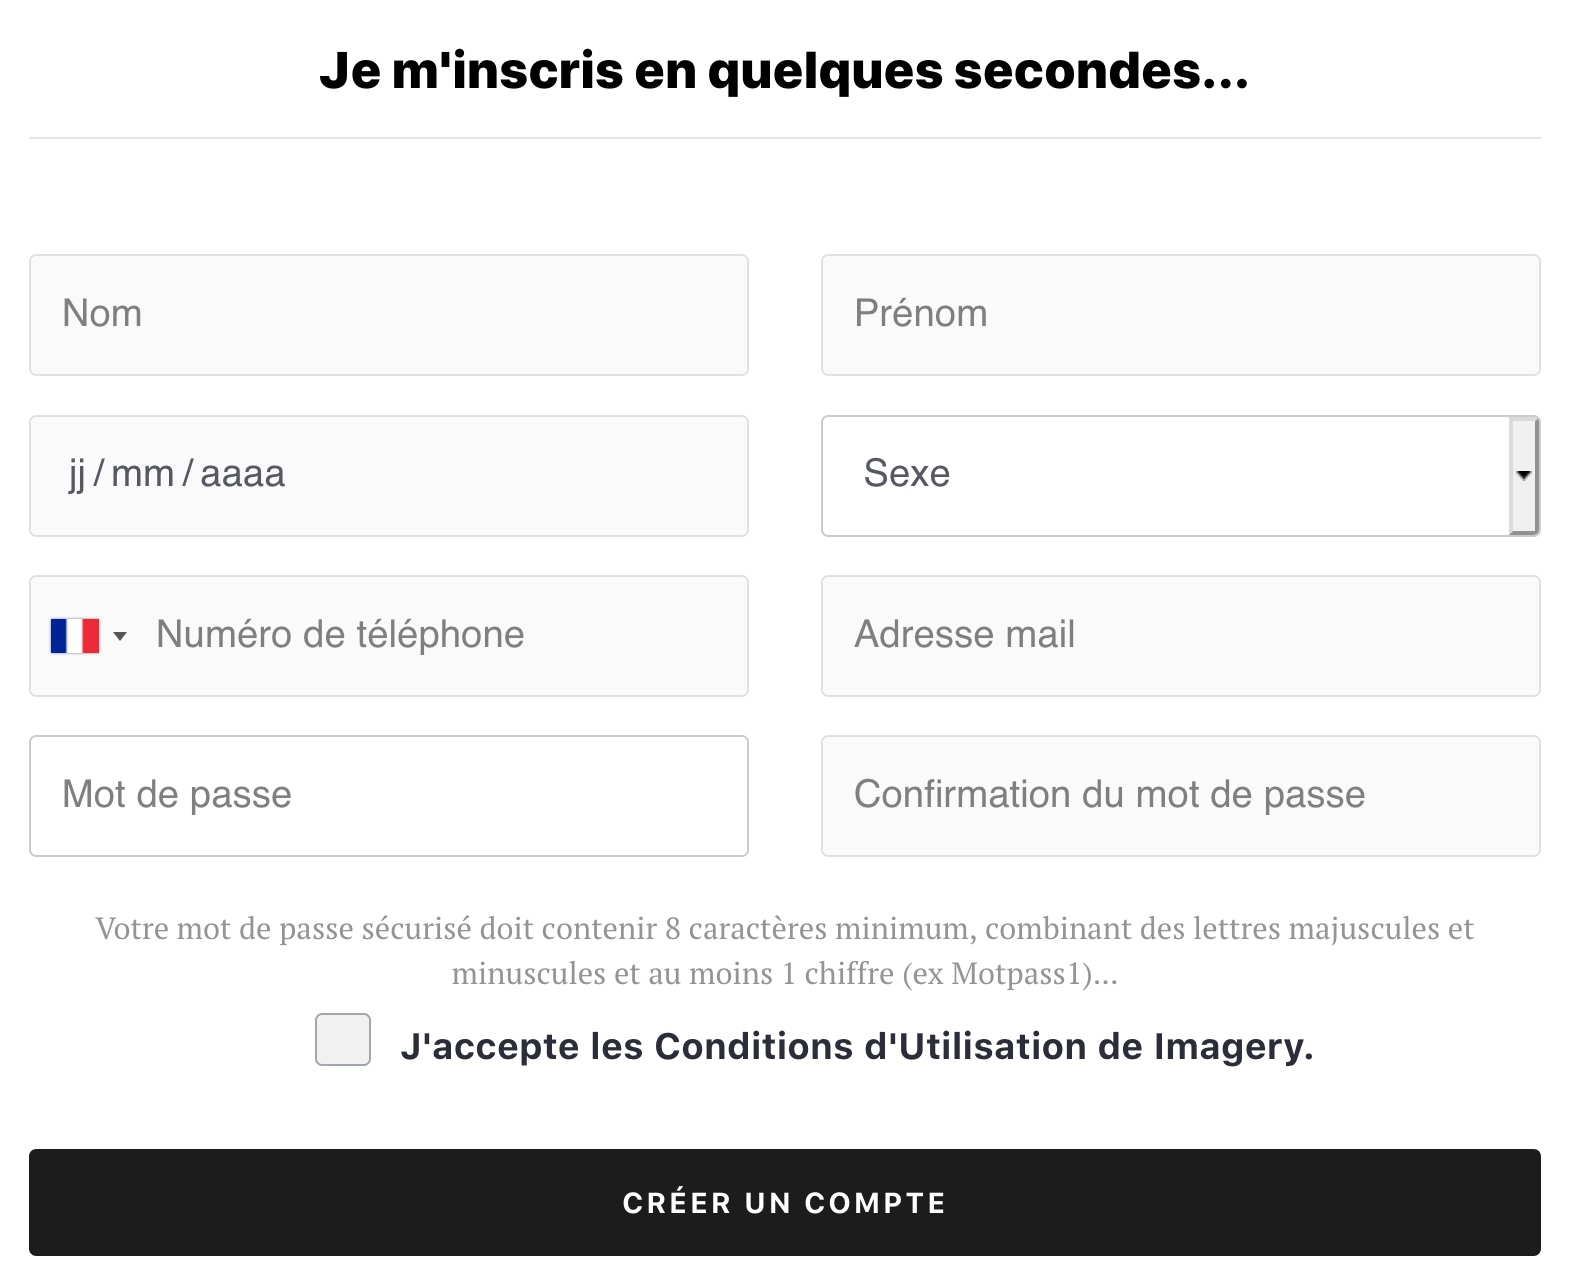
You are redirected to the page Registration Form.
- Fill Registration Form by filling out all fields
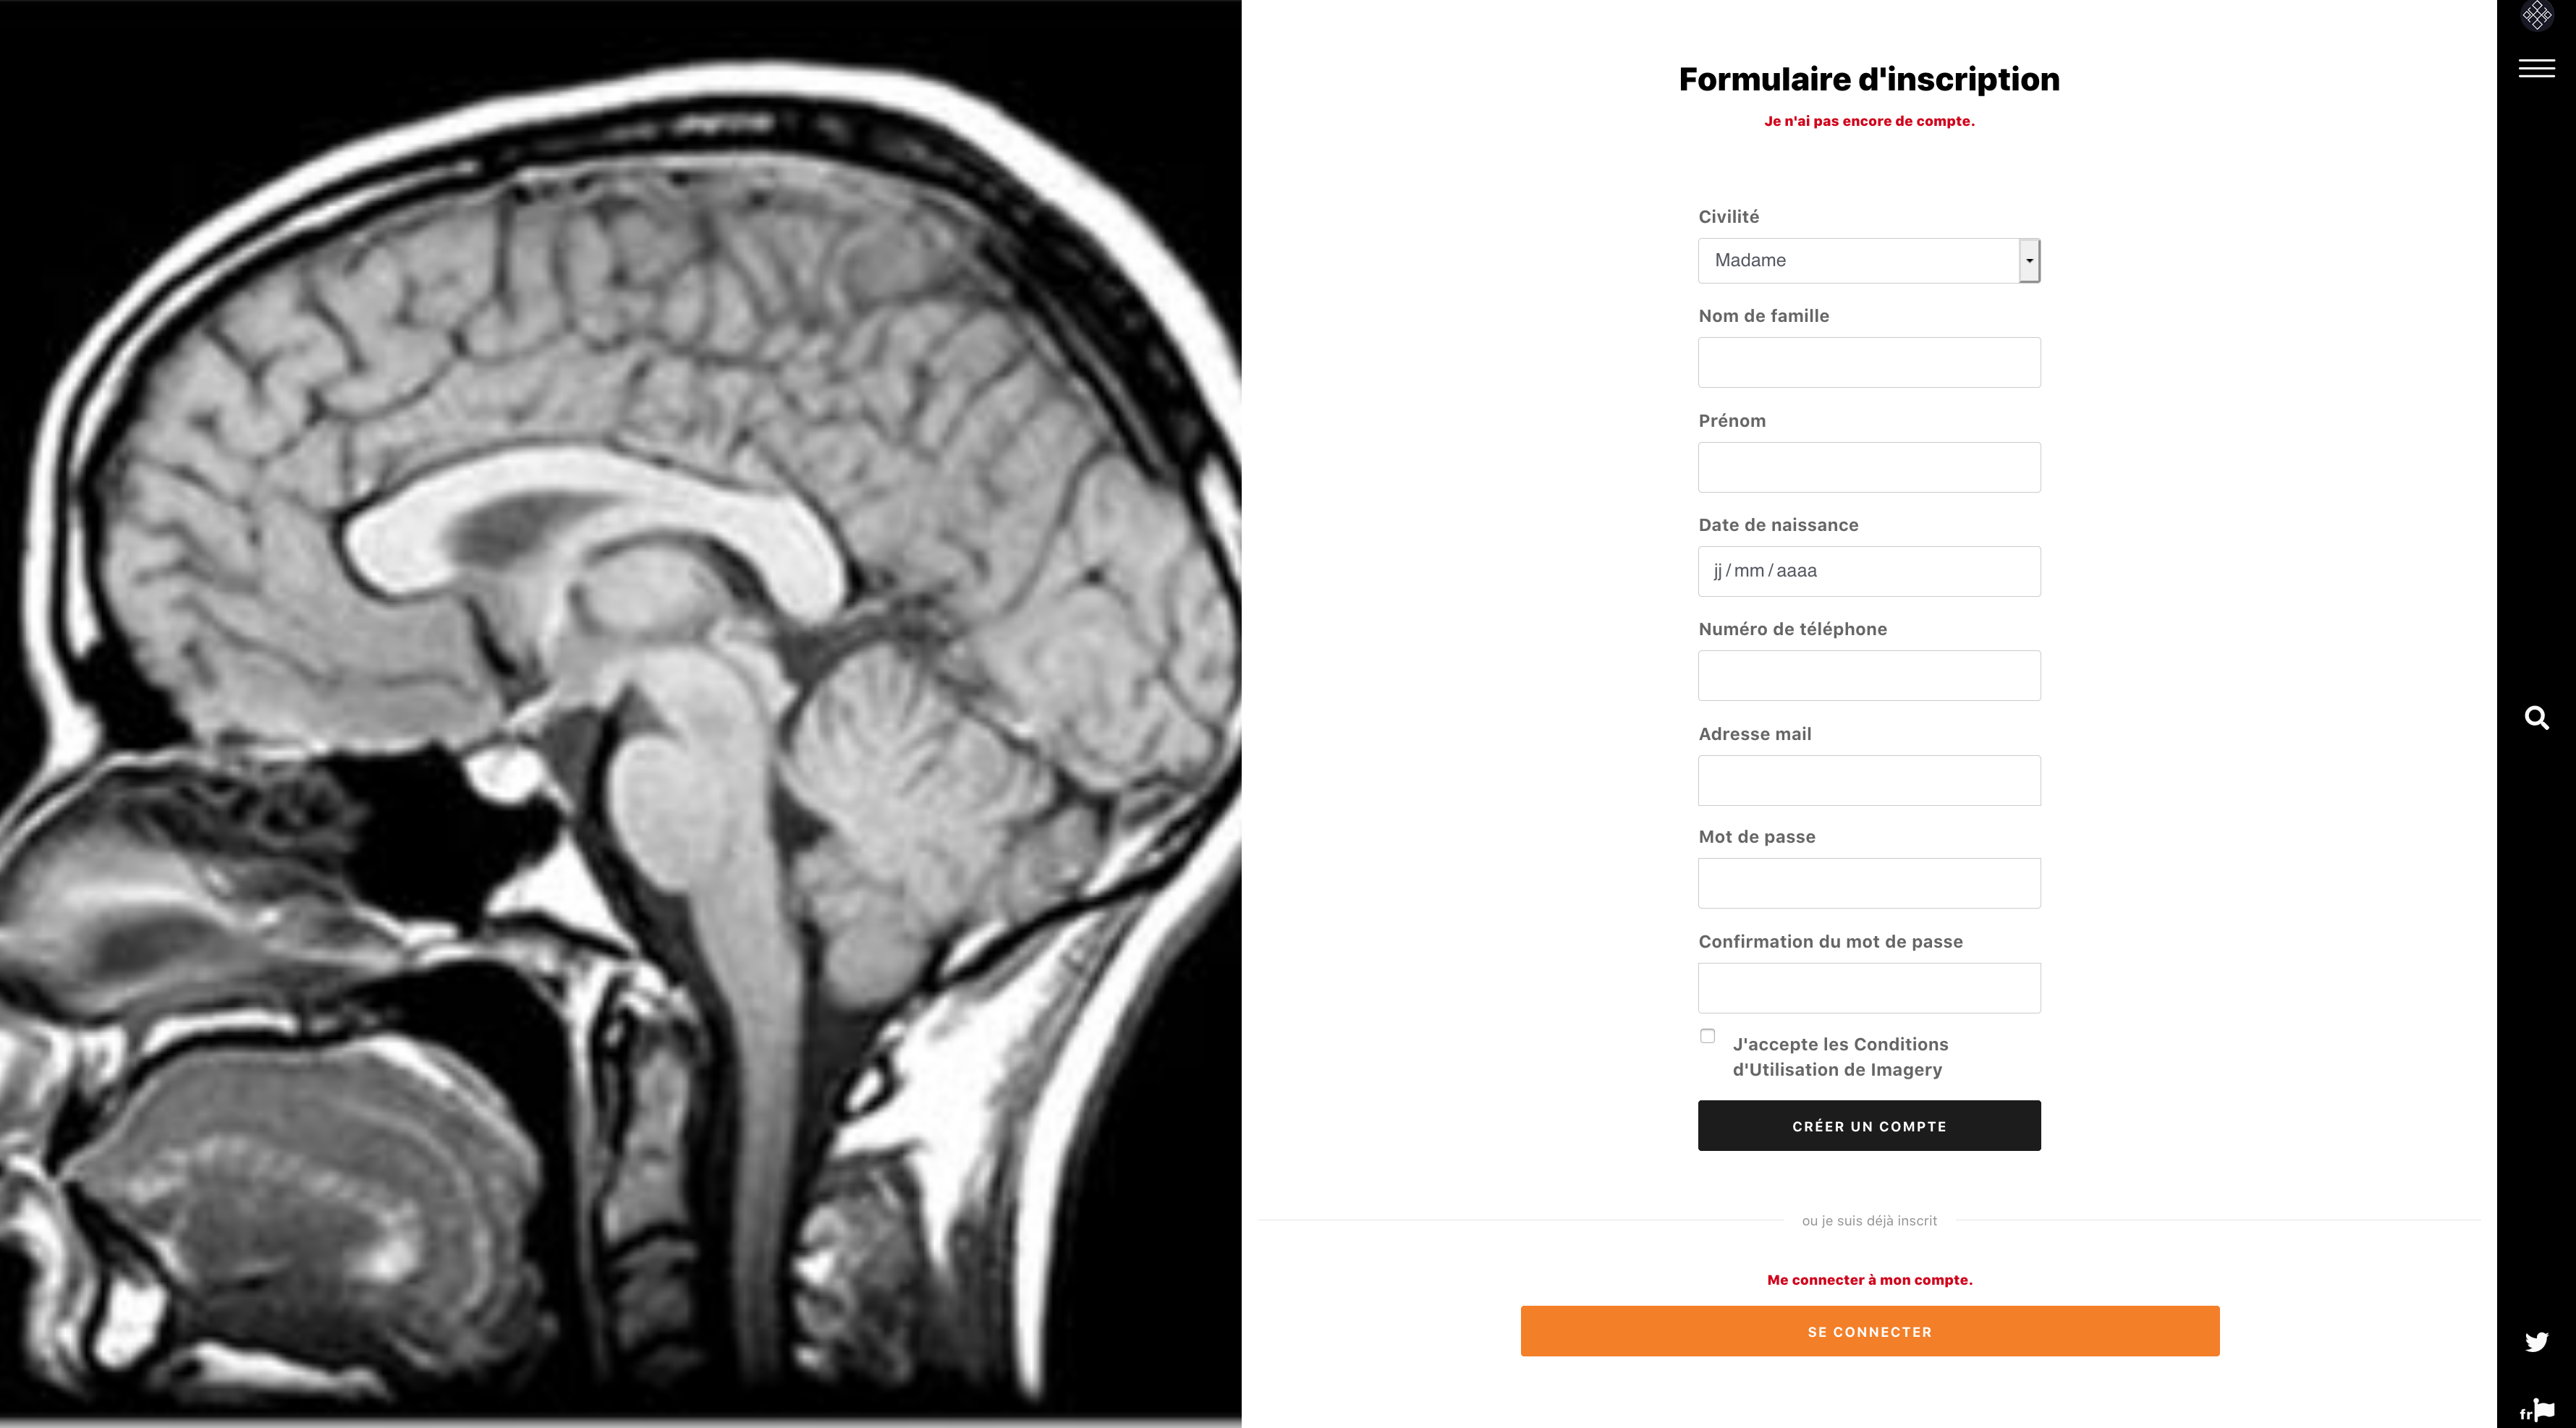
- Fill your name, gender, date of birth to validate identitovigilence during your next appointment decision
- Enter your mobile number to receive a passcode to xxx numbers to the next step. The code will be sent via SMS, it is used to check if the release number is yours and not that of a third person
- Enter your email address
- Create a secure password (it should contain the month uppercase, lowercase and numbers)
- Click on "I accept the Terms of Use"
Your account is created !
You can connect with your phone number but you still need to validate your email address. To do this, open the email you received and click the link to complete the activation of your account.
Account Verification Email
To finalize the validation of your account you must validate your email address.
- Ourez mail you received in your mailbox (to the address you mensionné during registration) and click the link Validate my email address
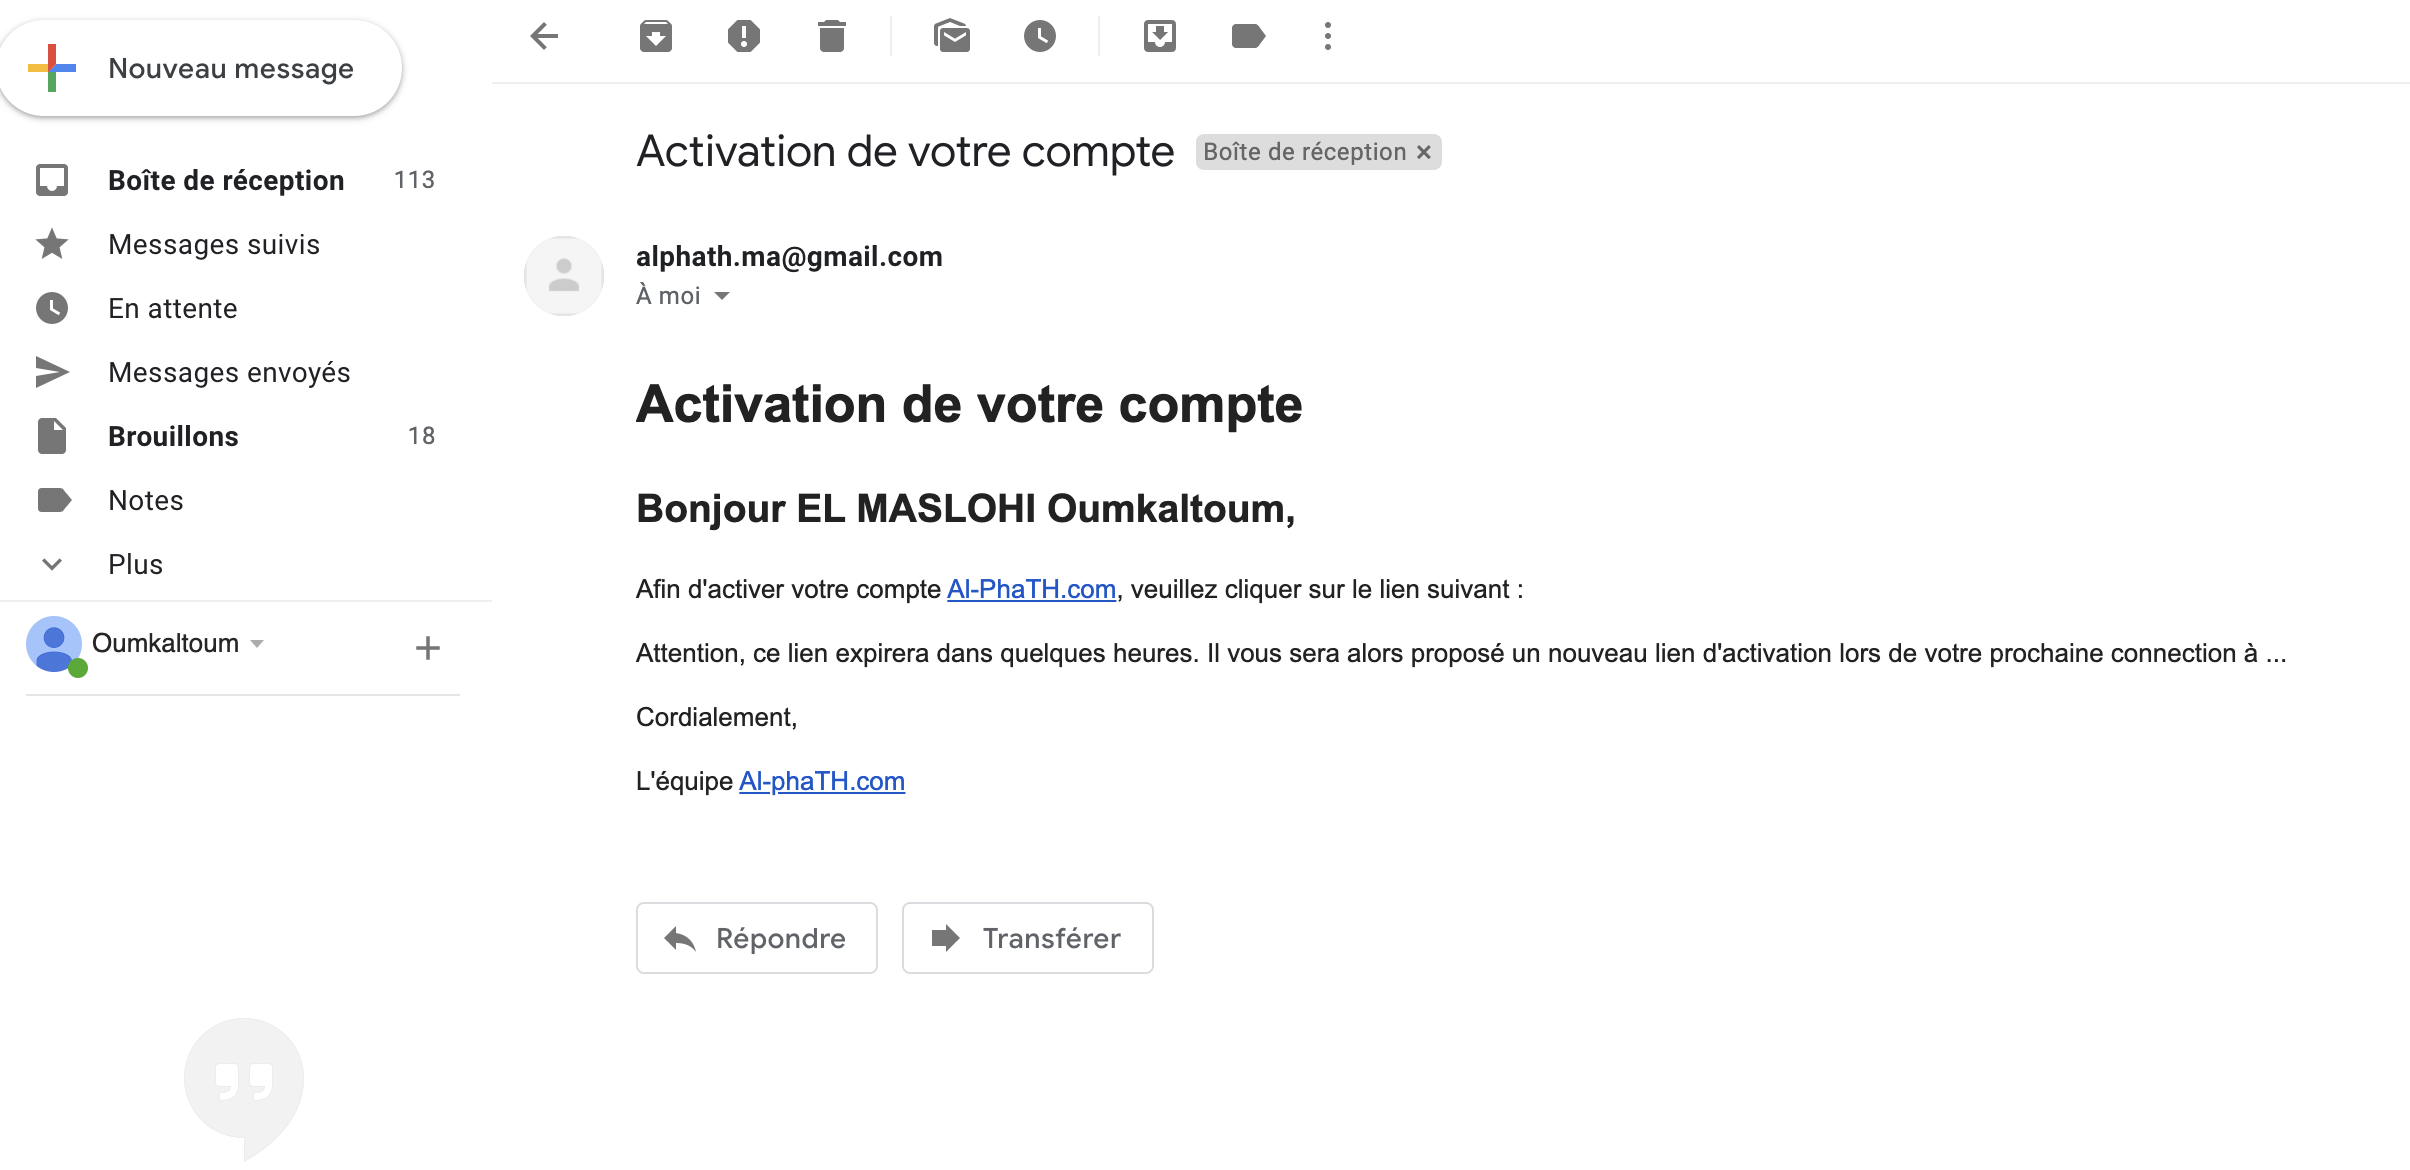
- Your account is now activated and the following message :
You can login to your account safely using your email address or your phone number.
Before creating an account
Before creating an account you can consult :
-
Imagery account:Create and access the account
Login or disconnect an account
Sign in to an account
- Click on the top right menu button to bring up the main menu
- Click on Patient connection
You are redirected to the login page.
- Fill the email address and password associated with your account.
- Click on Log in
Vous êtes redirigé vers votre espace sécurisé.
If you check the "Remember Me" so you stay logged in (e) with your account on your device even if you leave the page.
Disconnect from an account
Since taking site appointments.
- Click on the top right menu button to bring up the main menu.
- Click on Log out
From the personal account.
- Click on located on the top right initial.
- Then select Disconnect me.
Une fois déconnecté, vous retournez sur la page d'accueil.
-
Imagery account:Create and access the account
Receive an authentication code on the telephone number
Authentication Code
When creating your account, you must enter your phone number obligtoirement.
This number will be used to receive an authentication code to ensure that the phone number is yours. It will also be communicated to practitioners with whom you make an appointment online so they can contact you if necessary. It also allows you to receive SMS reminders for your appointments.
You will need to enter the XXX-digit code on the form that appears :

Once verified your phone number, you are redirected to your account that is partially validated. You can now sign in to your account with your phone number and your password.
To finalize the validation of your account with your email address, follow the steps by clicking the link How to register.
Receive Time
The reception time of the authentication code depends on your network operator.
Beyond 2 minutes, please check if the phone number is correct noted :
- Your number is correct, click on the link Get a new code.
- Your number is incorrect, click on the link Change phone number.
If you change the phone number associated with an account (existing), an authentication code is sent again to ensure that informed the new number is yours.
phone number abroad
You can create an account with a foreign patient Imagery phone number.
You just have to register your phone number with your country code :
- You must register and "+" and country code.
- the format "00" should not be included in place of "+".
- Example for France 01 XX XX XX 43 bECOMES +33 1 XX XX XX 43.
-
Imagery account:Create and access the account
Forgot your password ?
You forgot your password
- Click on the top right menu button to bring up the main menu
- Click on Patient connection
- Click on "Forgot your password ?"
You are redirected to the page "Reset the password of your account" :
- Enter the email address and phone number associated with your account
- Click on Send
You receive an email with an active link for several hours.
- Ciquez on the link. You are redirected to the reset page.
- Create new password.
- Log into your account with your email address and your new password.
You do not receive an email
The reception of the email may take some time, think anyway to check your spam if the email is there.
Your email address or phone number is not recognized is that one of your contact information is not correct. You must reapply "Forgot your password ?" and communicating another of your email addresses and / or a second phone number.
-
Imagery account:Create and access the account
Edit or add personal information
Edit or add information or personal account information
You need to change or add personal information or account information :
- Click on the top right menu button to bring up the main menu
- Click on Patient connection to access your account
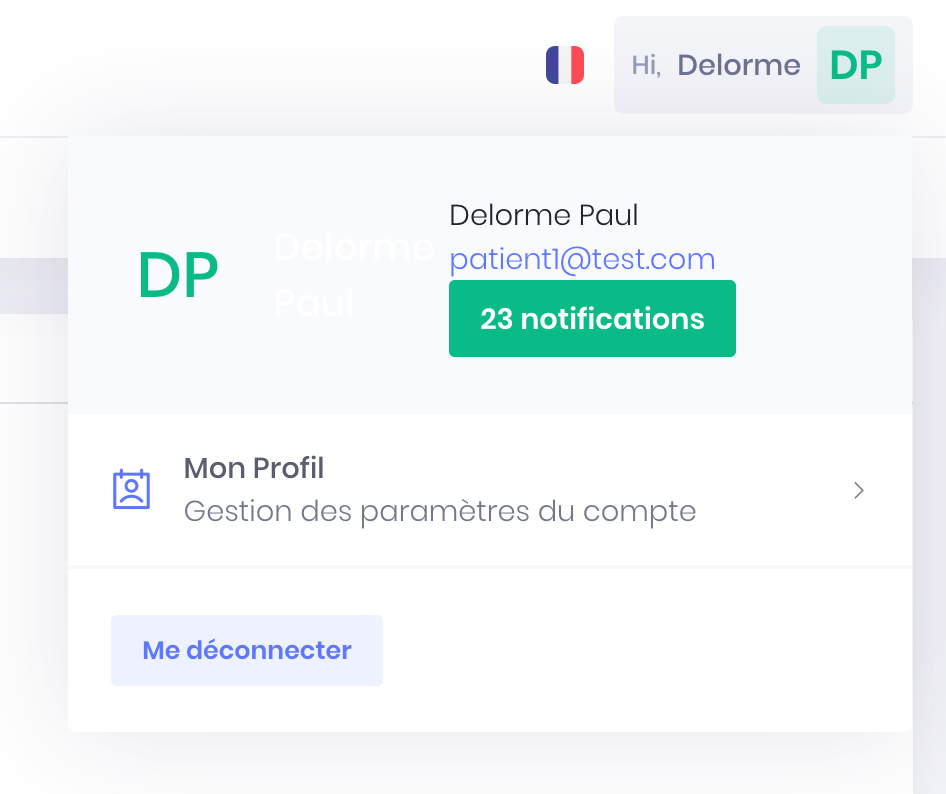
- Click on located on the top right initial.
- Then select My profile.
You are redirected (e) of the space the contact details and patient information :
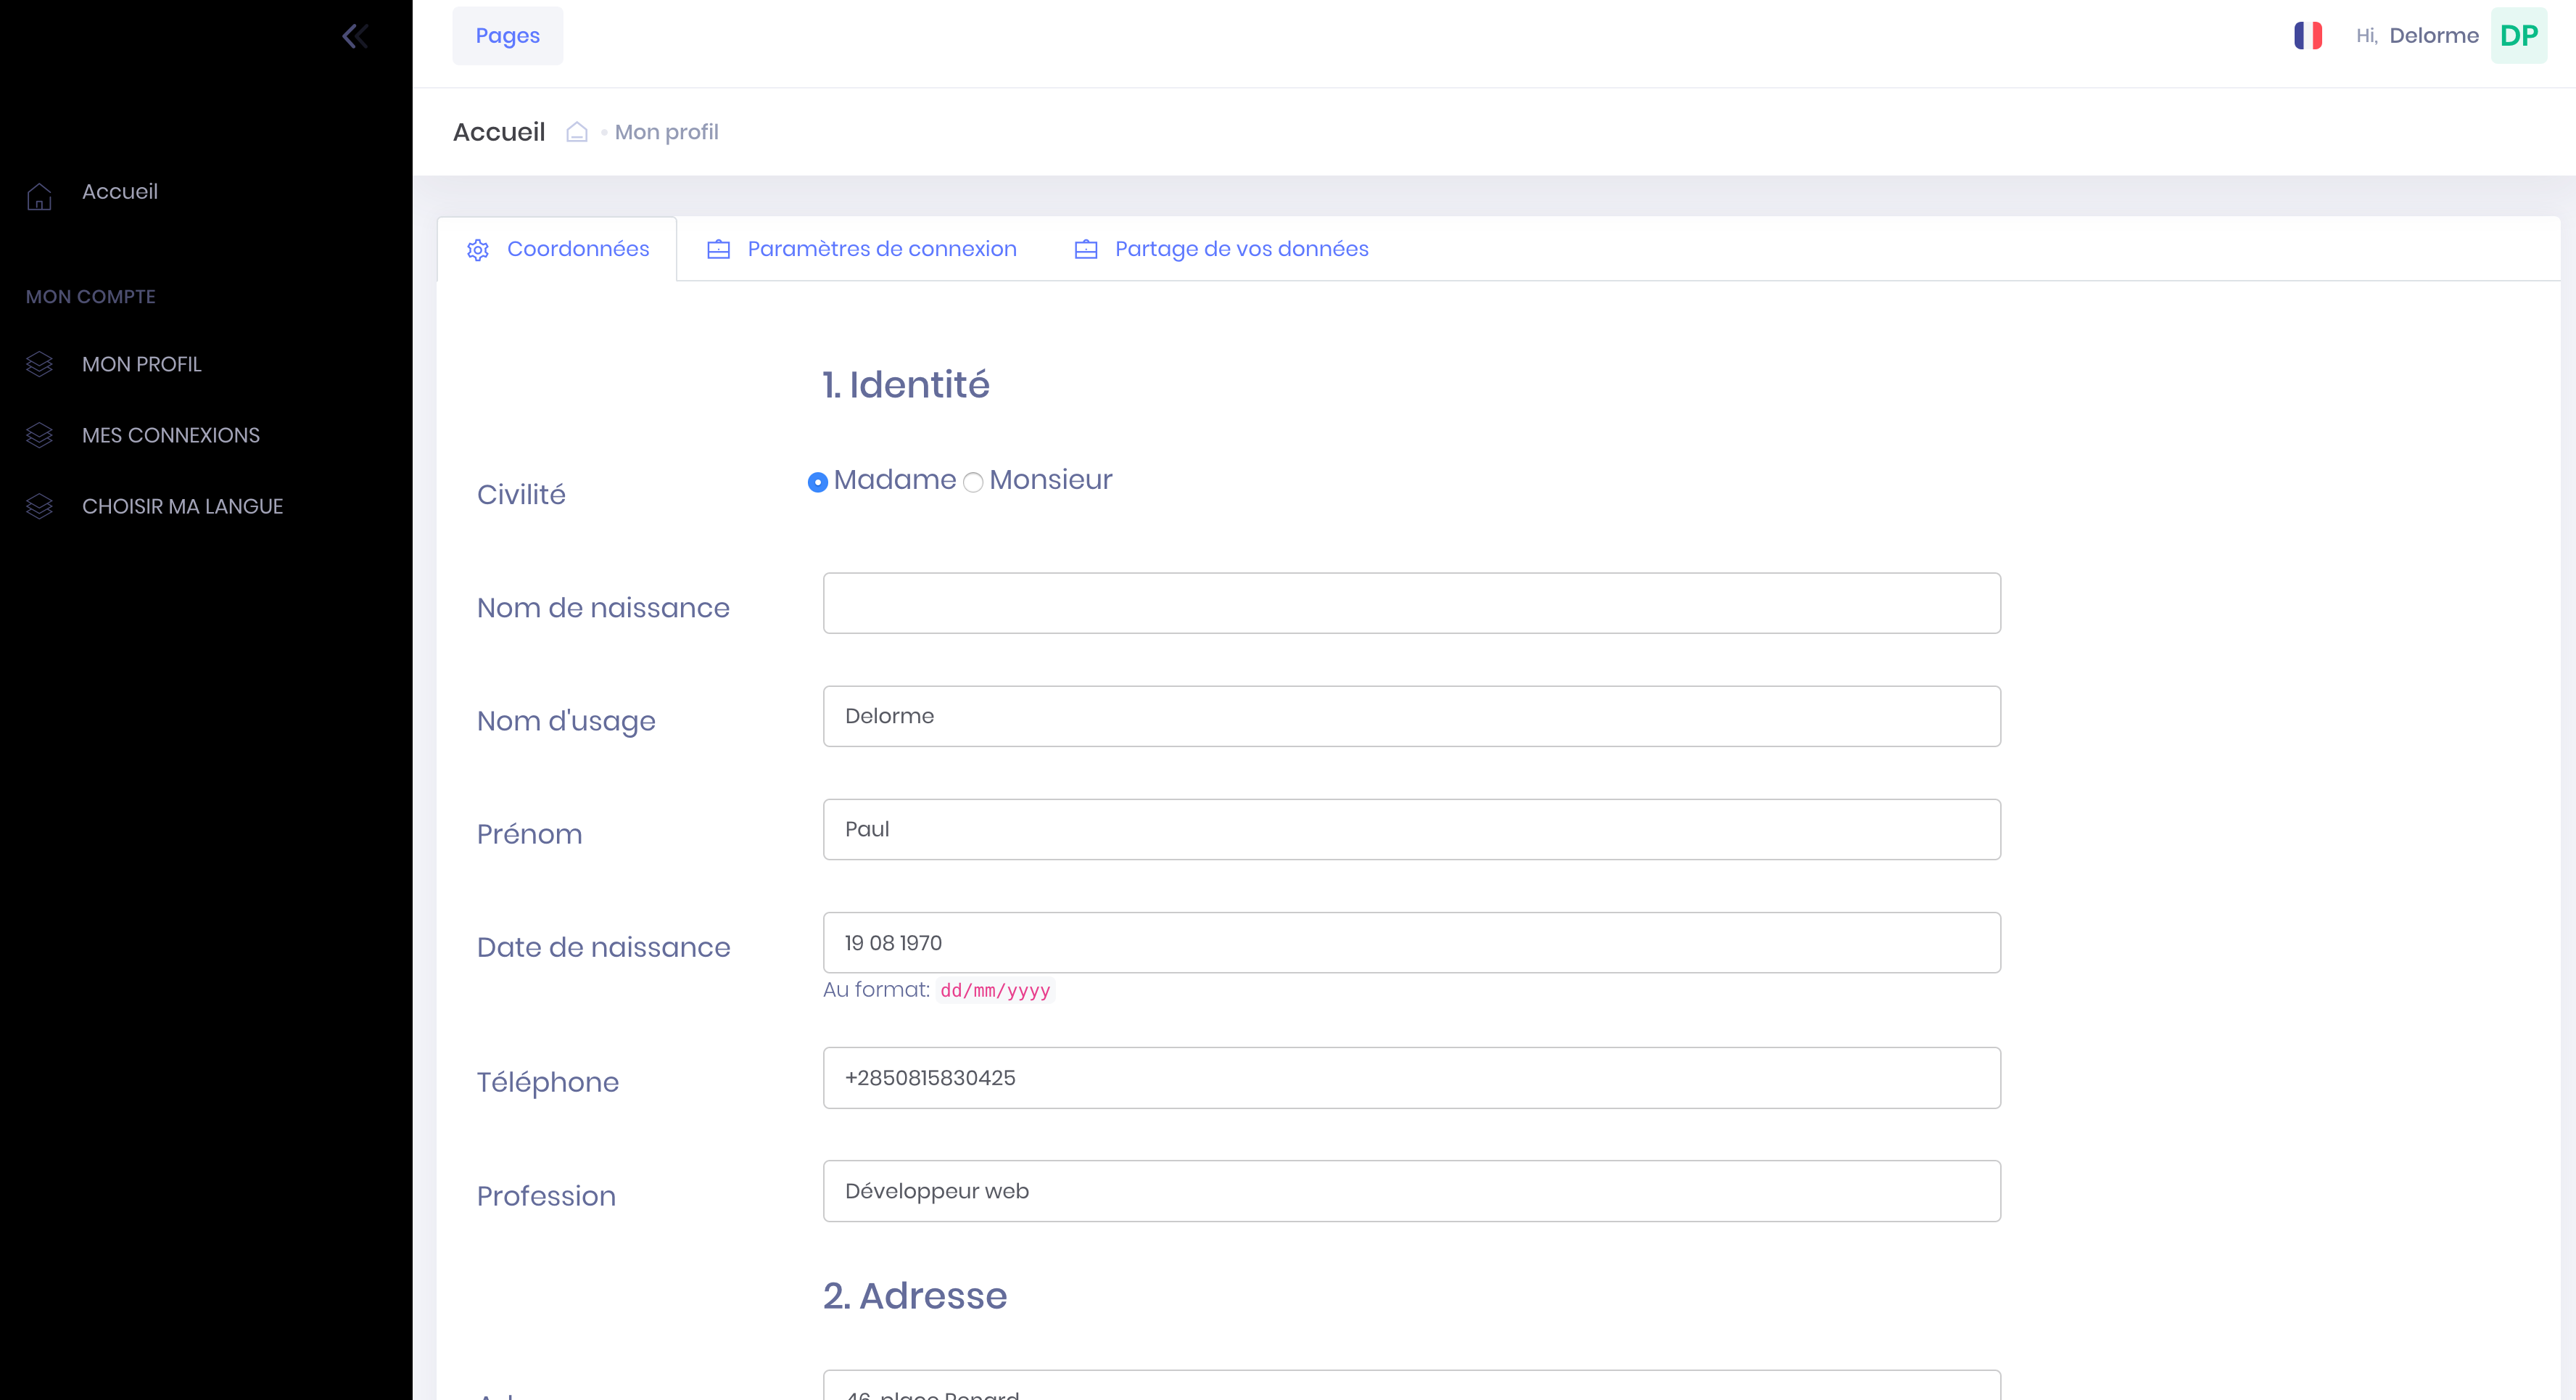
- You can then modify or add the following contact information by clicking the "pencil" :
- Civility
- Last name
- First name
- Birth date
- Postal address
- Email address
- Password
- Phone number
When all your data has been changed or added, click "Register".
Caution : if you need to change the email address associated with your account log in first with your old email address and password and proceed to update the address in section "My profile". You can then log in with your new email address at your next connection.
-
Imagery account:Create and access the account
Delete Account
Delete Account Imagery.com
You want to remove an account :
- Click on the top right menu button to bring up the main menu
- Click on Patient connection to access your account
- Click on located on the top right initial.
- Then select My profile.
You are redirected (e) of the space the contact details and patient information, then click on the tab "Paramètres de connexion" :
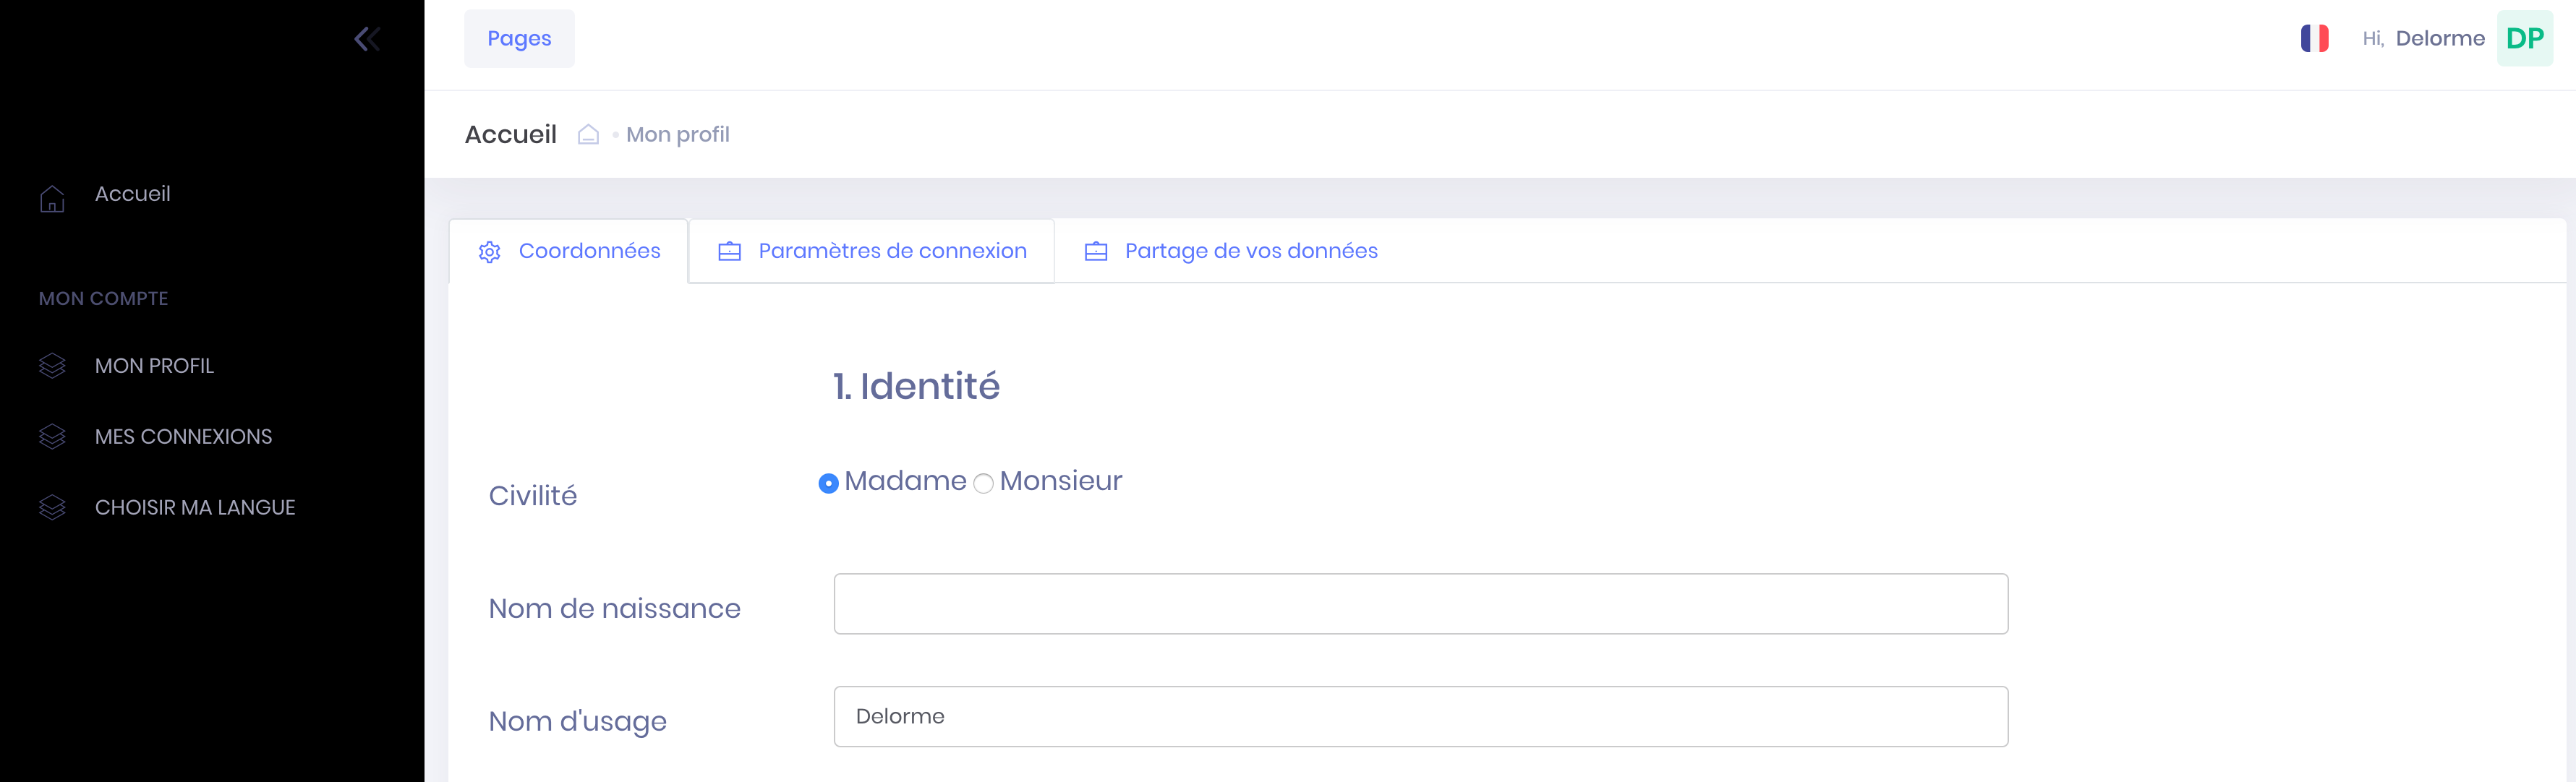
- Click on the red button "Delete my account" (at the bottom of page) :
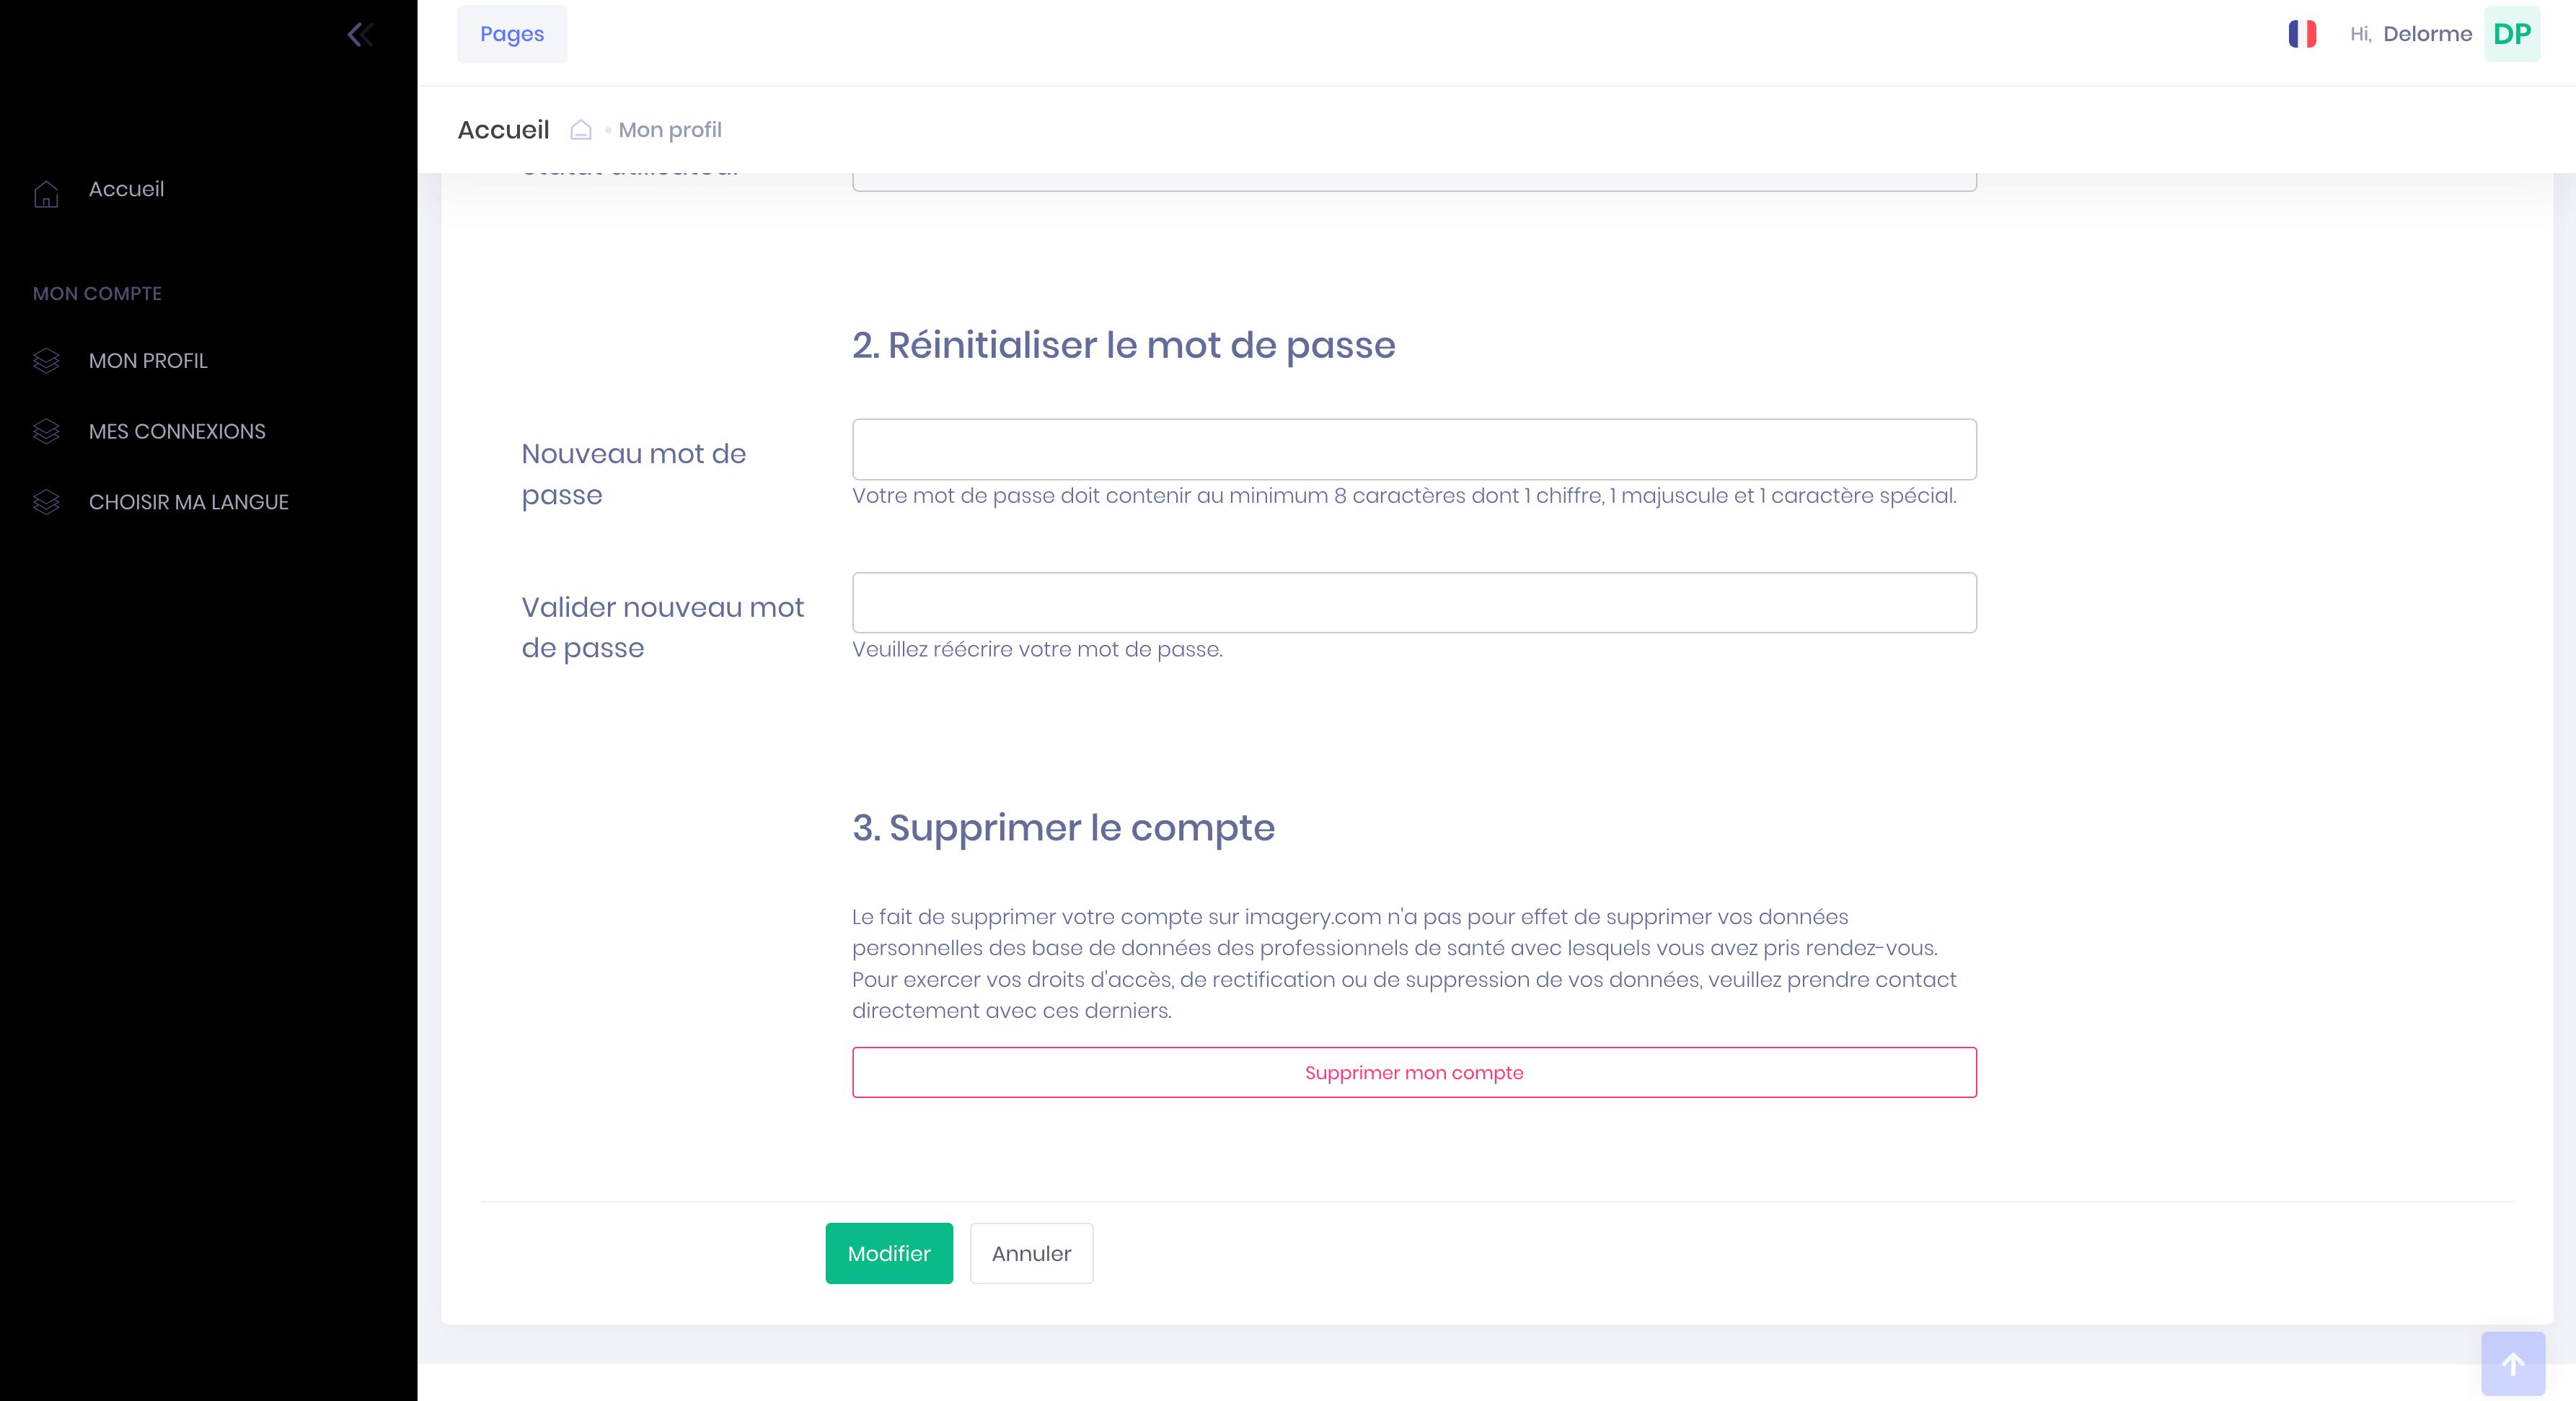
Reminder : Deleting your account is not imagery.com will delete your personal information database of health professionals with whom you have made an appointment. To exercise your rights to access, rectify or delete your data, please make direct contact with them.

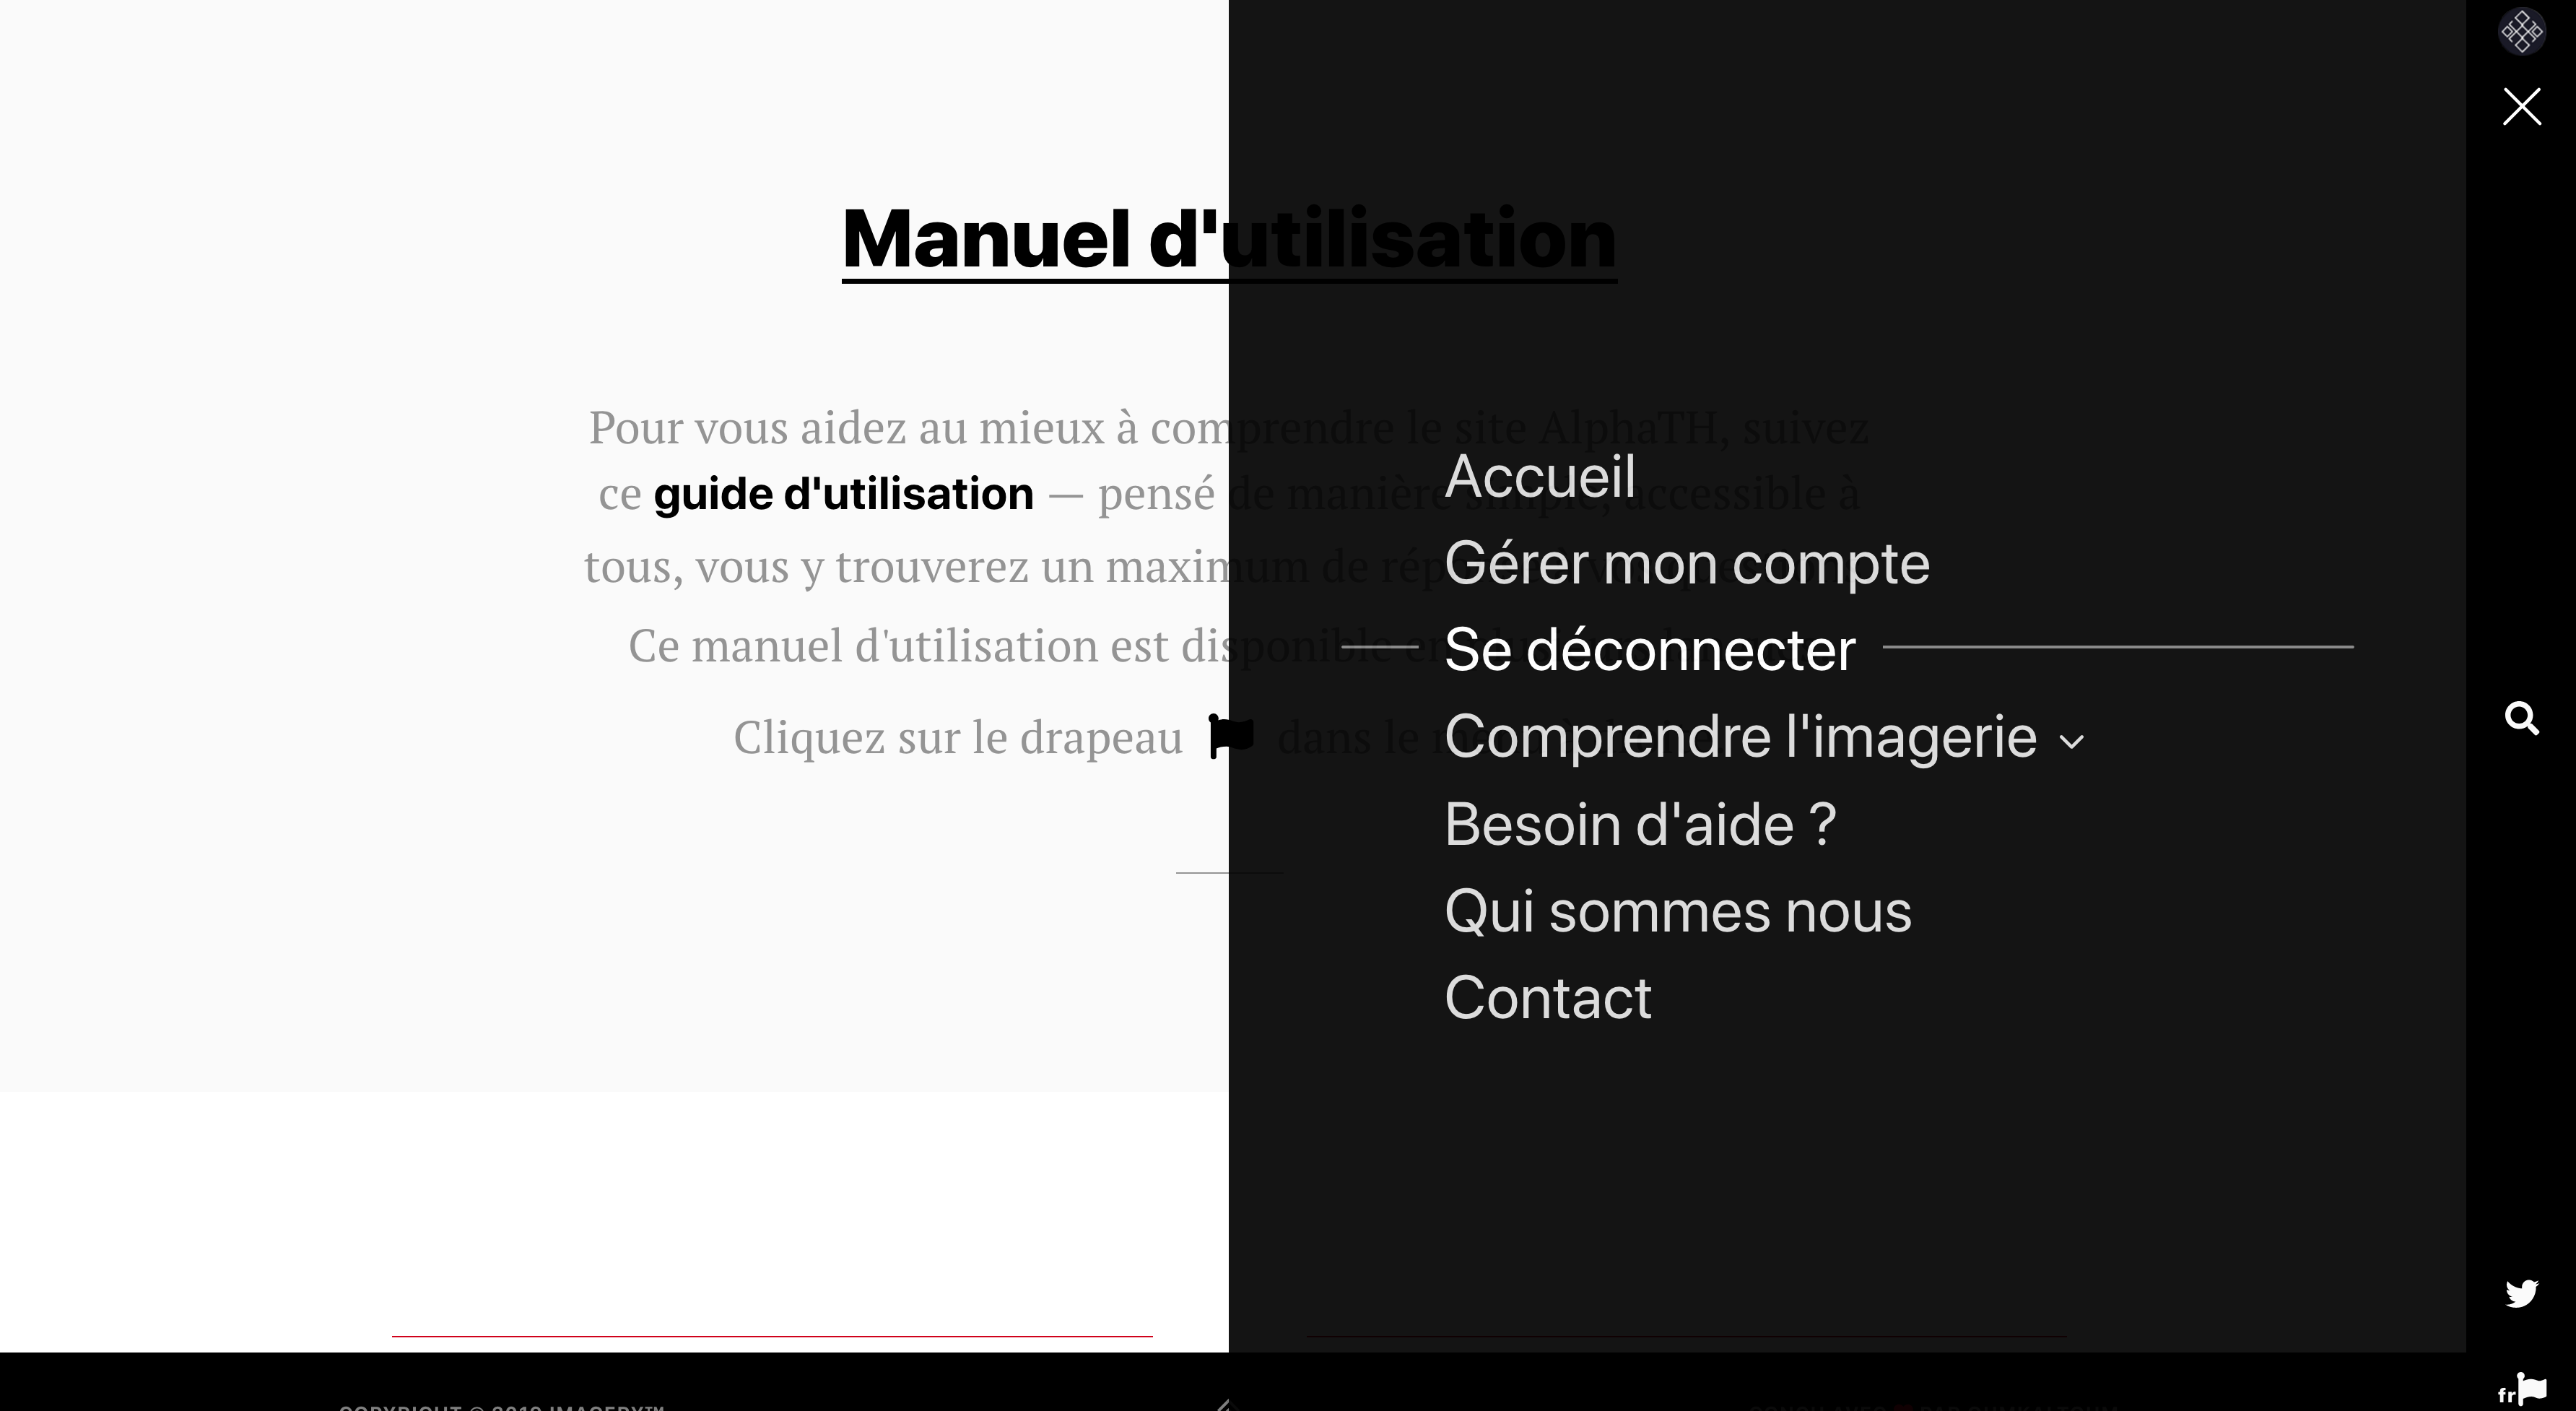
User's manual
user's guide
— thought out in a simple way, accessible to all, you will find a maximum of answers to your questions.This User's Manual is available in several languages.
Click on the flag in the menu on the right.
Imagery account:Create and access the account
Make an appointment
-
Make an appointment
Find an appointment with a doctor or a known establishment
On the home page
To search for an appointment with a practitioner or facility that you know, you can use the search engine on this page.
- Note the name of the practitioner or the institution name searched in Box "Search for an establishment, a doctor, a speciality..."
- Click the Profile practitioner or institution wanted from those proposed in the dropdown list
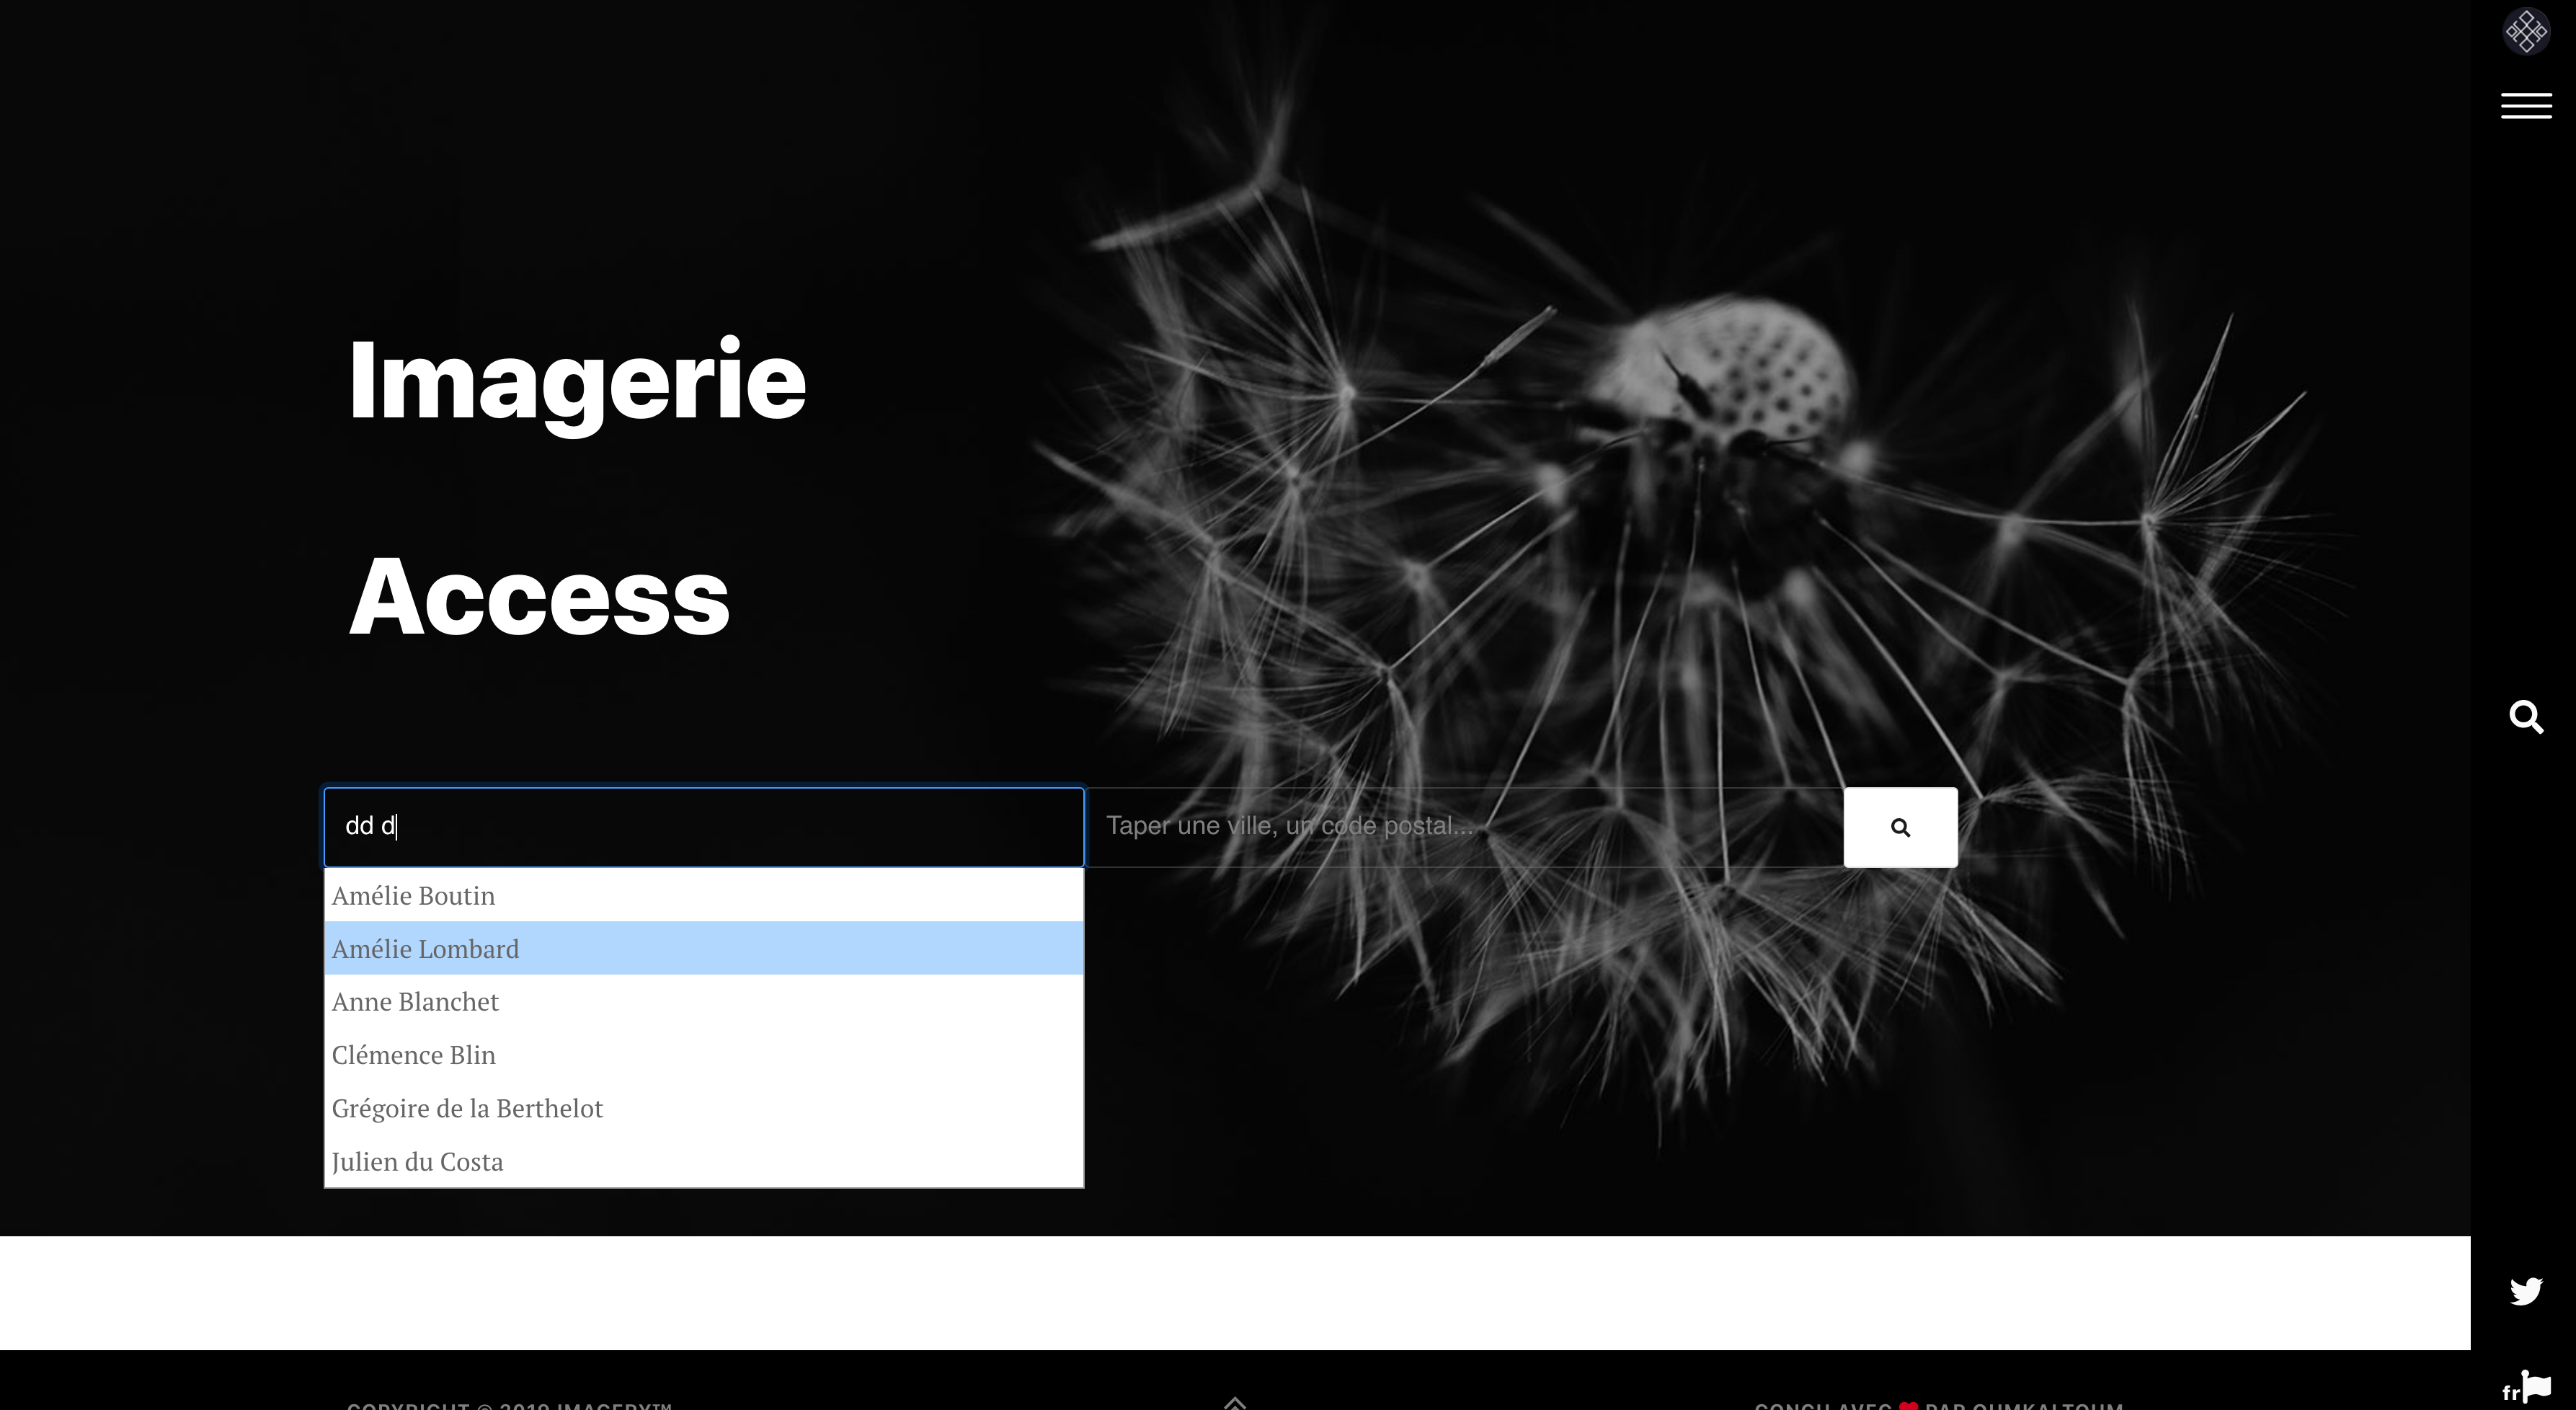
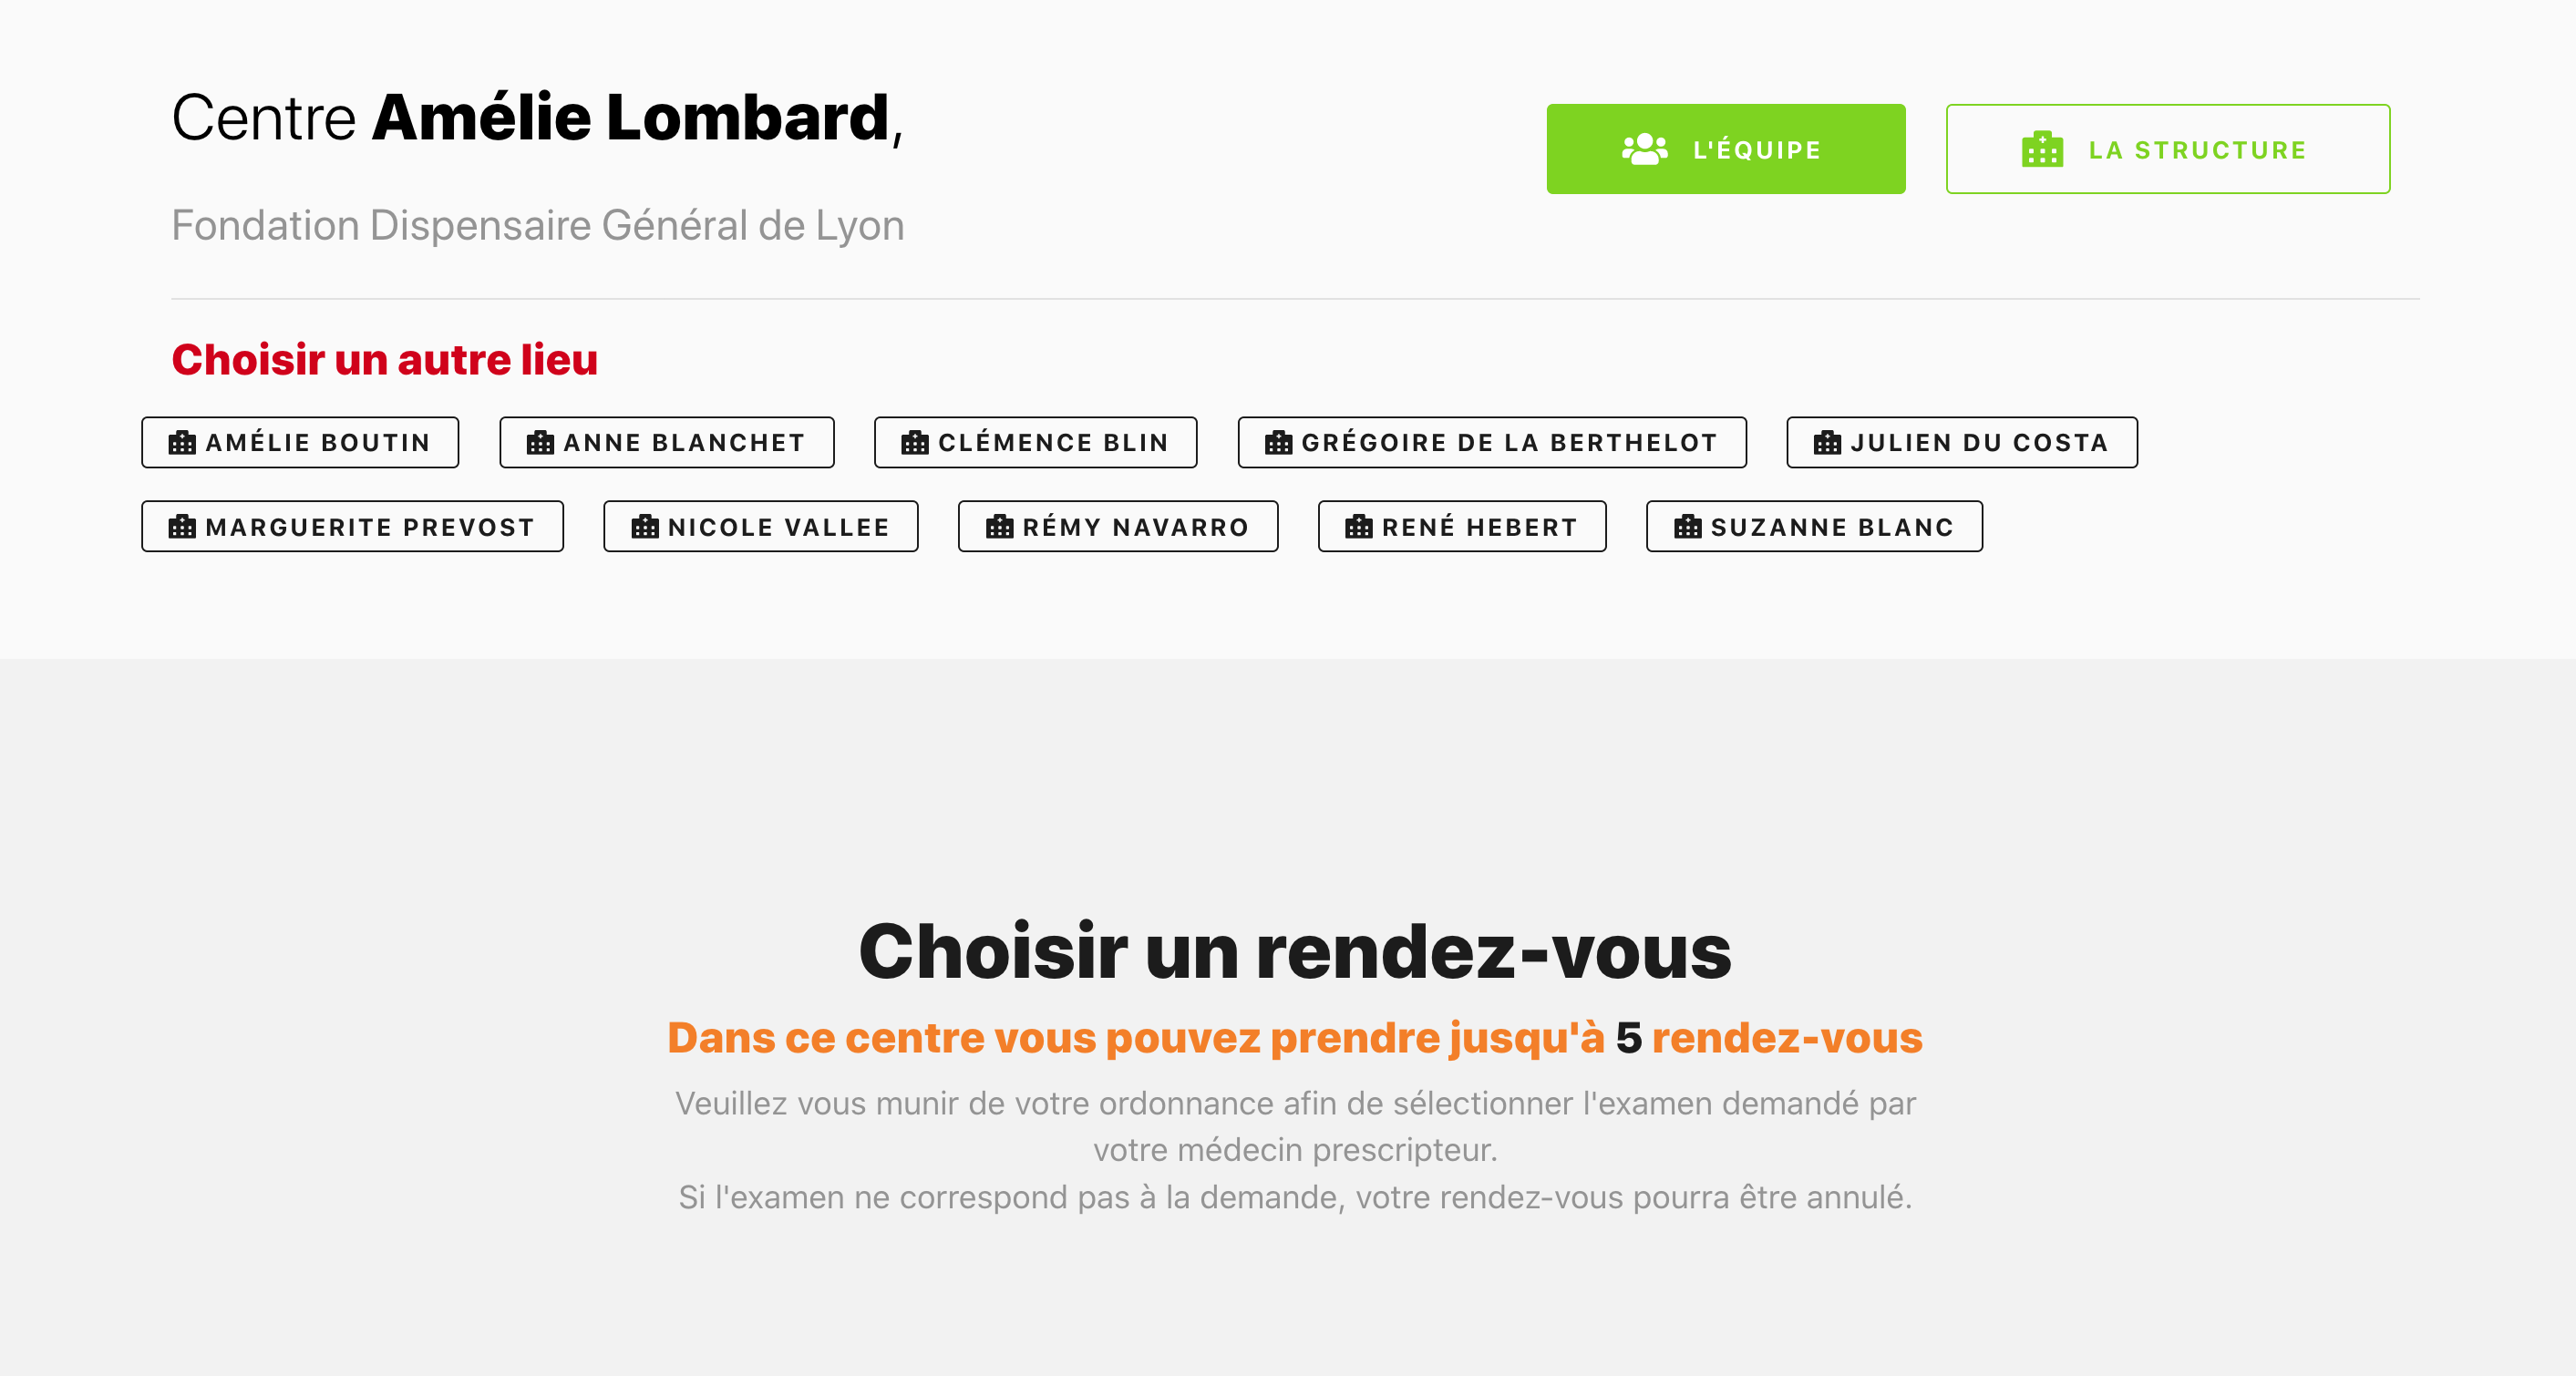
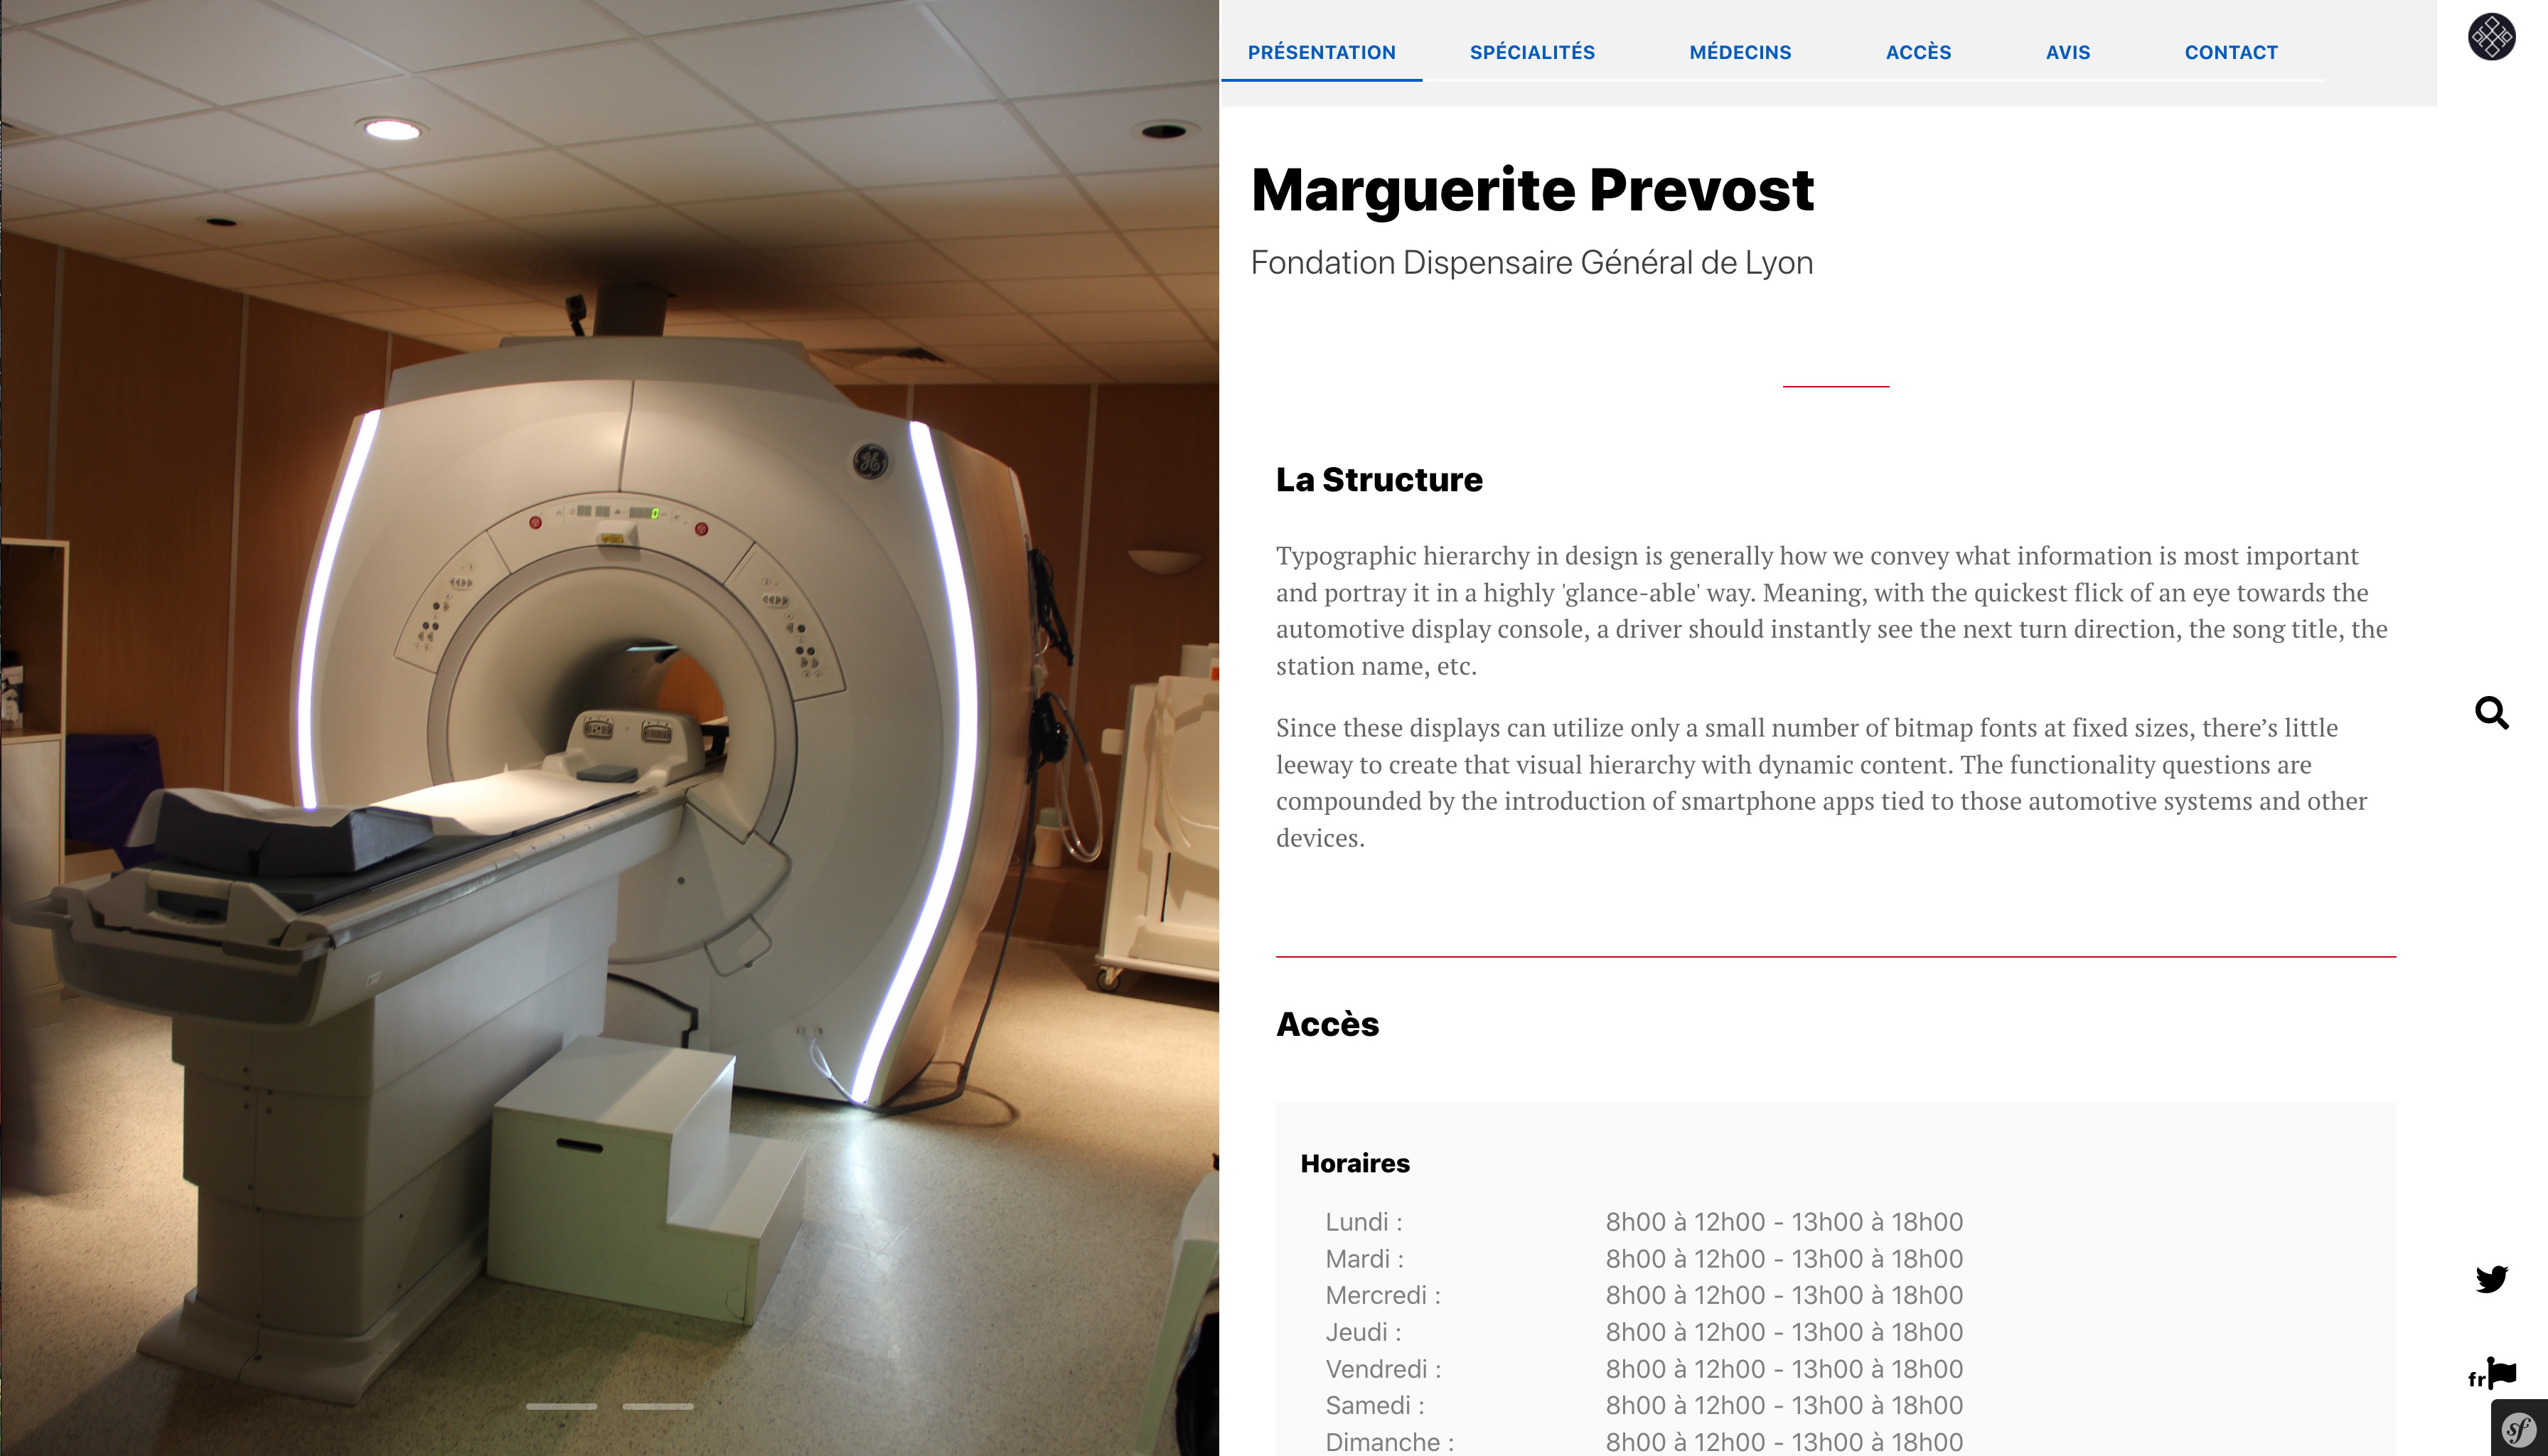
You are redirected (e) on the page dedicated to praticen or establishment.
You can find the entire team by clicking on the button "See the team" as well as all information about the center (opening hours, access ...) by clicking on the button "The structure".
To learn how to make an appointment you click the link Choose and confirm a time slot.
From the menu
You can also access the search engine by clicking on "magnifying glass" in the middle of the right bar
- Communicate key words in Box "Search..." top left
You can narrow your search based on the criteria found in the left side of the screen.
For more details on the search engine's filter system, go to the section Filter, Filter search results
To find a practitioner or facility, the spelling must be accurate otherwise the profile will not be proposed. If you can not find the practitioner or institution sought is that it is not yet noted in Imagery.
-
Make an appointment
Search appointments by specialty or pattern
On the home page
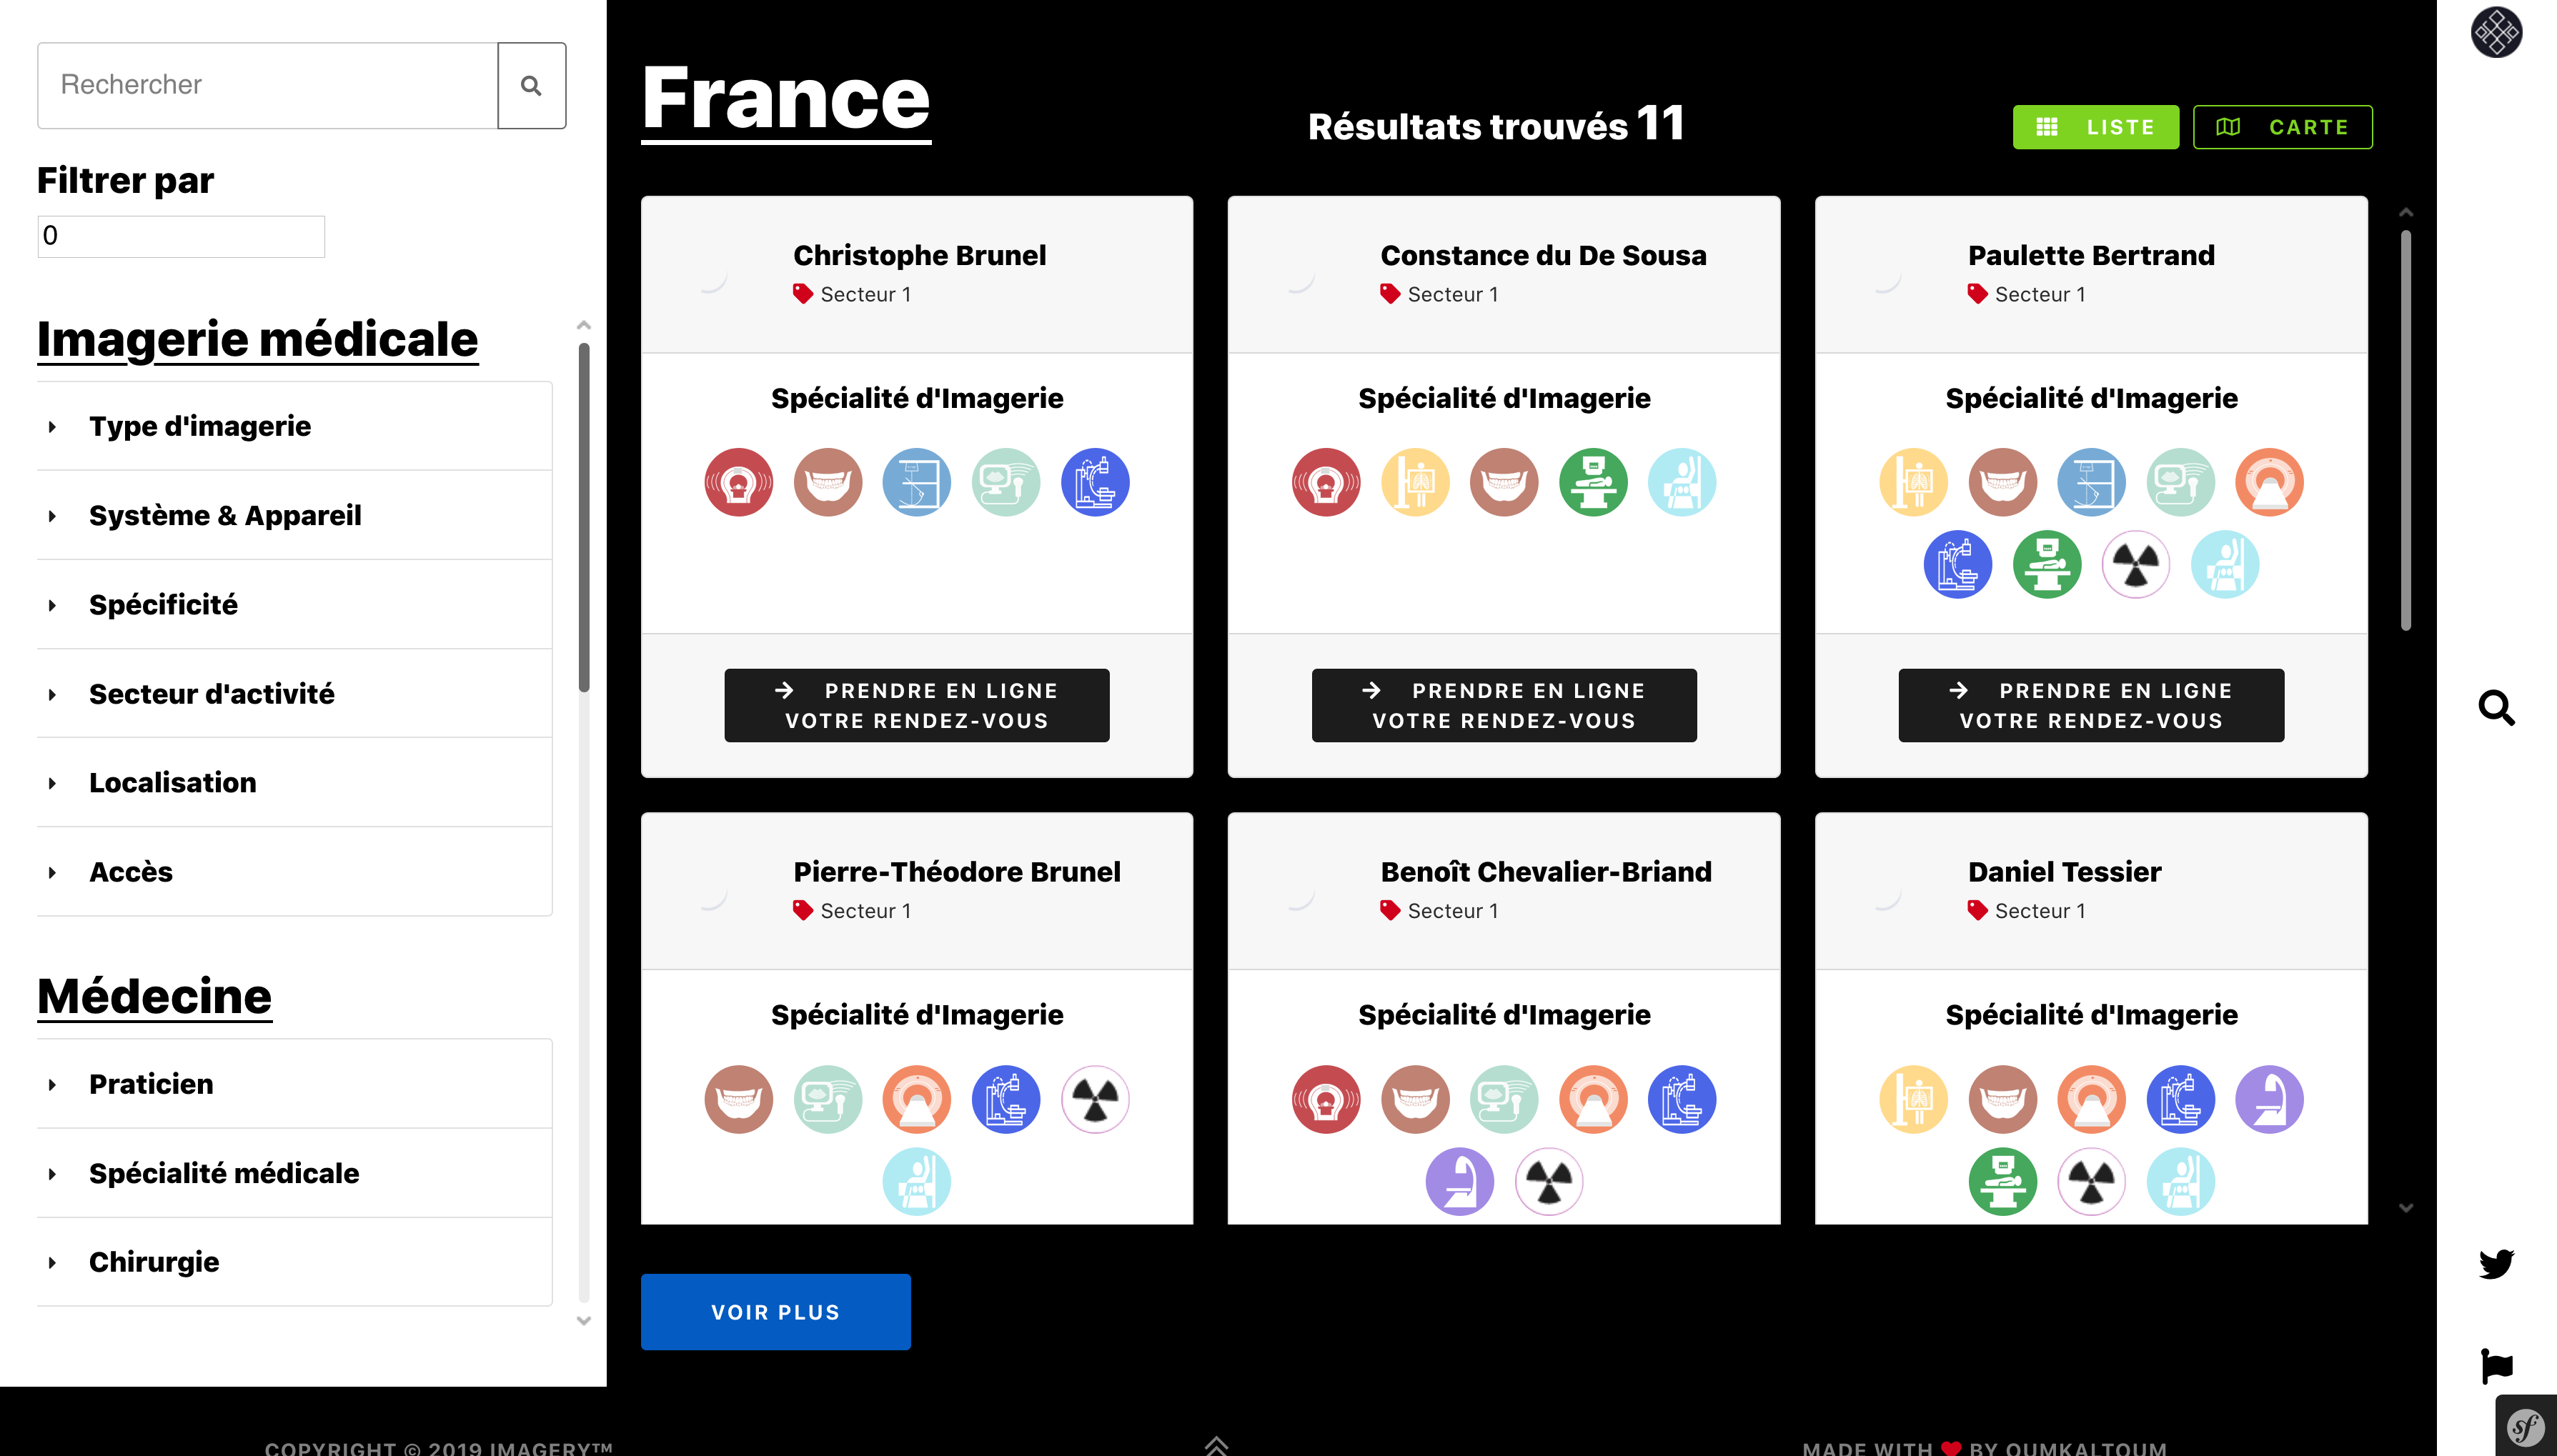
To search for an appointment by medical specialty or paramedical or pattern, you can use the search engine on this page.
- Note the first letters of the specialty or the desired pattern (e) in Box "Search for an establishment, a doctor, a speciality..."
- Click on the specialty or desired pattern from those proposed in the dropdown list
- Communicate the name of the location where you wish to see in the box "Type a city, a postcode..."
- Click on the correct locality desired from those available in the dropdown list
- Click the white button "" to validate your search request
You are redirected (e) on the results page Search offering practitioners and relevant institutions.
From the menu
You can also access the search engine by clicking on "magnifying glass" in the middle of the right bar.
- Contact the locality in Box "Search..." top left
- Click on (the) term (s) desired (s) on the left side of the screen
For more details on the search engine's filter system, go to the section Filter, Filter search results
Once the chosen practitioner, click its name to access its page Imagery, where you can find information about his firm.
Warning ! The placement of a practitioner in the results is random and changes with each new search, for reasons of equity between all professionals Imagery partners.
-
Make an appointment
Filter, Filter search results
When searching for a center or practitioner with a specialty or pattern, you can refine the results found through several filters on the left side of the screen.
- Click the (s) filter (s) corresponding to your request and choose one or more options from those listed. You can combine multiple filters if necessary.
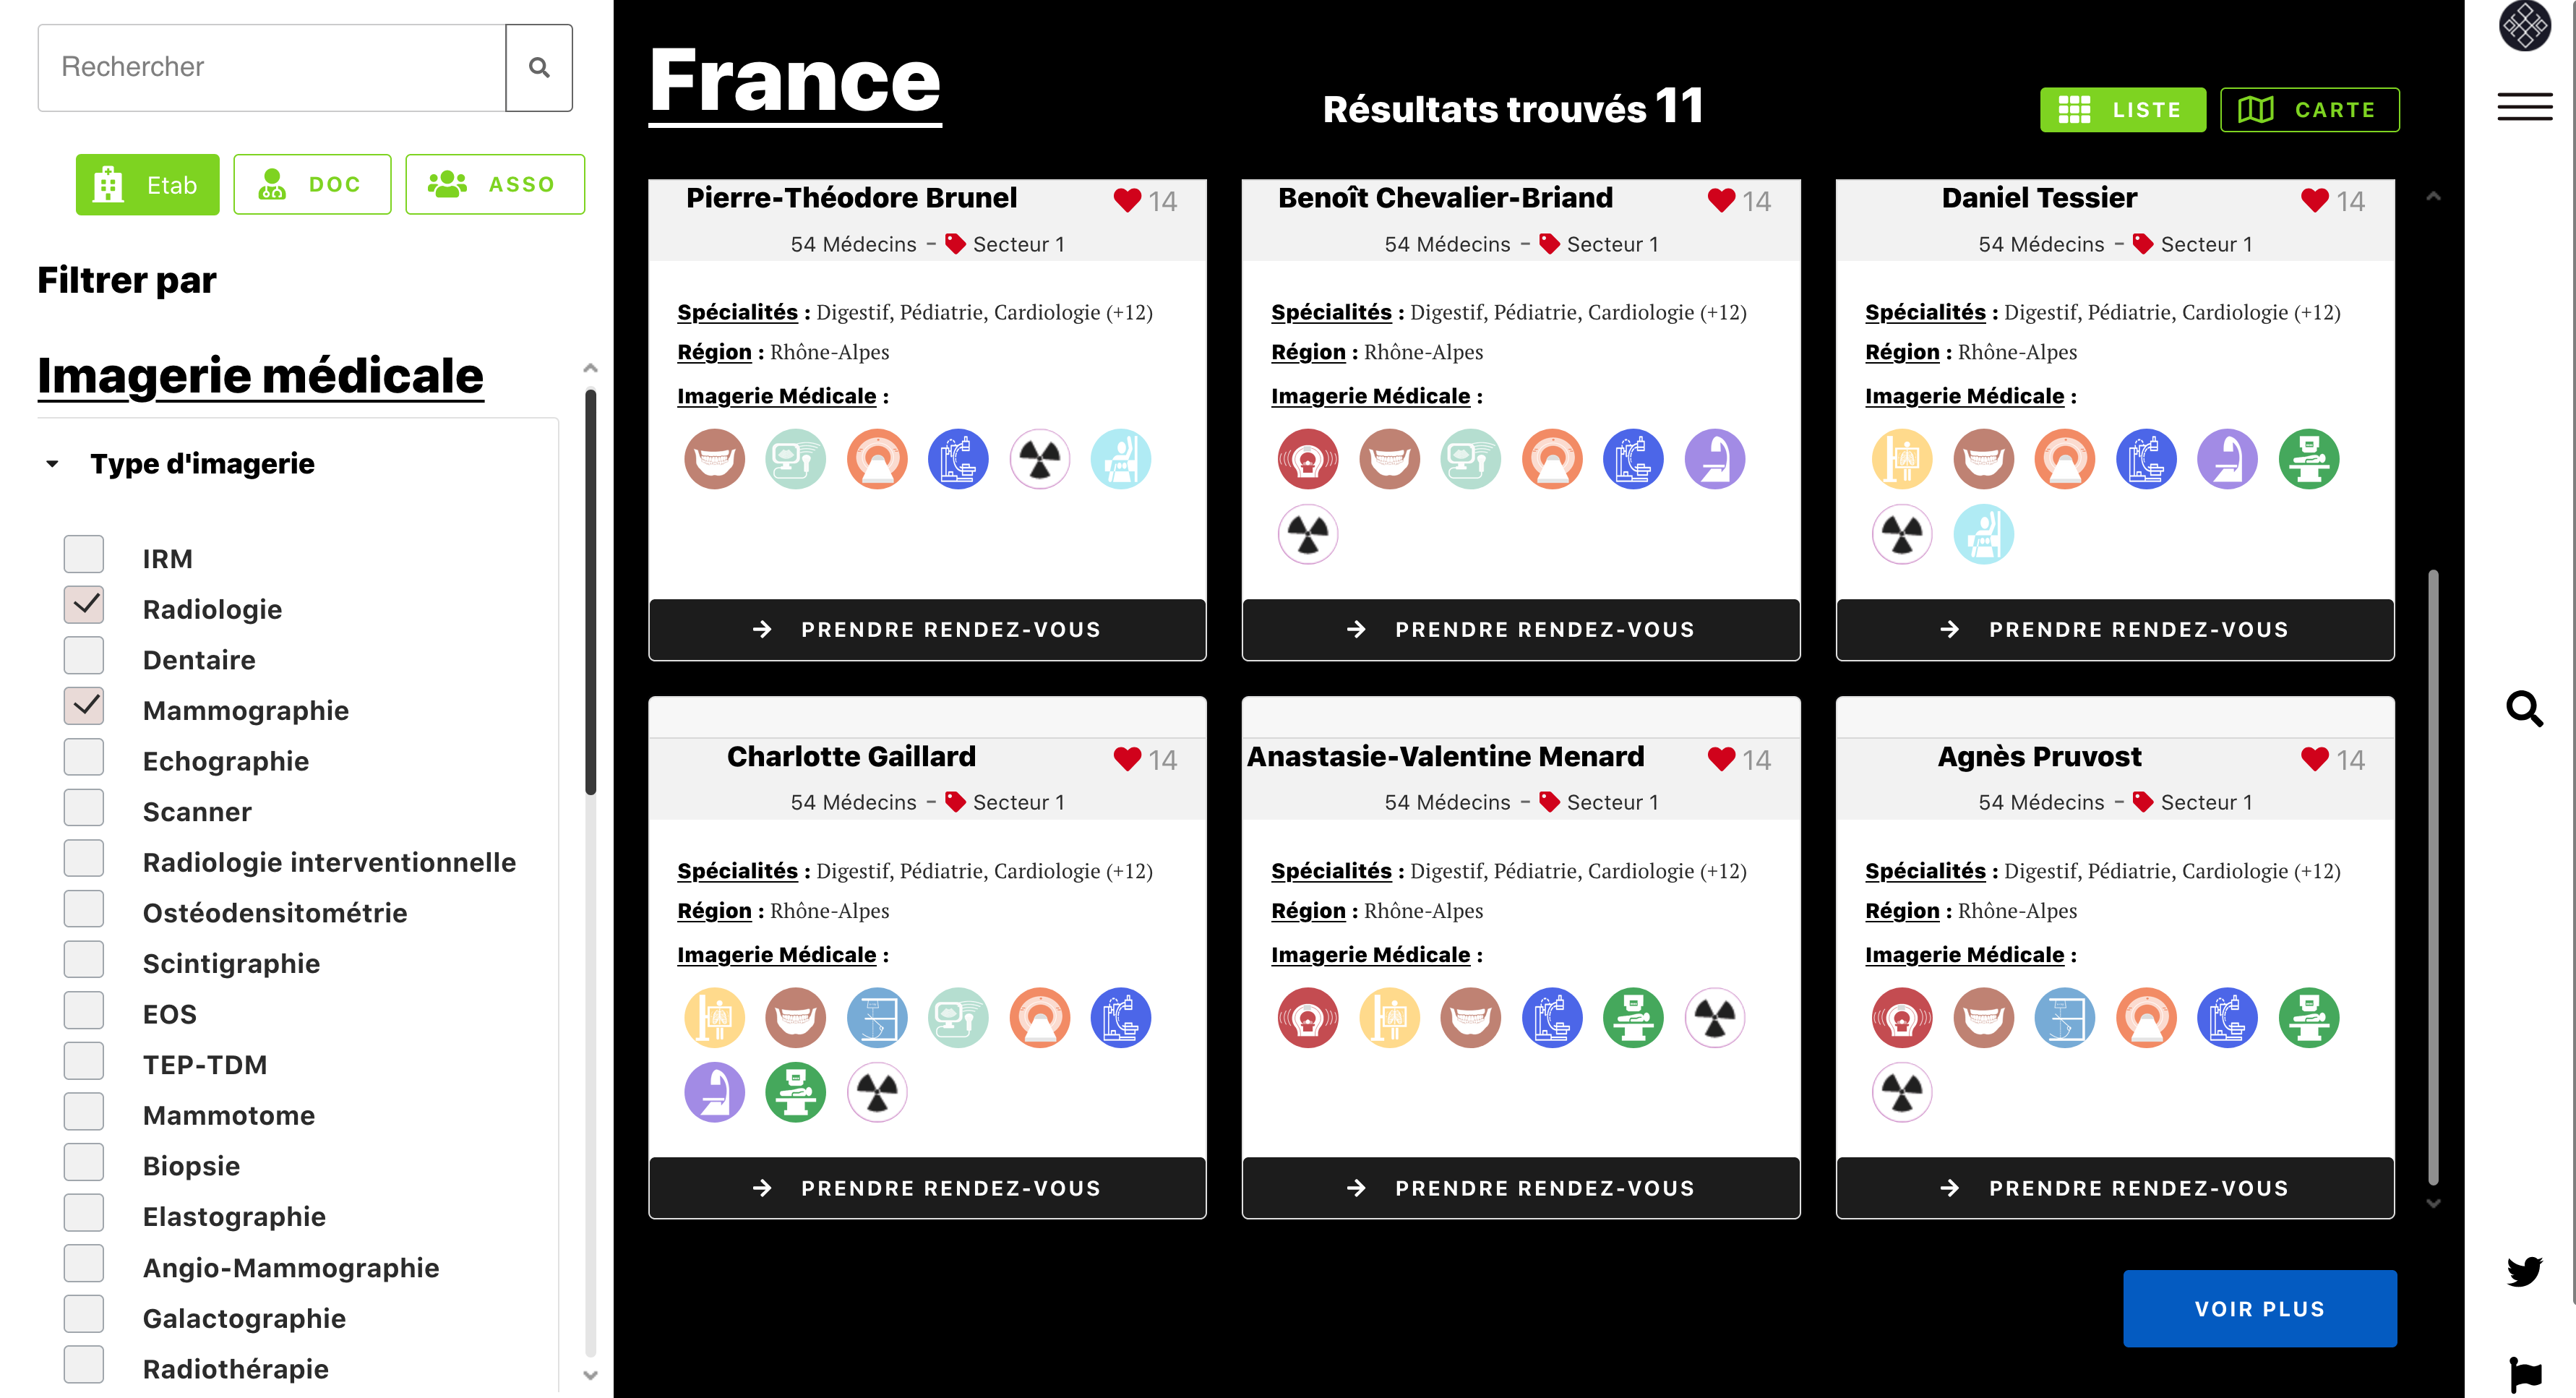
Available filters :
- type of imaging; this is the category imaging (MRI, Radiology, Mammography ...)
- Exam ; these are the tests related to the type of imaging (MRI knee, chest Radio ...). The list of exams adapts to the type of selected imaging
- indication; This is the reason for consultation (Monitoring MS, trauma ...) .. The list of indications depends on the selected examination
- System & Device; it is the anatomy-related categories
- Specificity
- Fees
- Access
- Spoken languages
- medical specialty
The results of the proposed centers or practitioners are then refined.
After selecting center, click on its name to access its page Imagery, where you can find the information indicated by the center.
Cette partie sera complétée quand le système de filtre sera opérationnel...
-
Make an appointment
Choose and confirm an appointment slot
Choose a niche appointment
Once the search by name or by the practitioner specialty / pattern made and the chosen practitioner, you arrive on the page dedicated to him to choose a niche to visit his availability calendar.
- Select the place of consultation if the practitioner has several

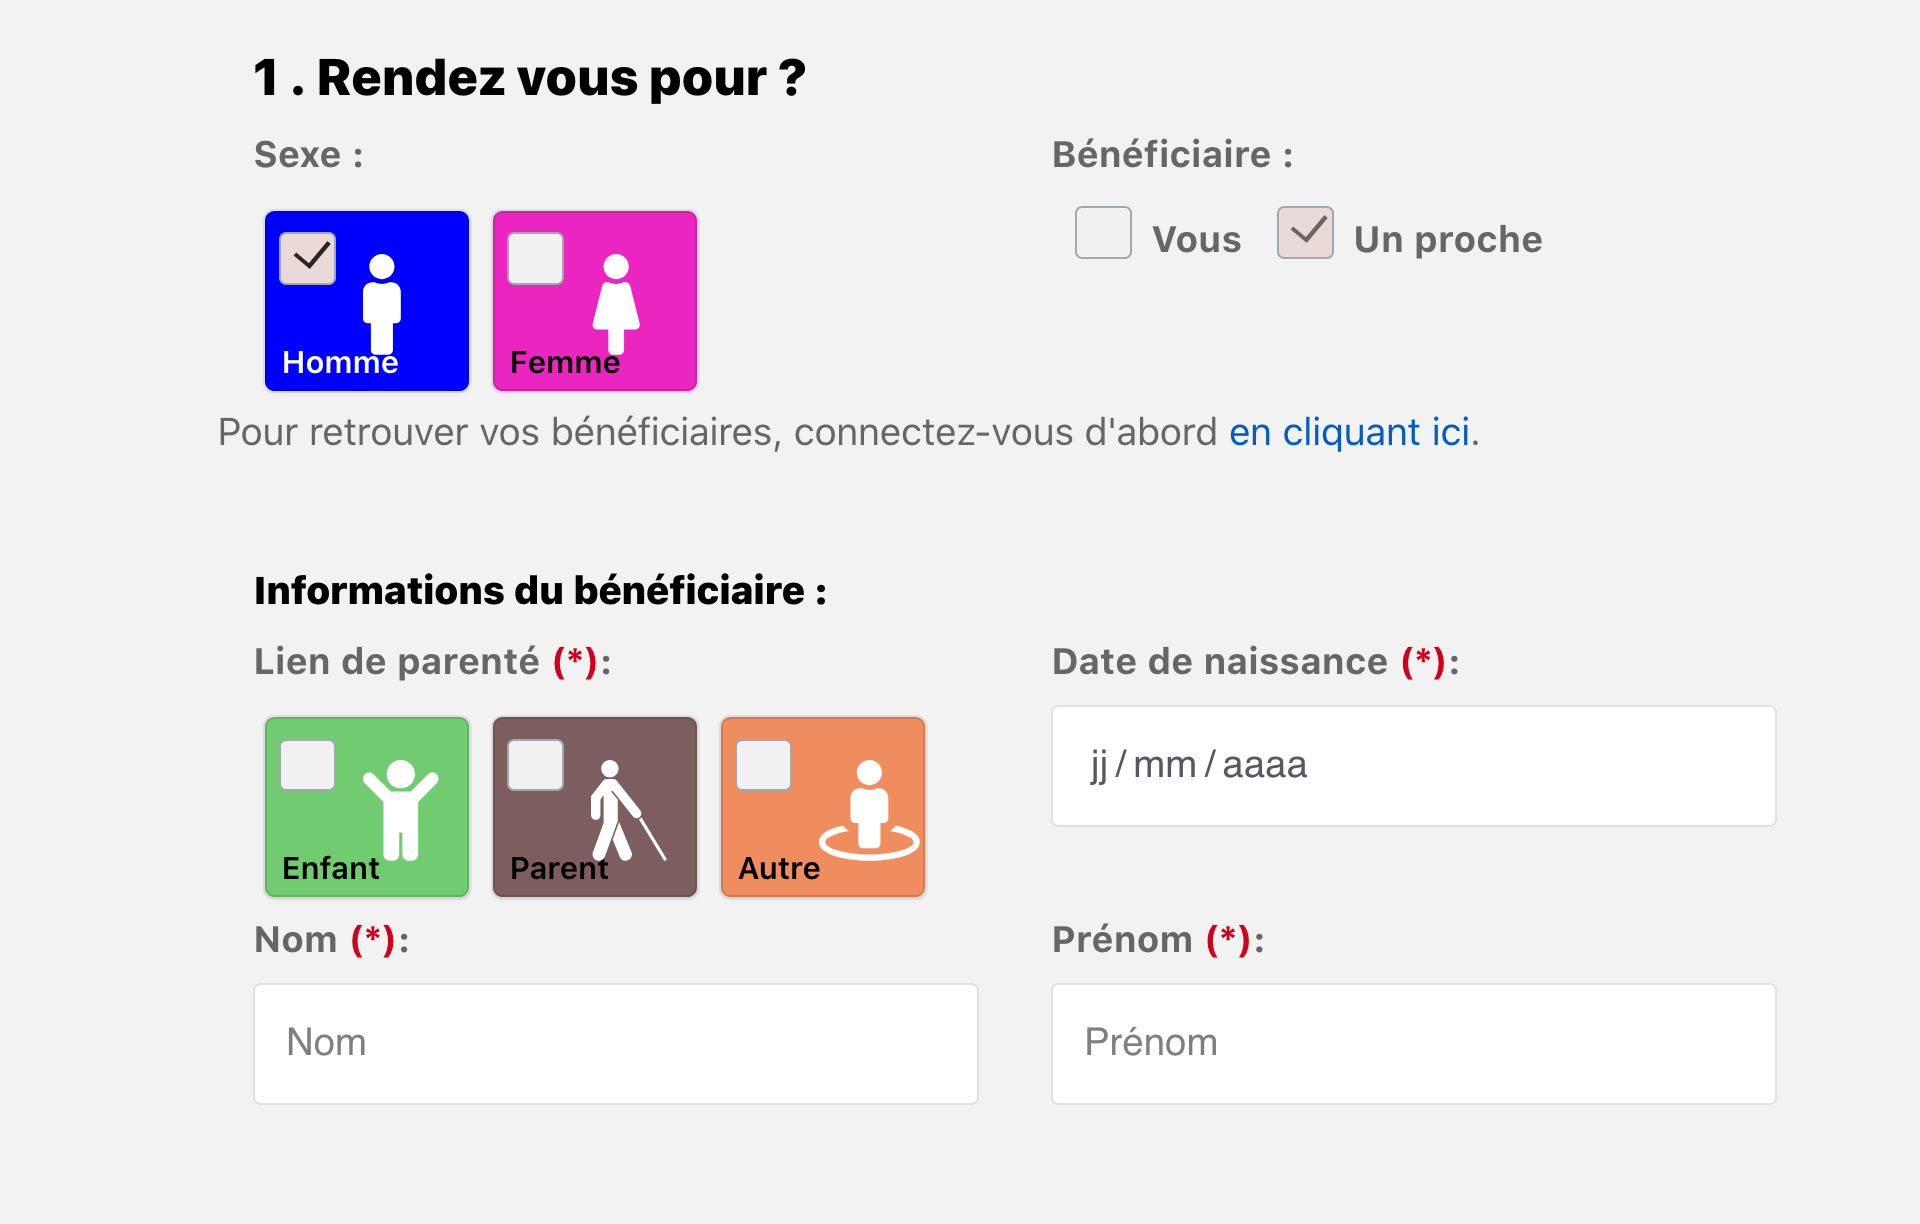
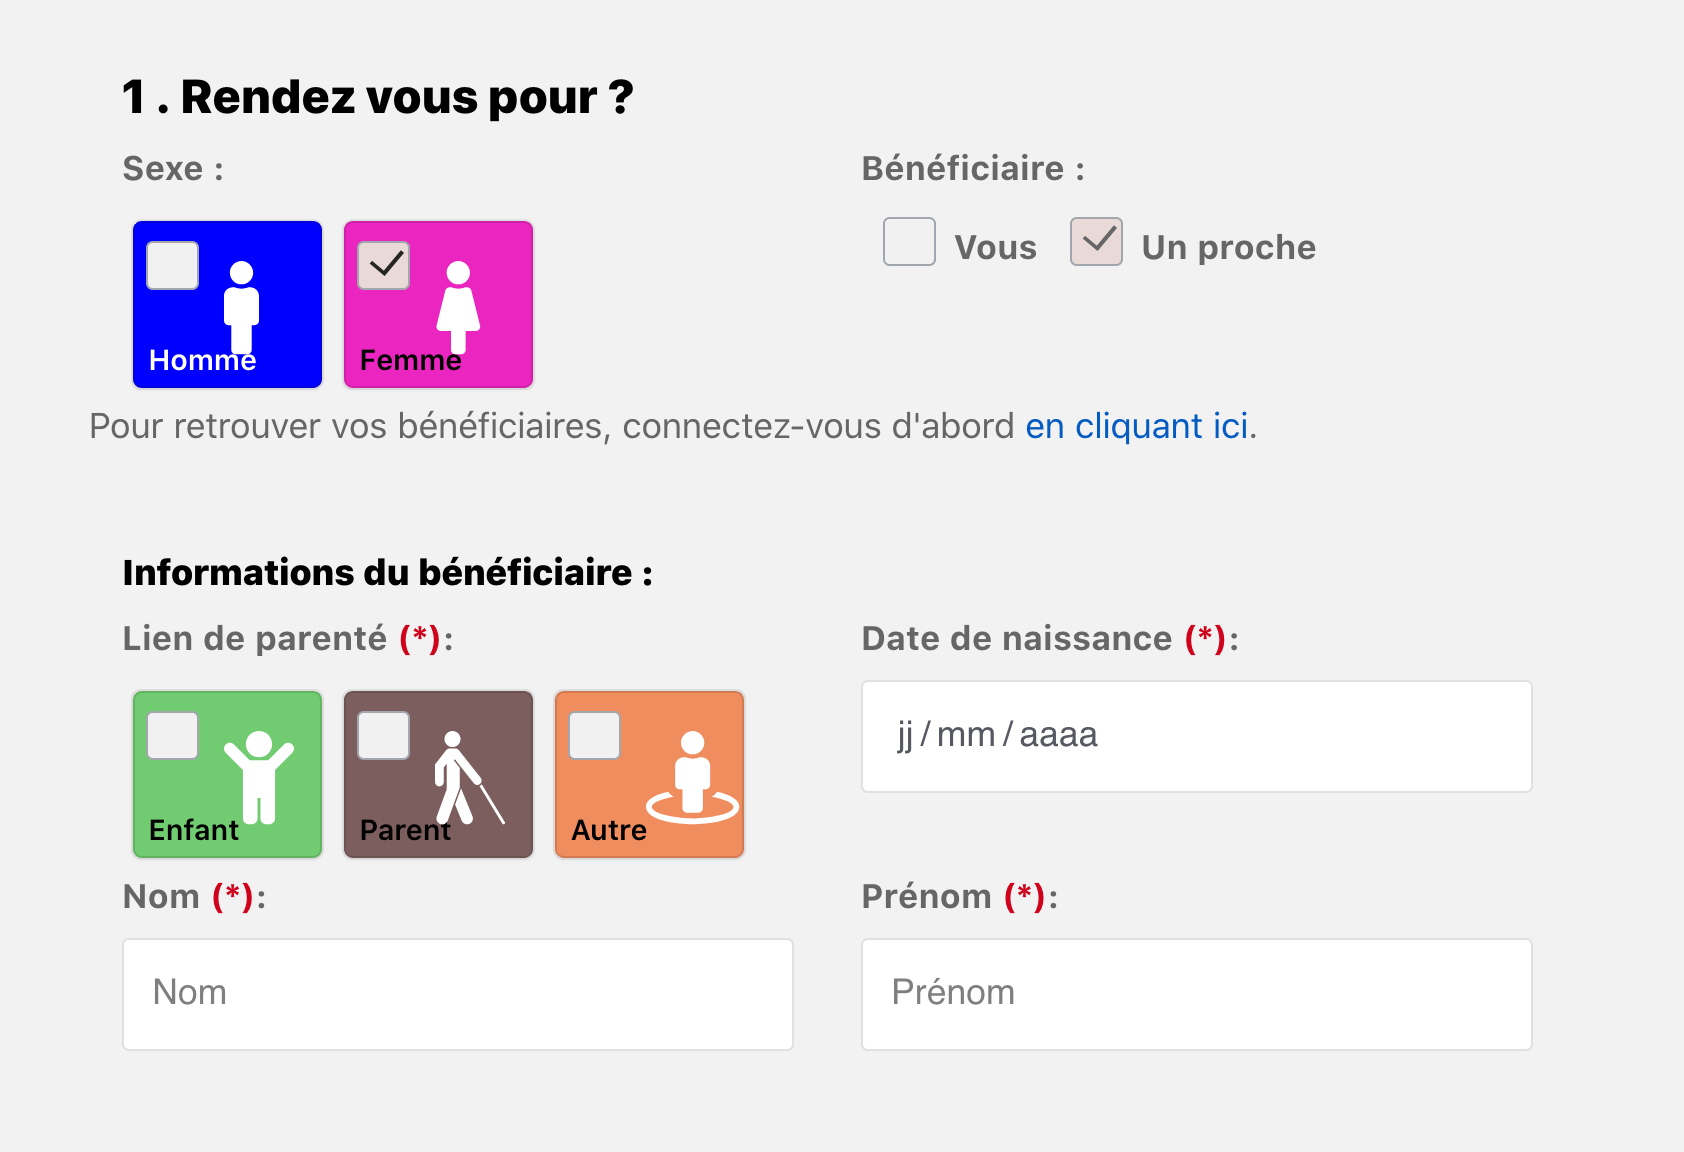
- Choose the sex and the recipient of the review
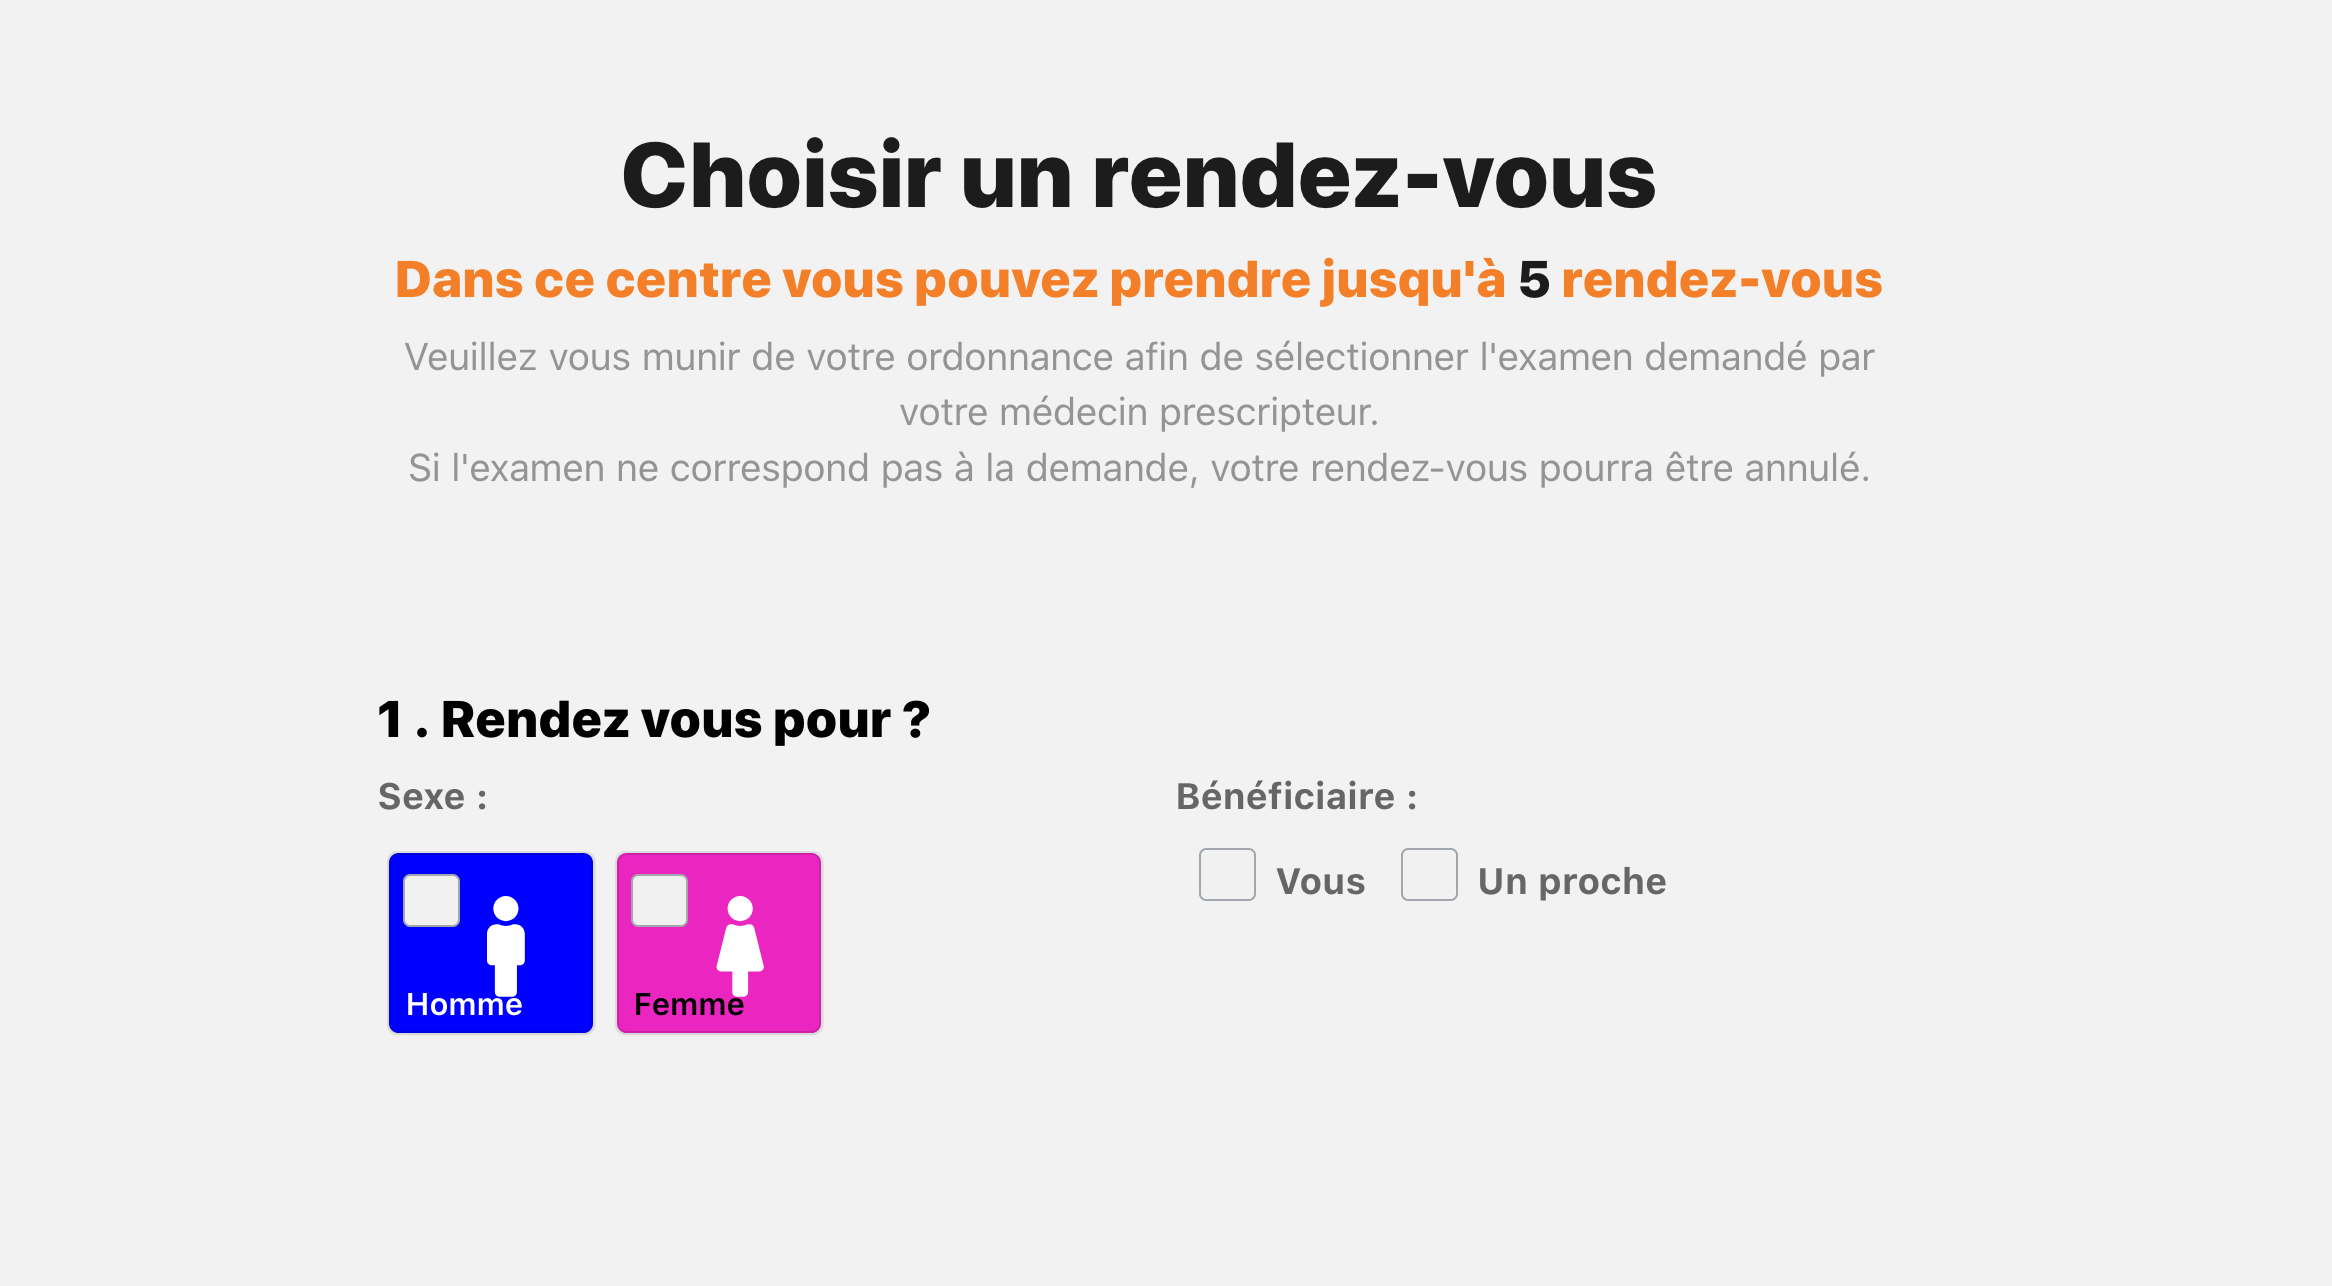
If you choose to make an appointment for a loved one, you must complete the identity information or by filling out the form, or by logging into your account to ovoir the list of your saved bénéficaires.
- Select the imaging category from the center
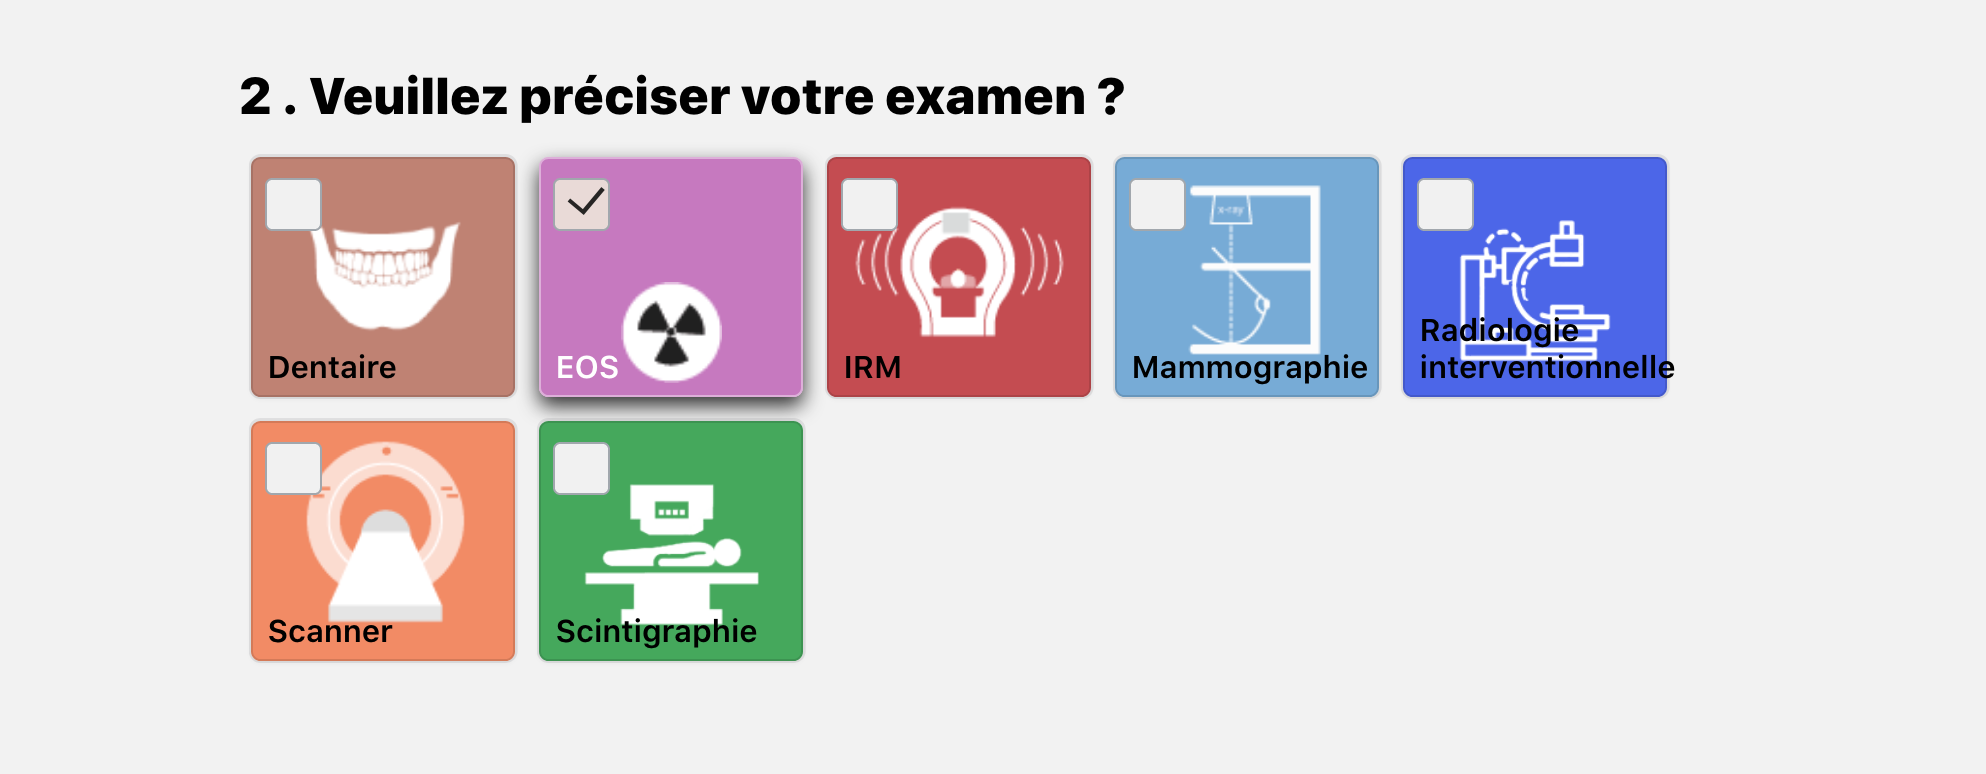
- Select the desired exam among those proposed. You can filter by anatomic region by clicking on the man or typing keywords.
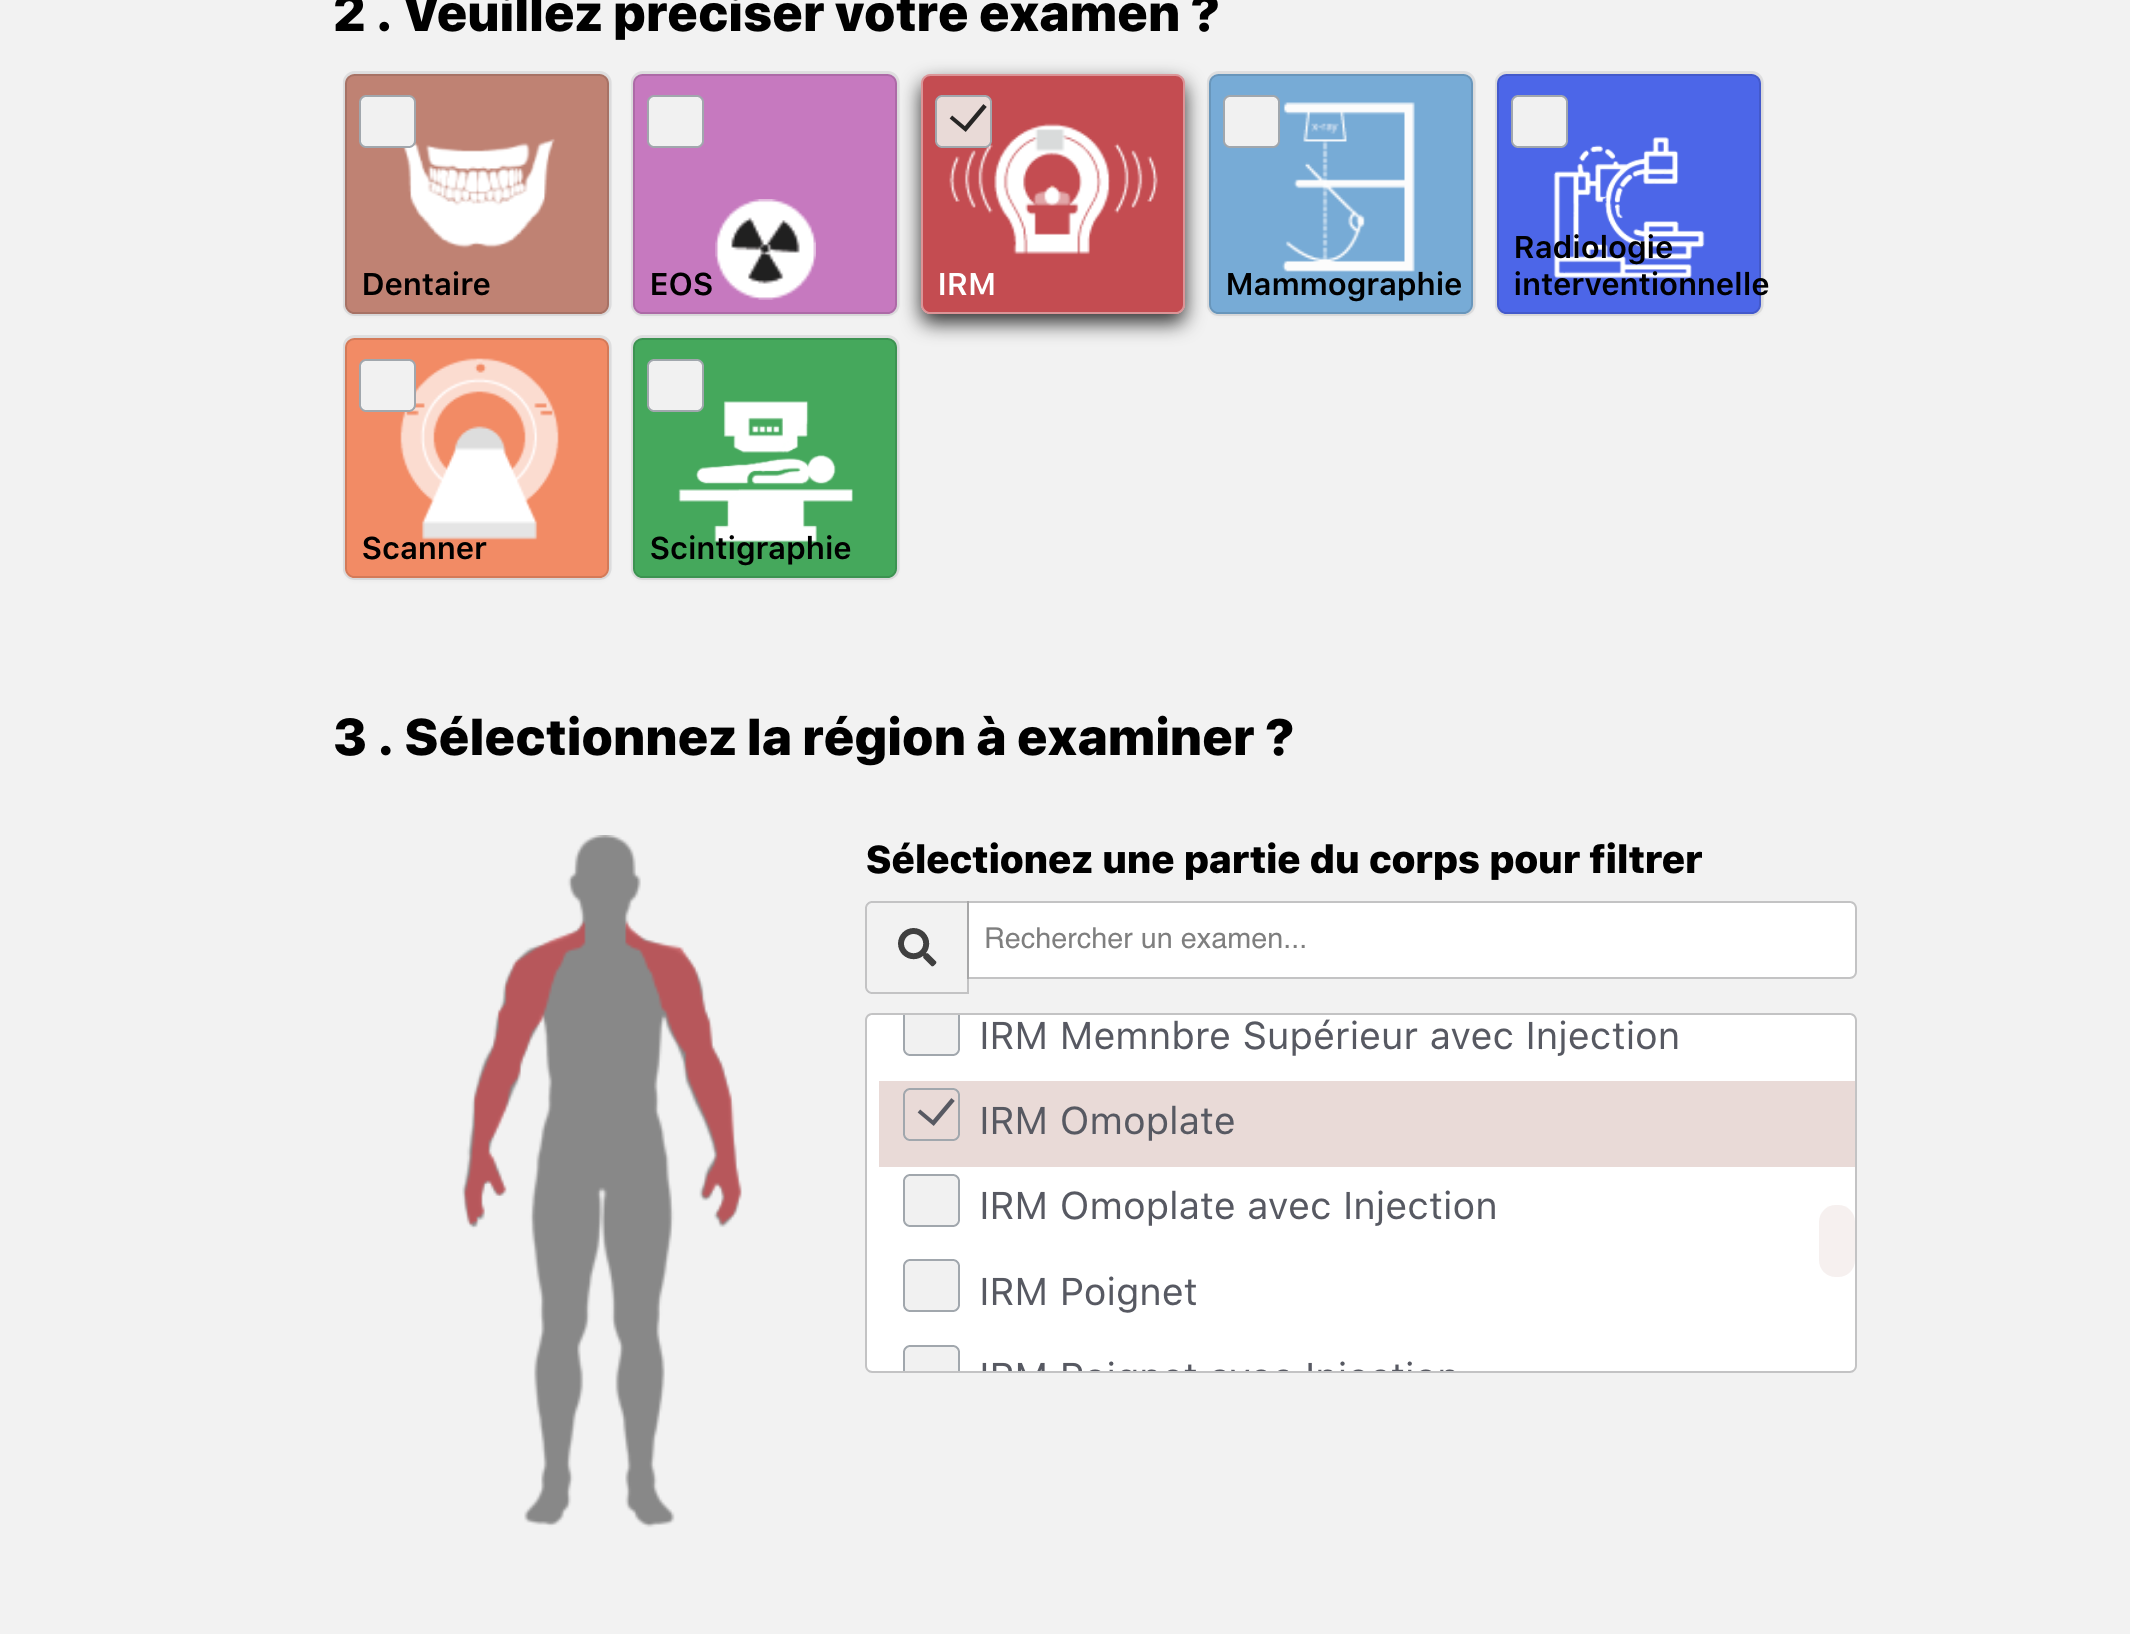
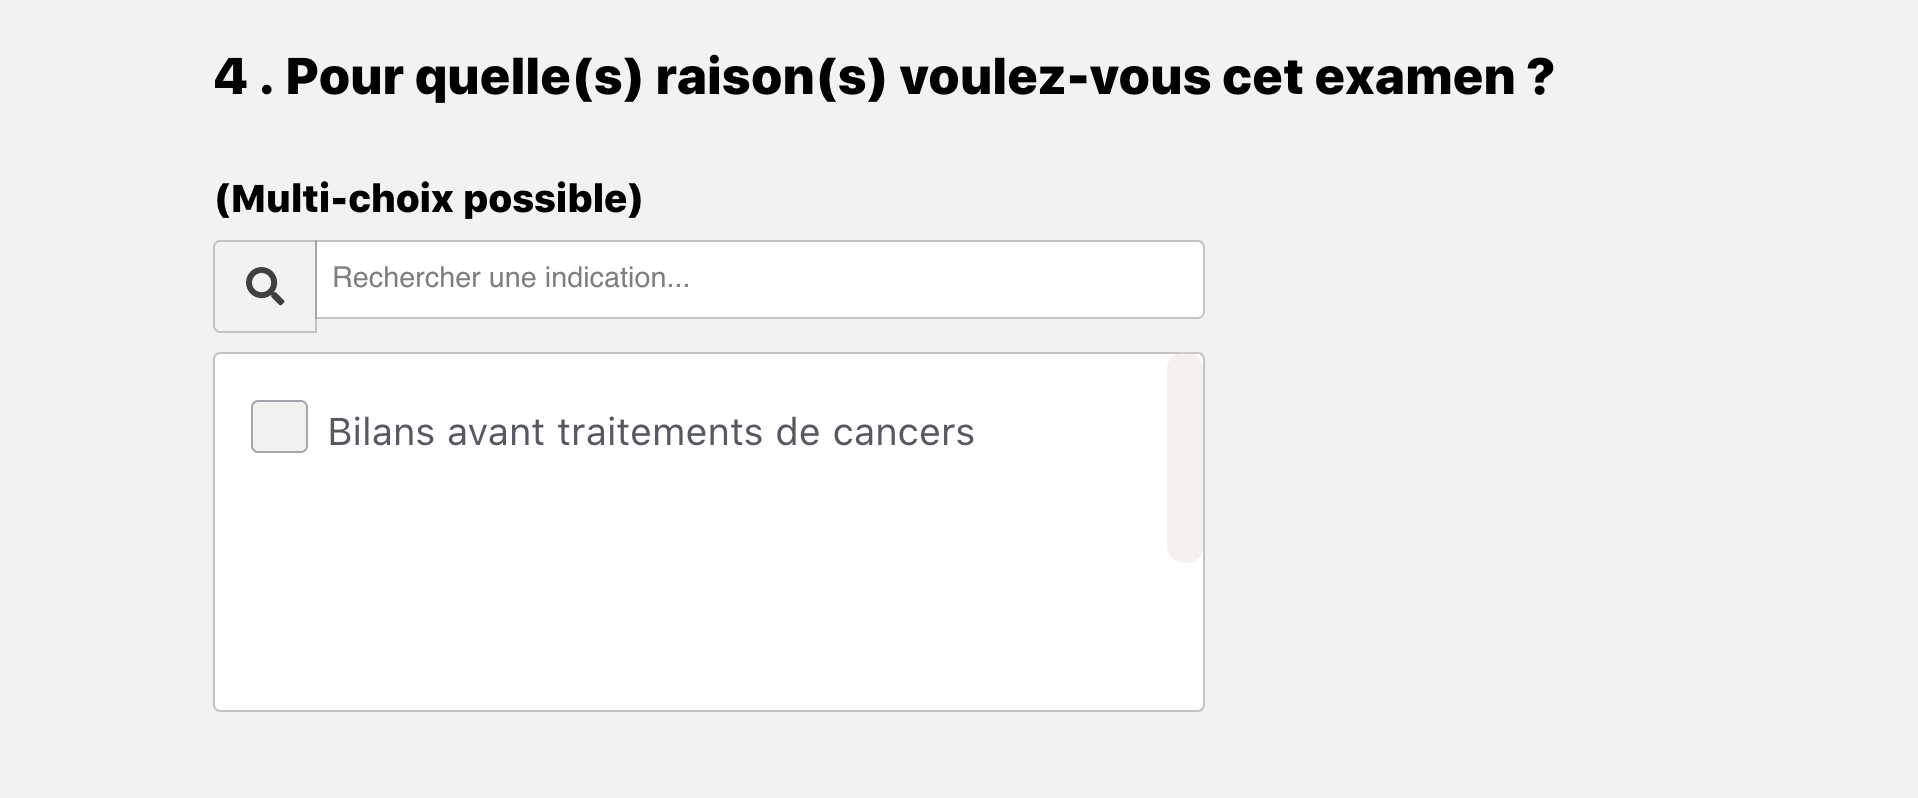
- You can select the indication, the medical reason why you want to make an appointment. This information may be important to your management.
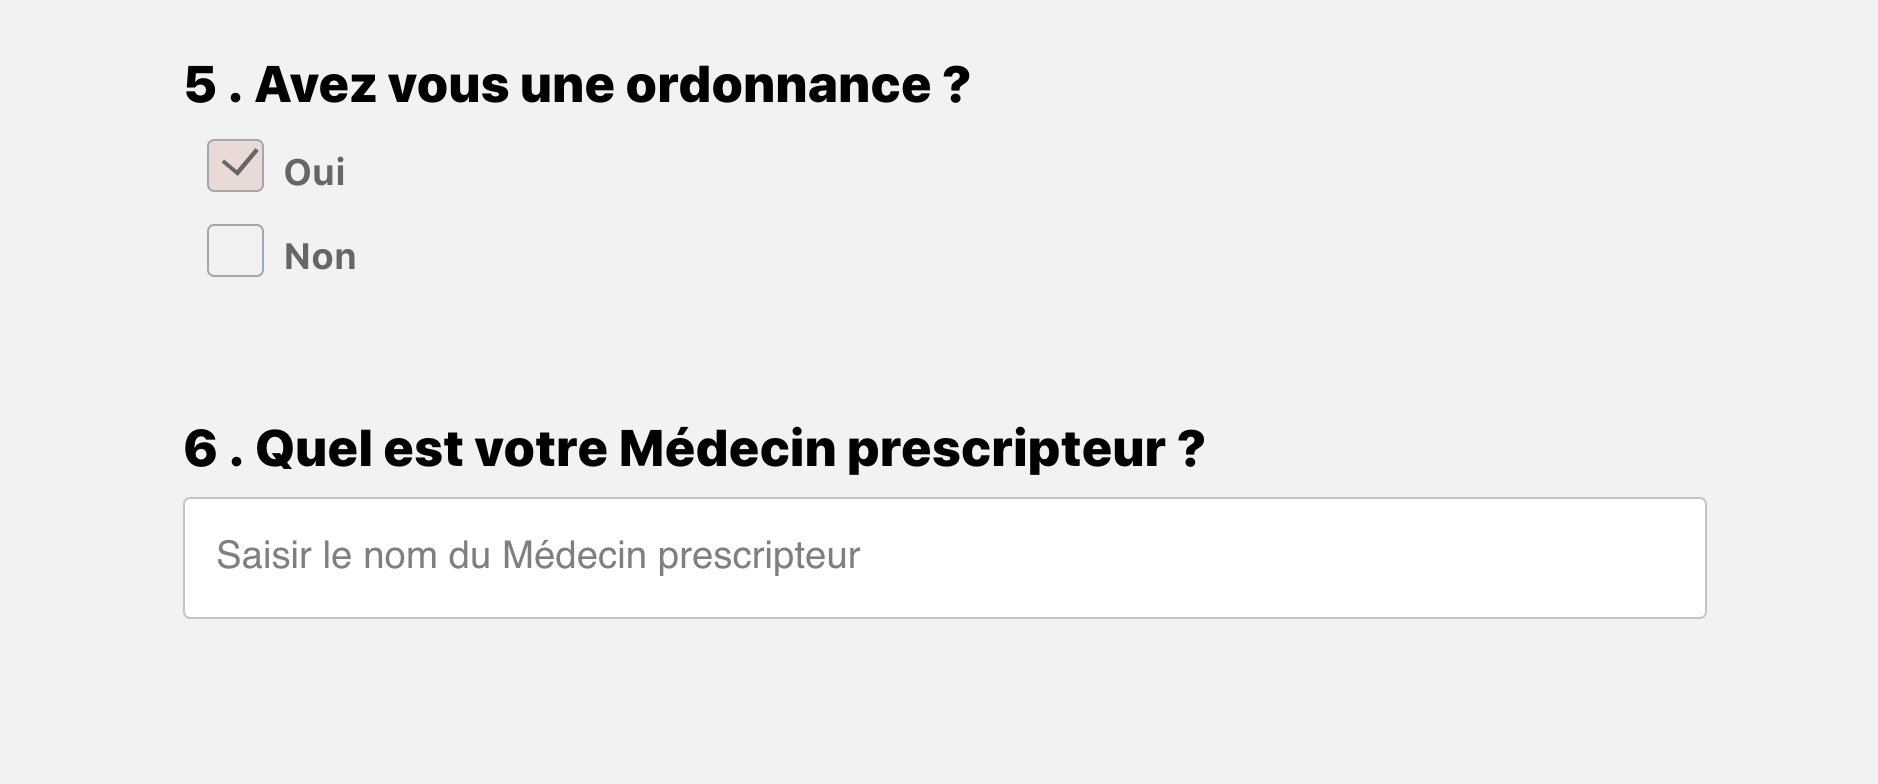
- Check if you are in possession of a prescription and inform the name of the practitioner who sends you.
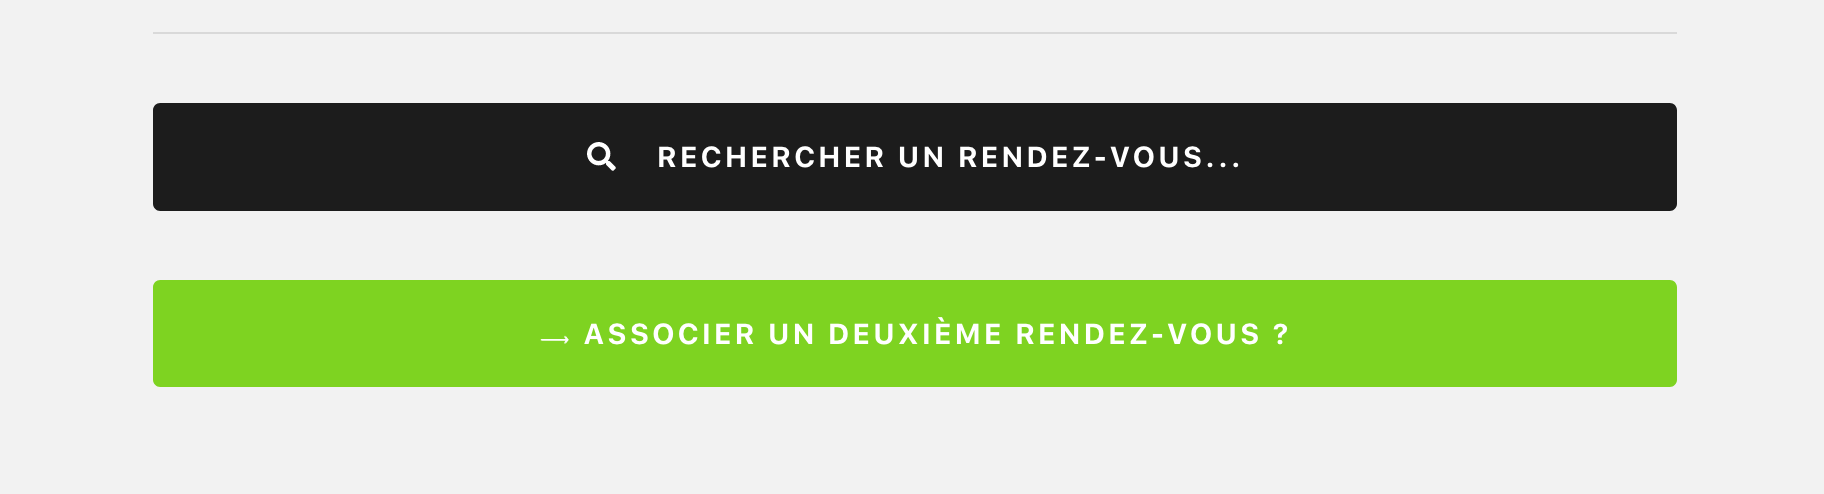
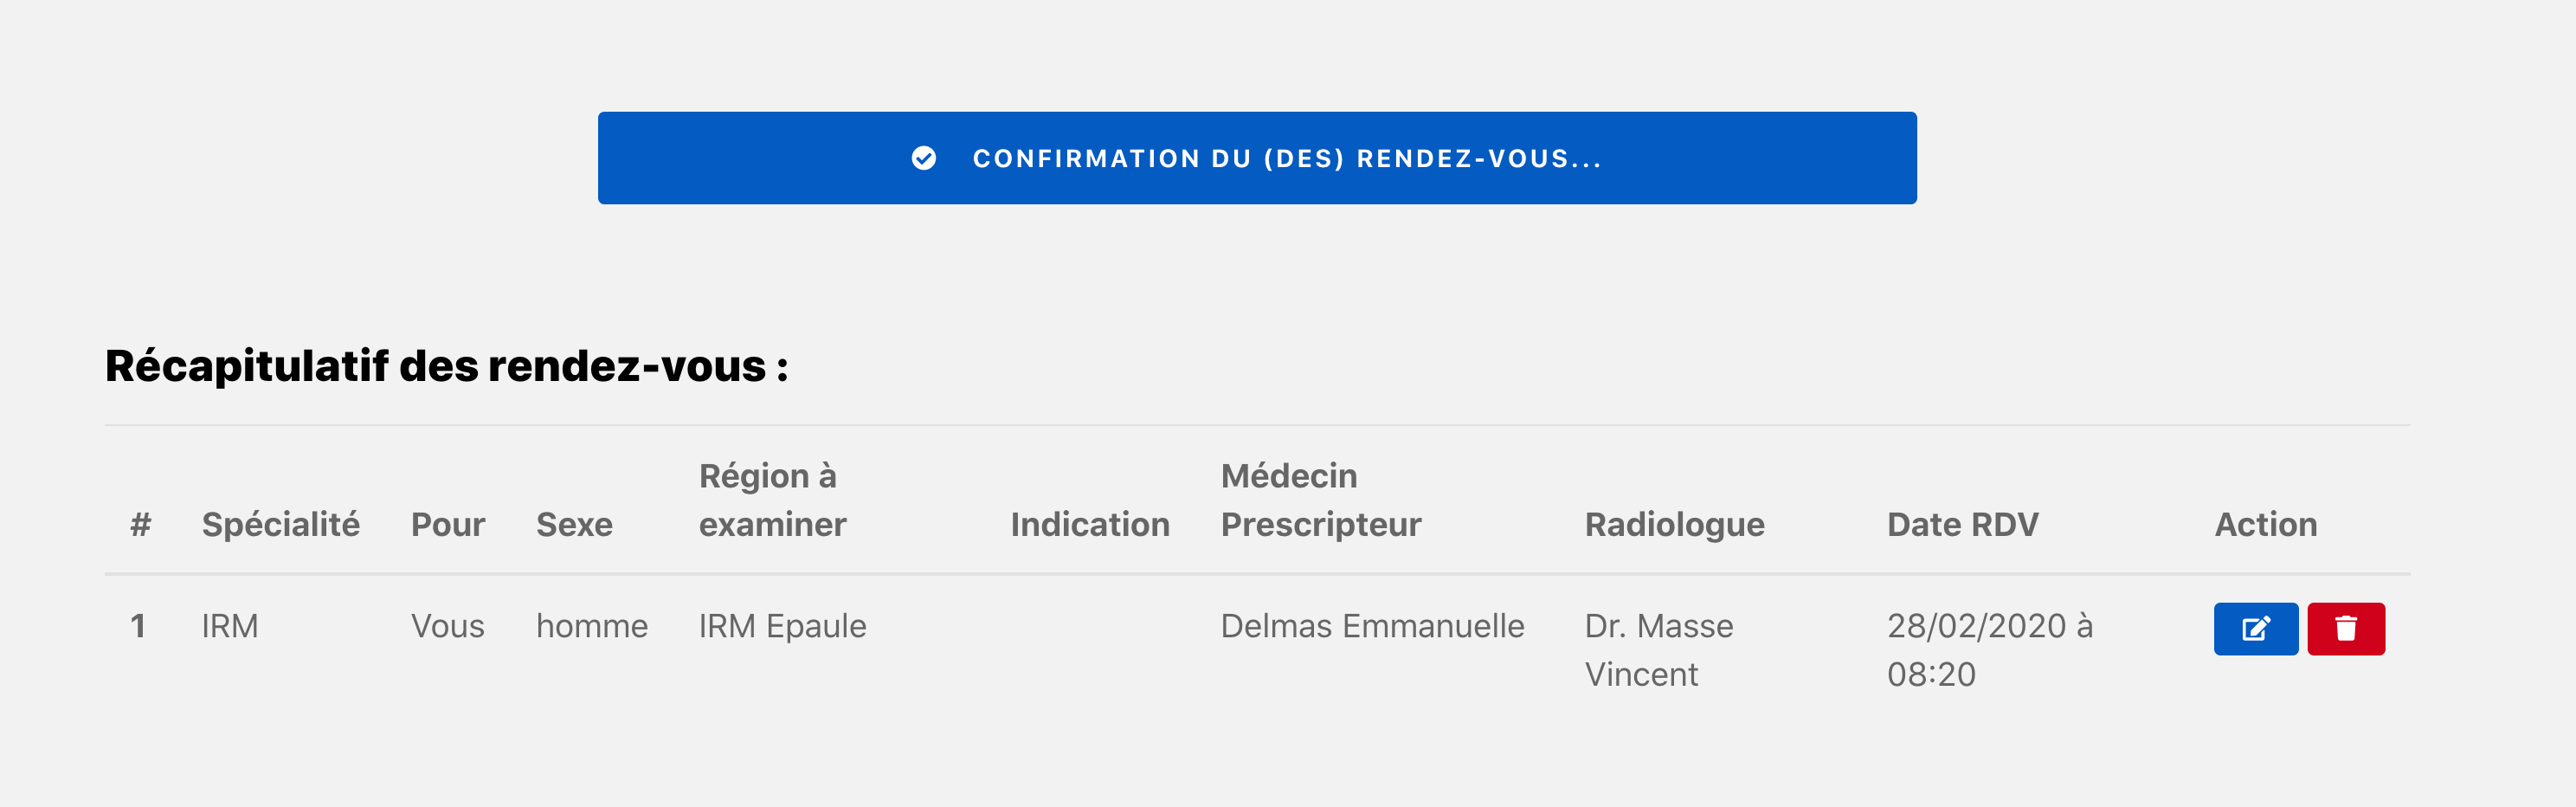
- Click on the black button "Search an appointment"
You have in the table located below the button "Search an appointment" A summary of selected information above.
- Choose the time that works from the available slots
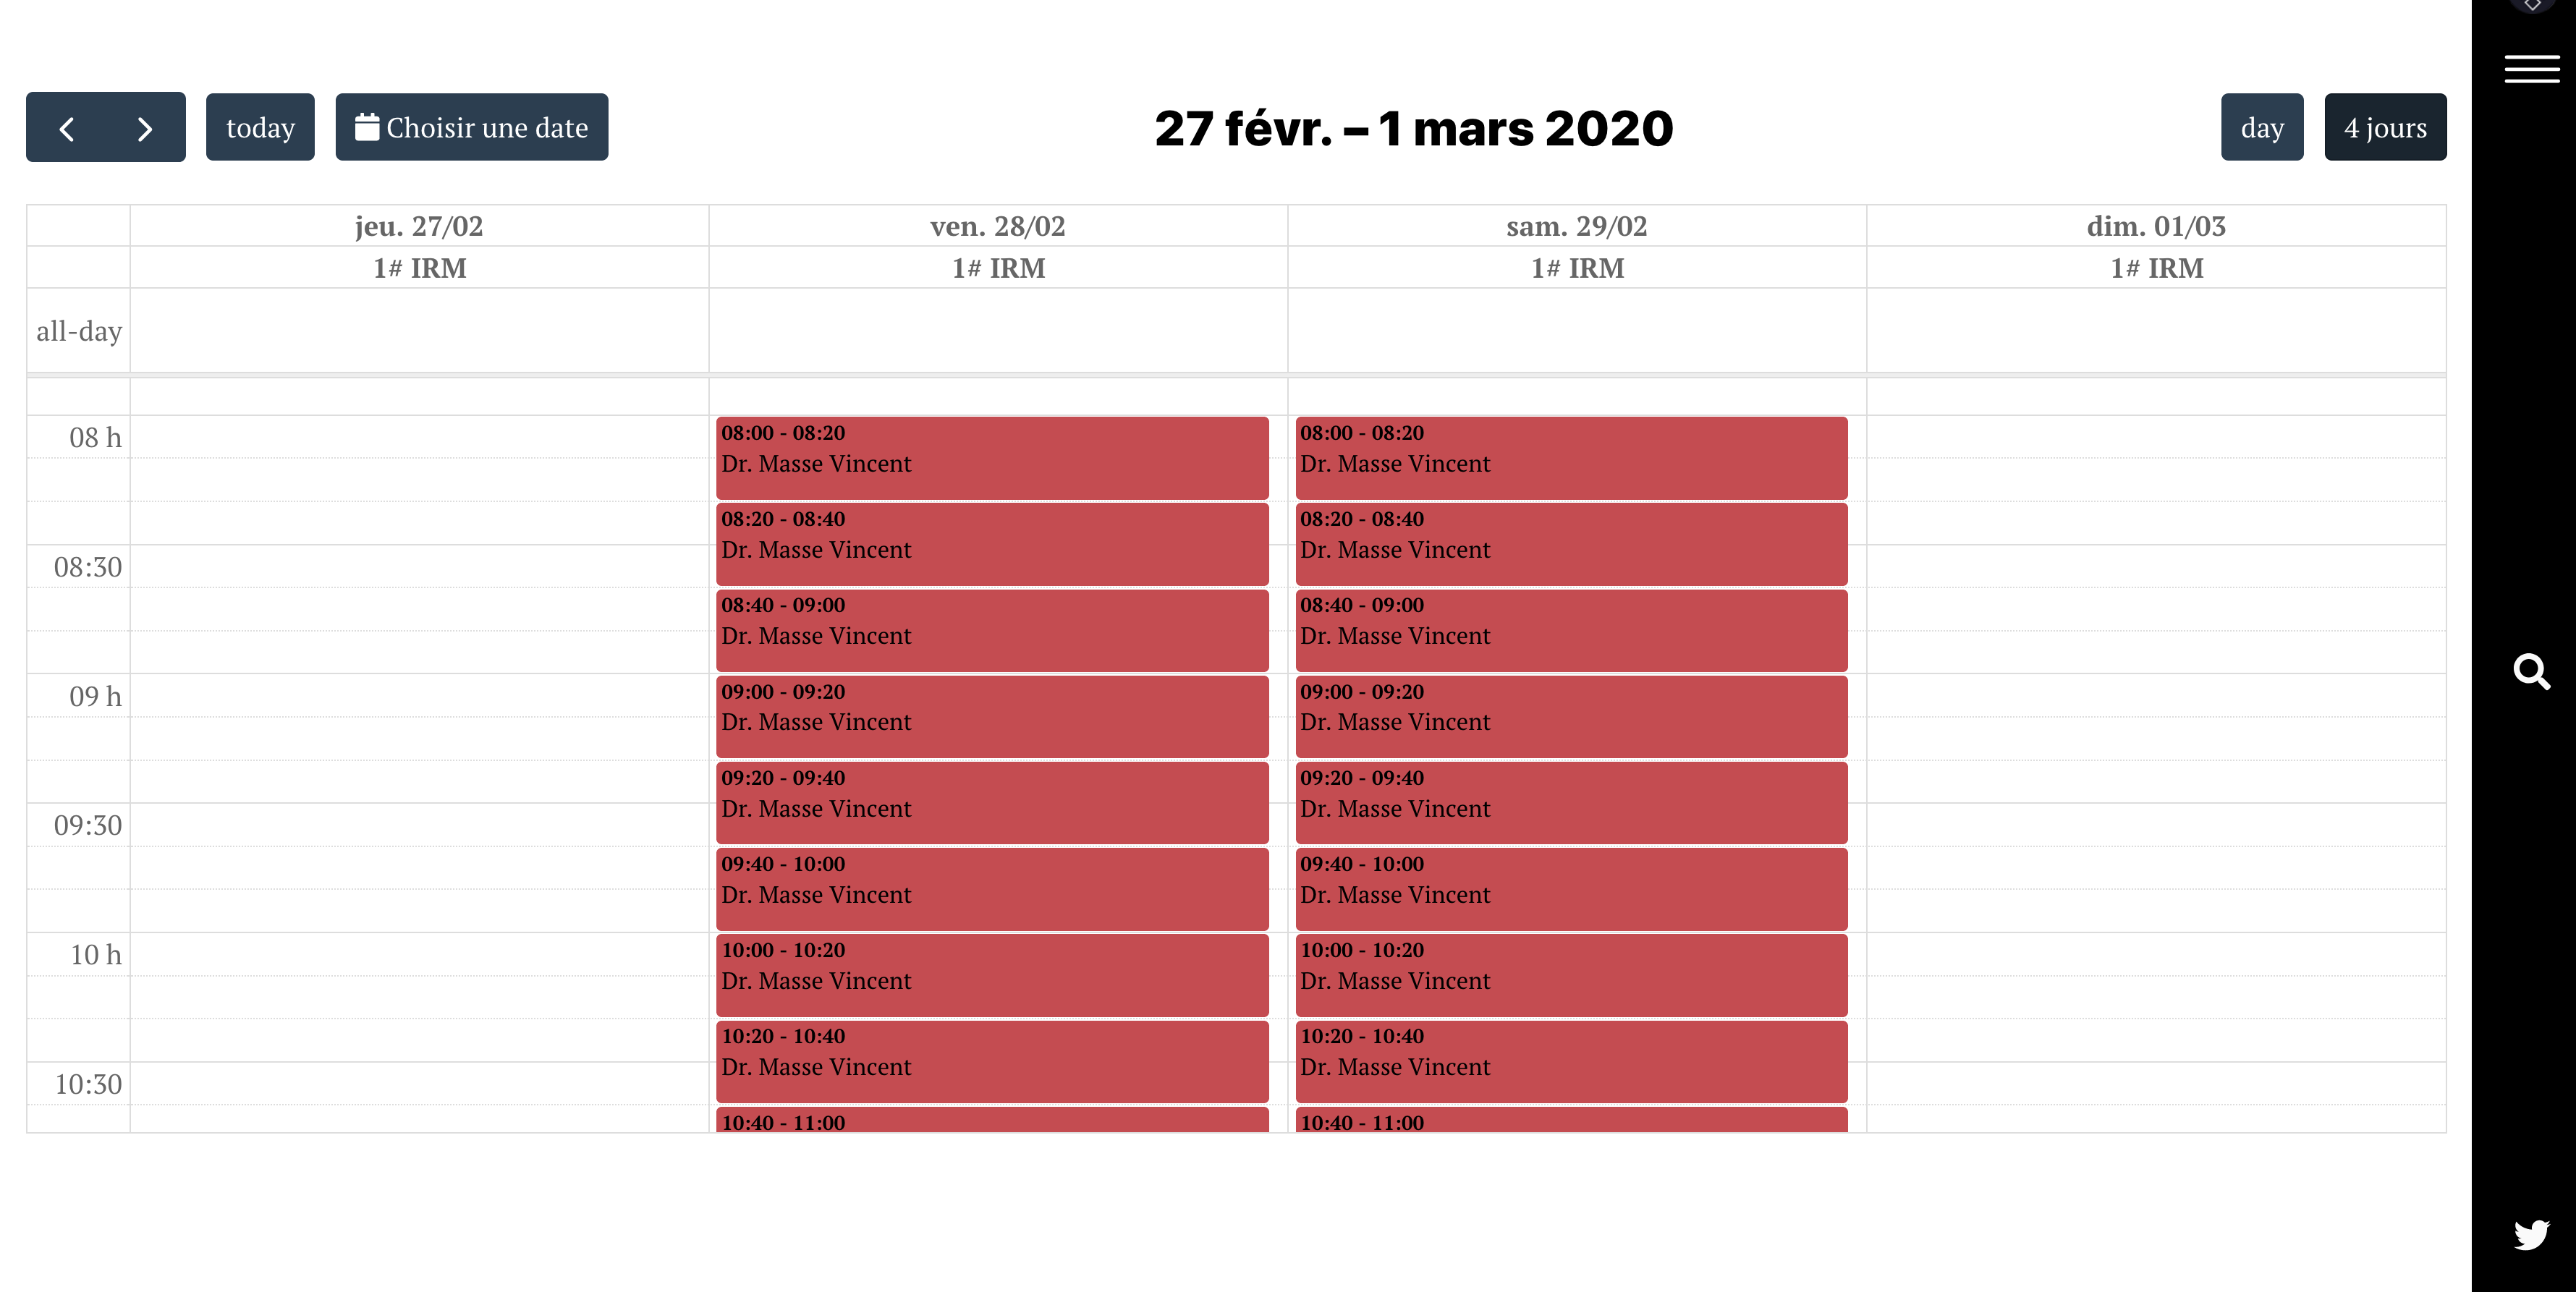
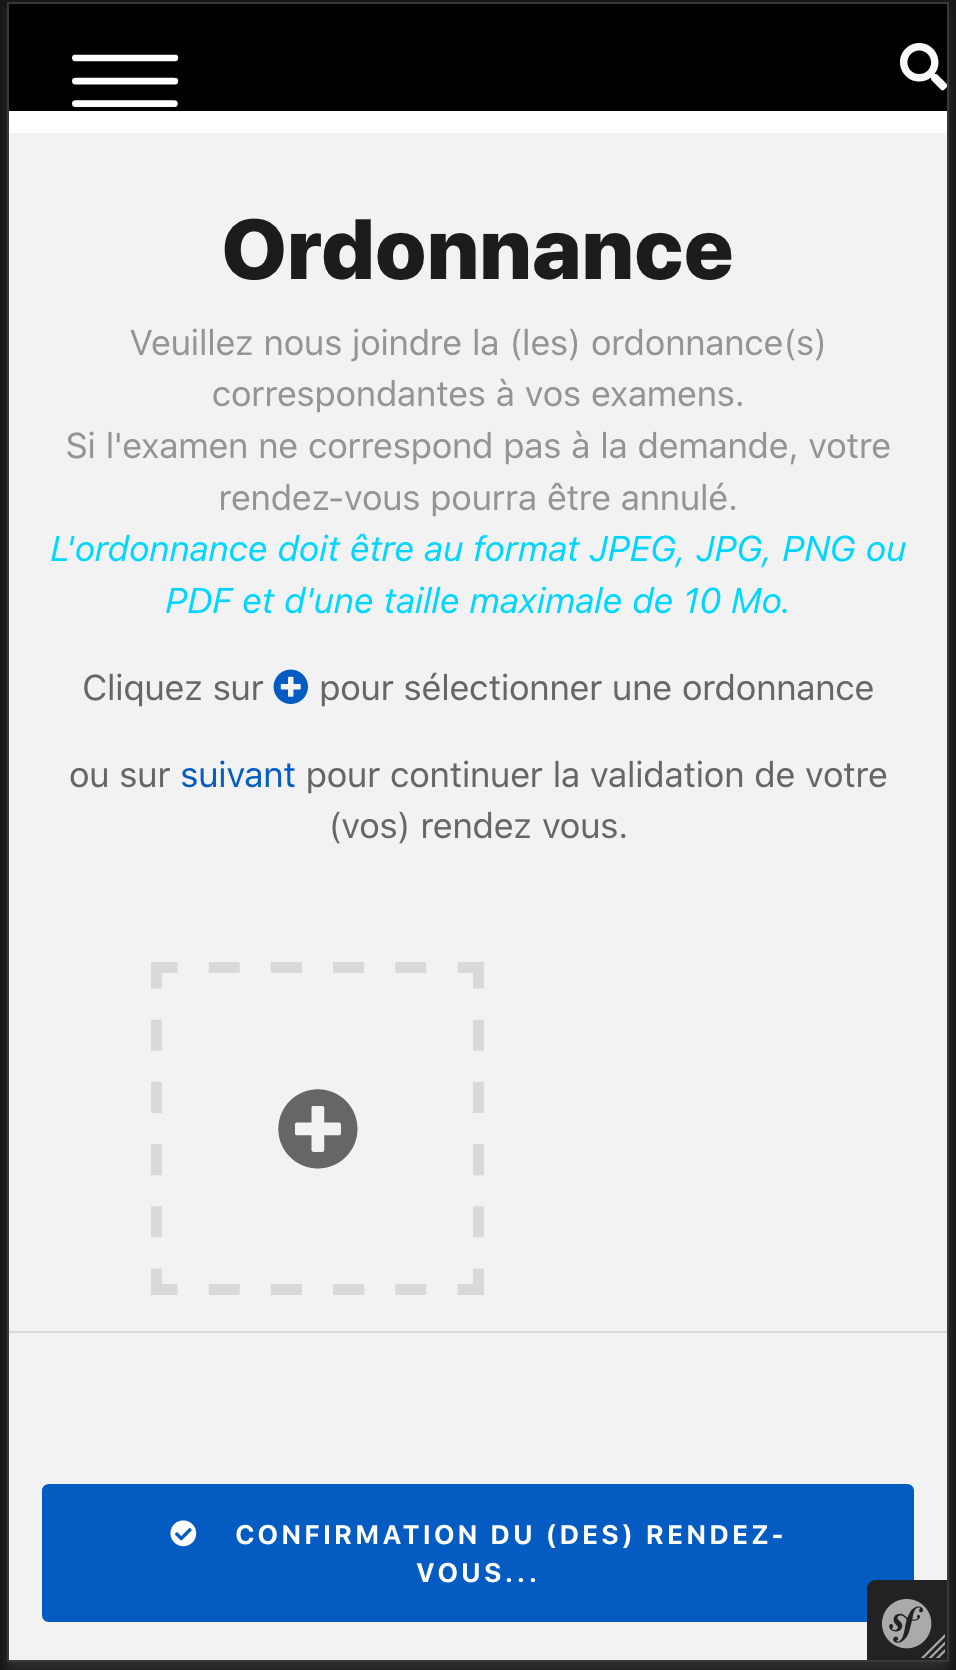
You will be taken (e) below to download your prescription. Remember to take a photo and send it to you to save it in your computer.
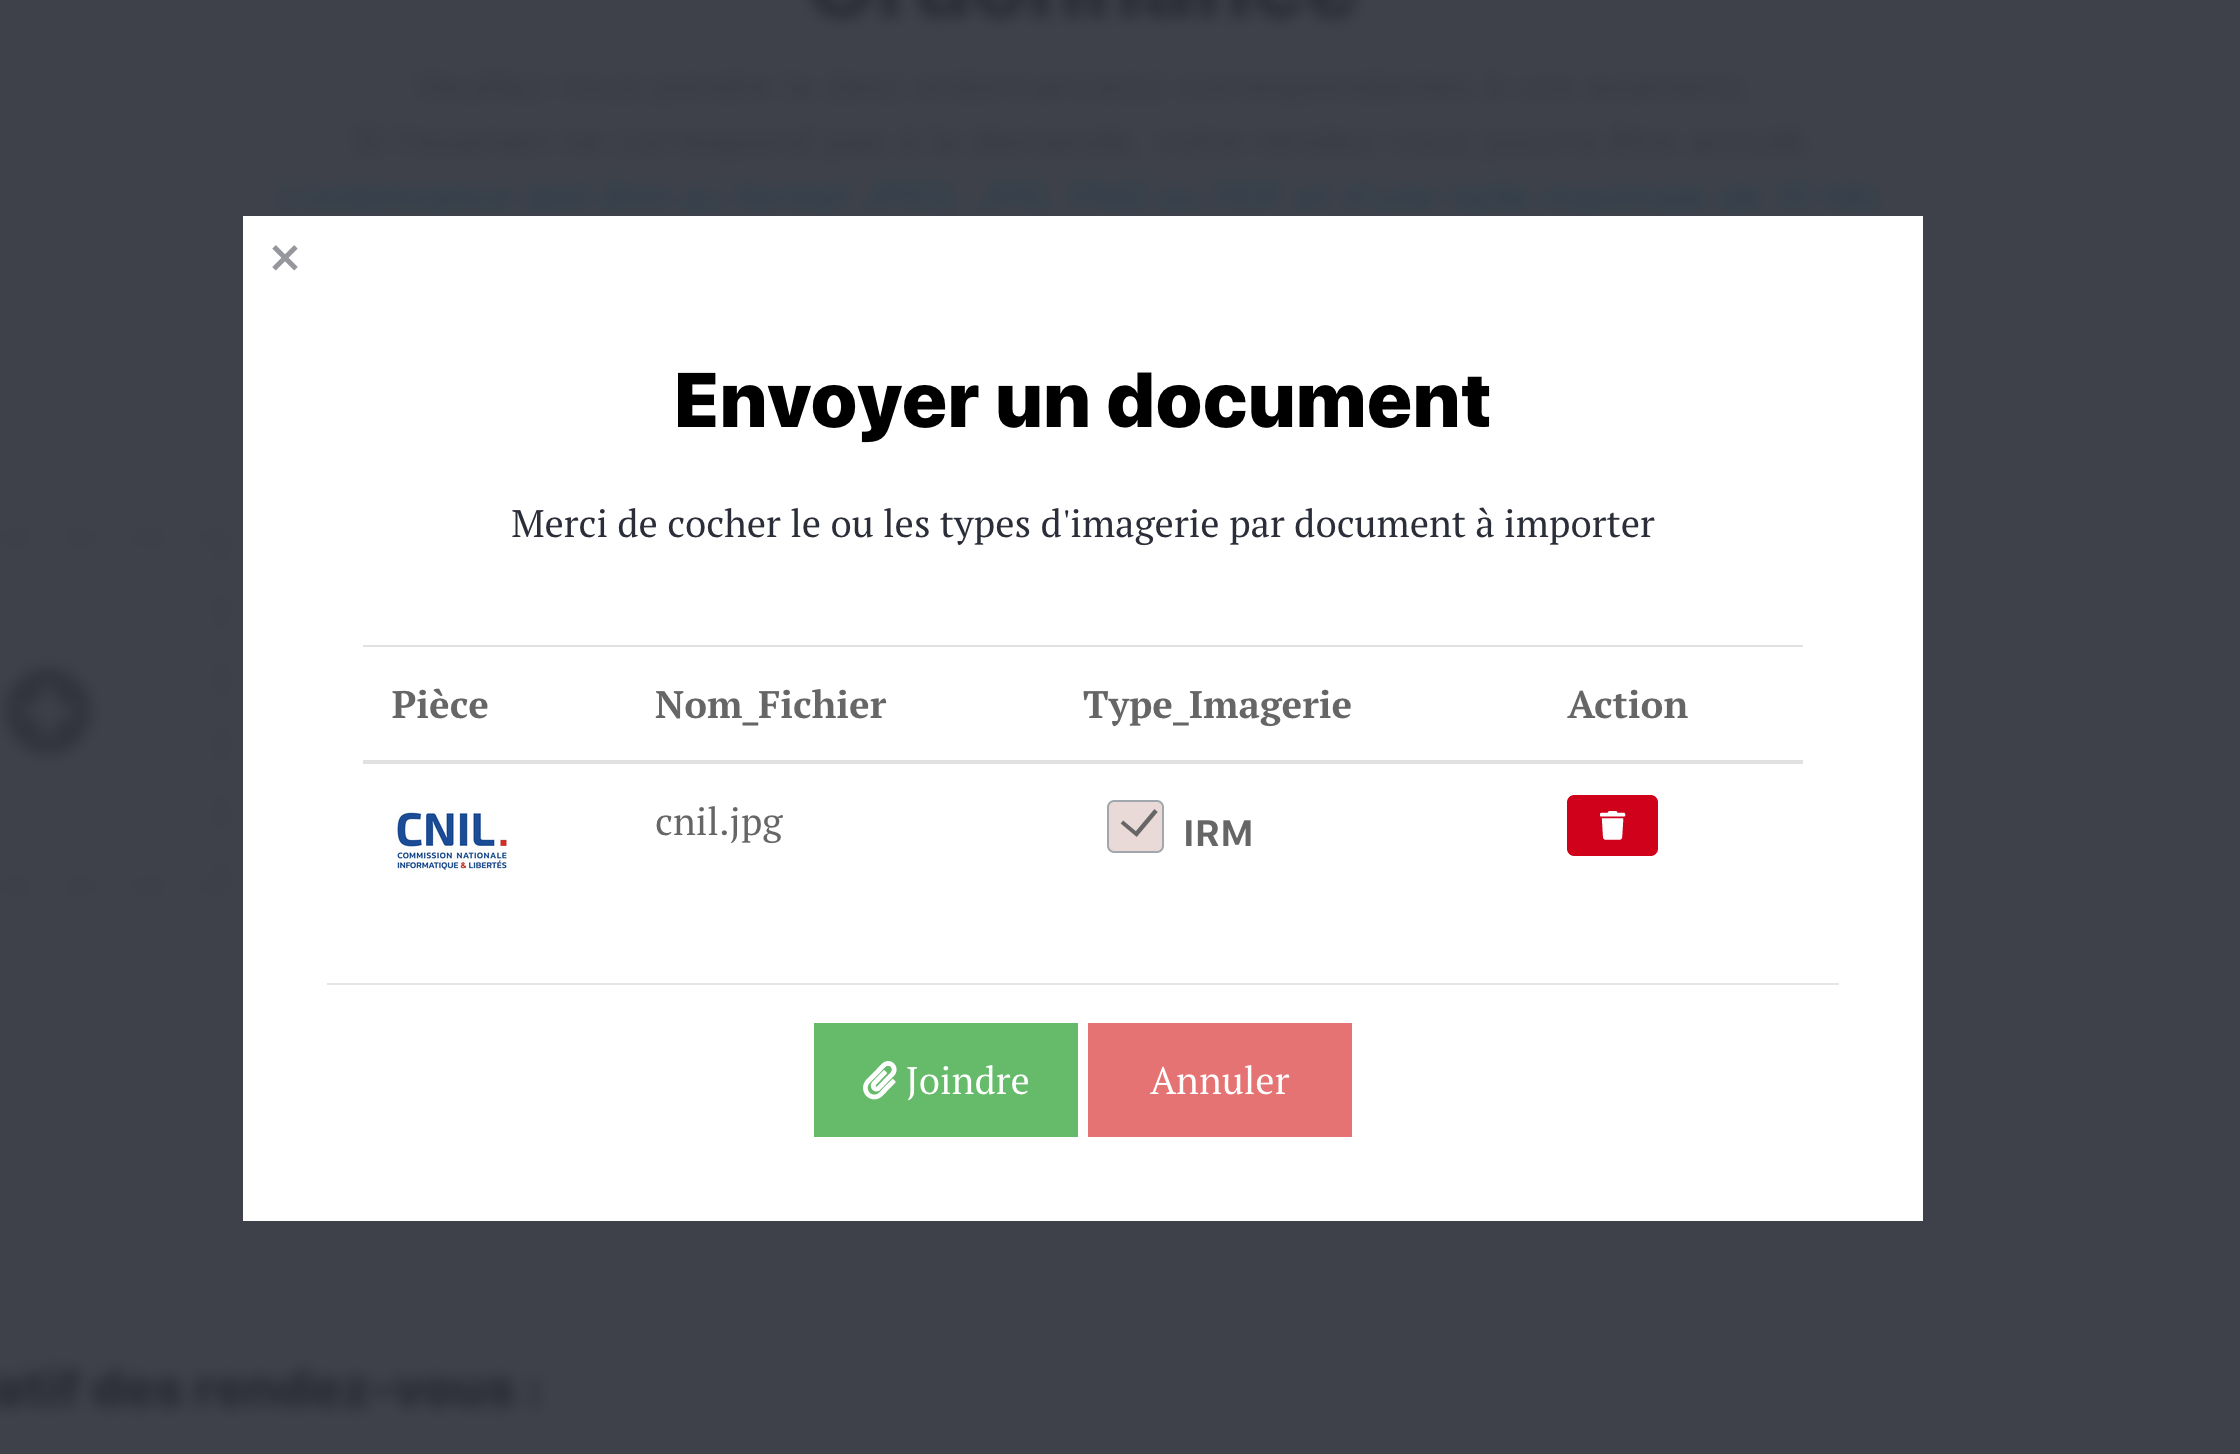
Send a document
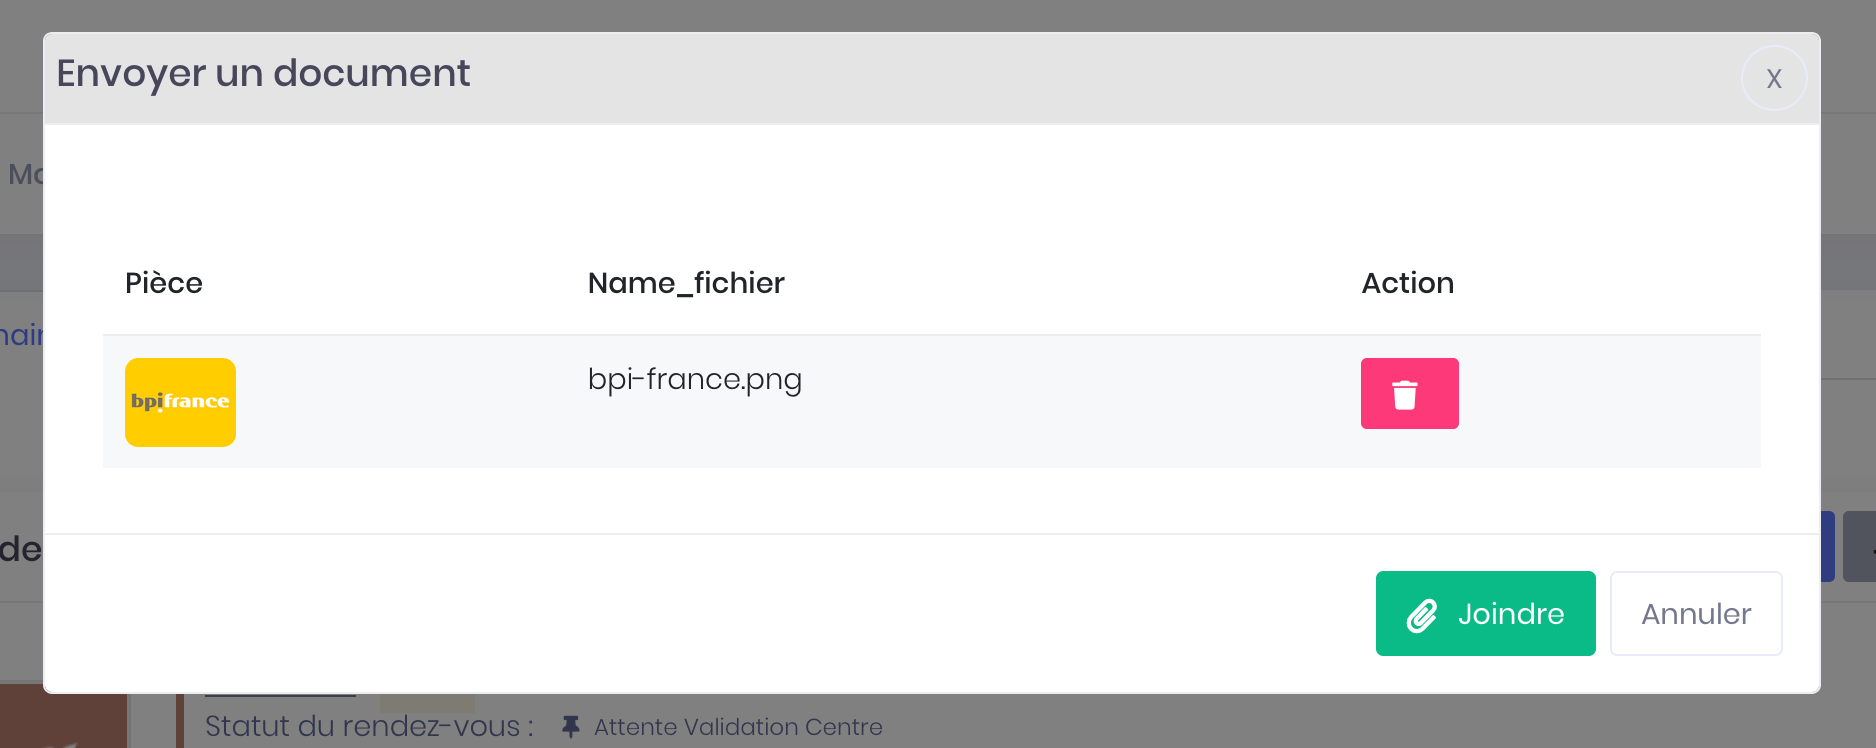
- Click the square to start sending your prescription and browse your files
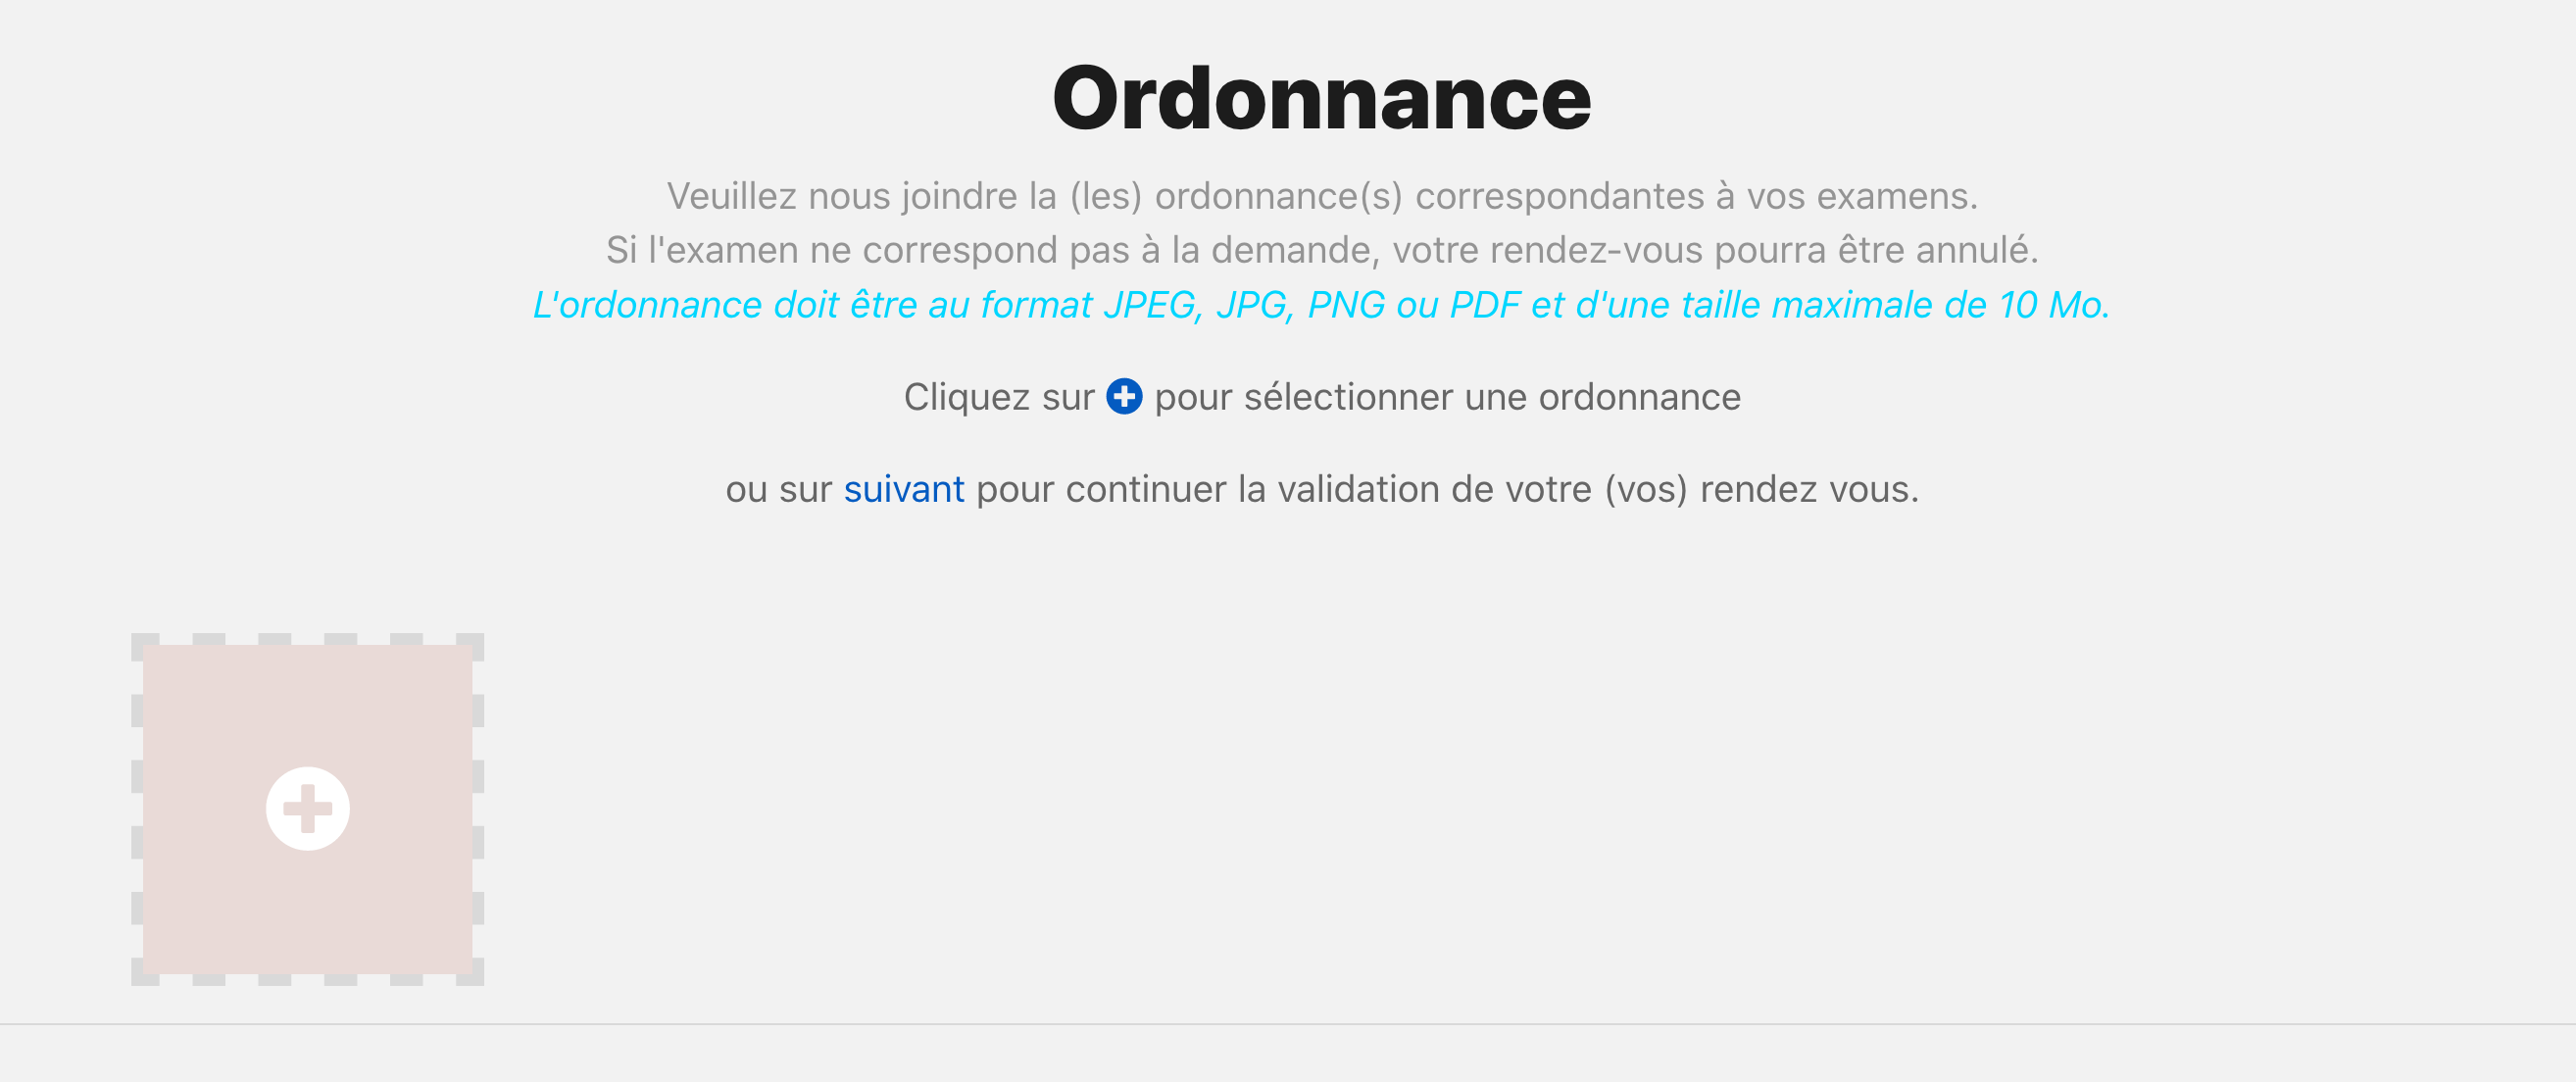
- Select the right document to send
- Confirm your selection by clicking the green button "Join"
- If necessary, repeat this process several times if you have multiple documents to send (Taking Blood, implantable device card ...)
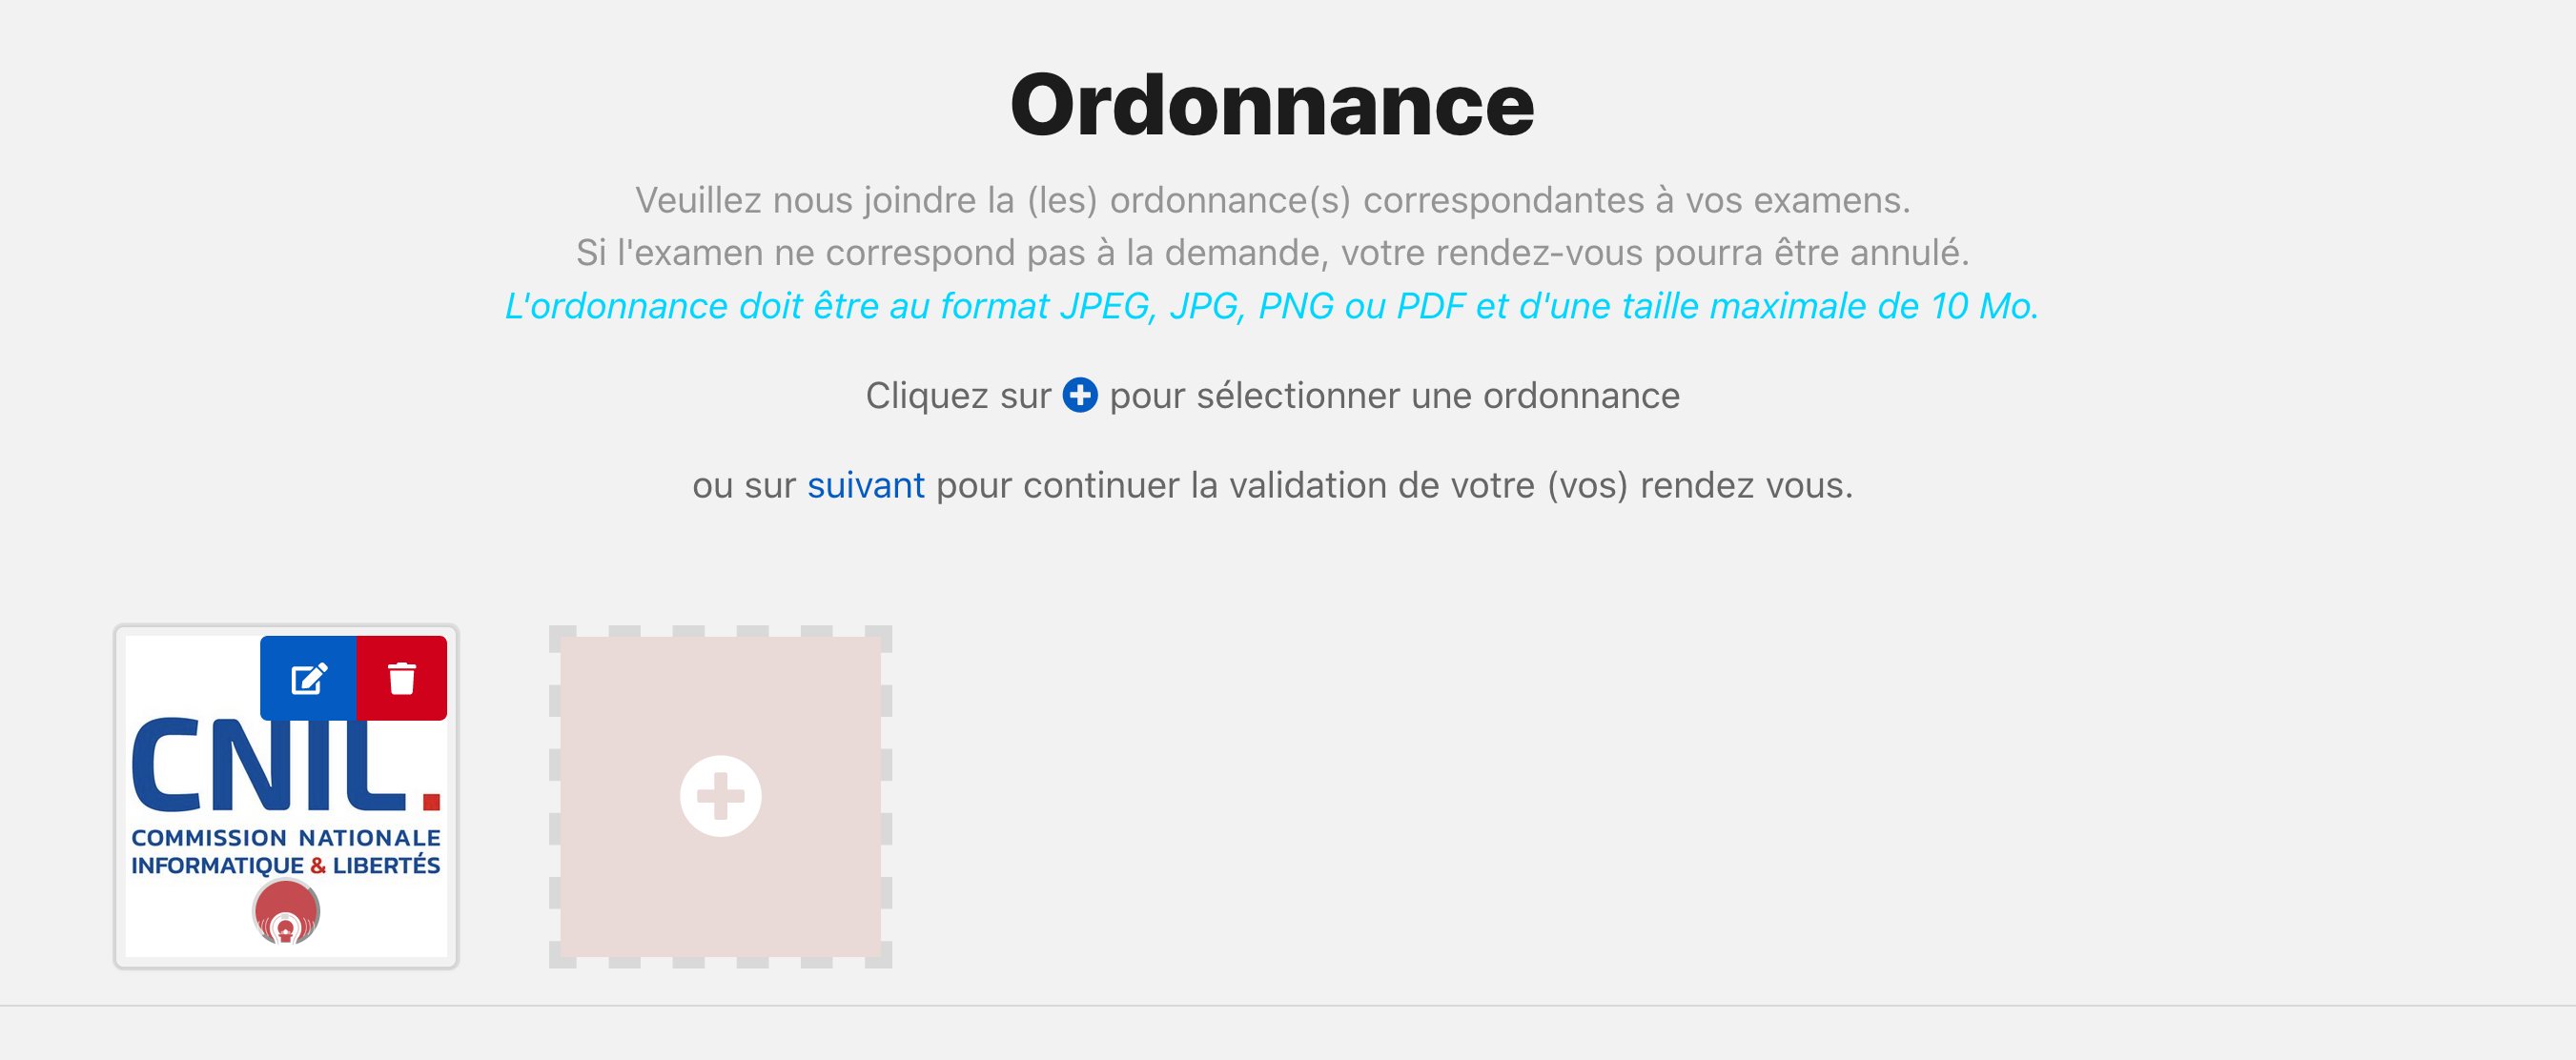
- Then confirm by clicking on the blue button "Confirmation of appointment(s)"
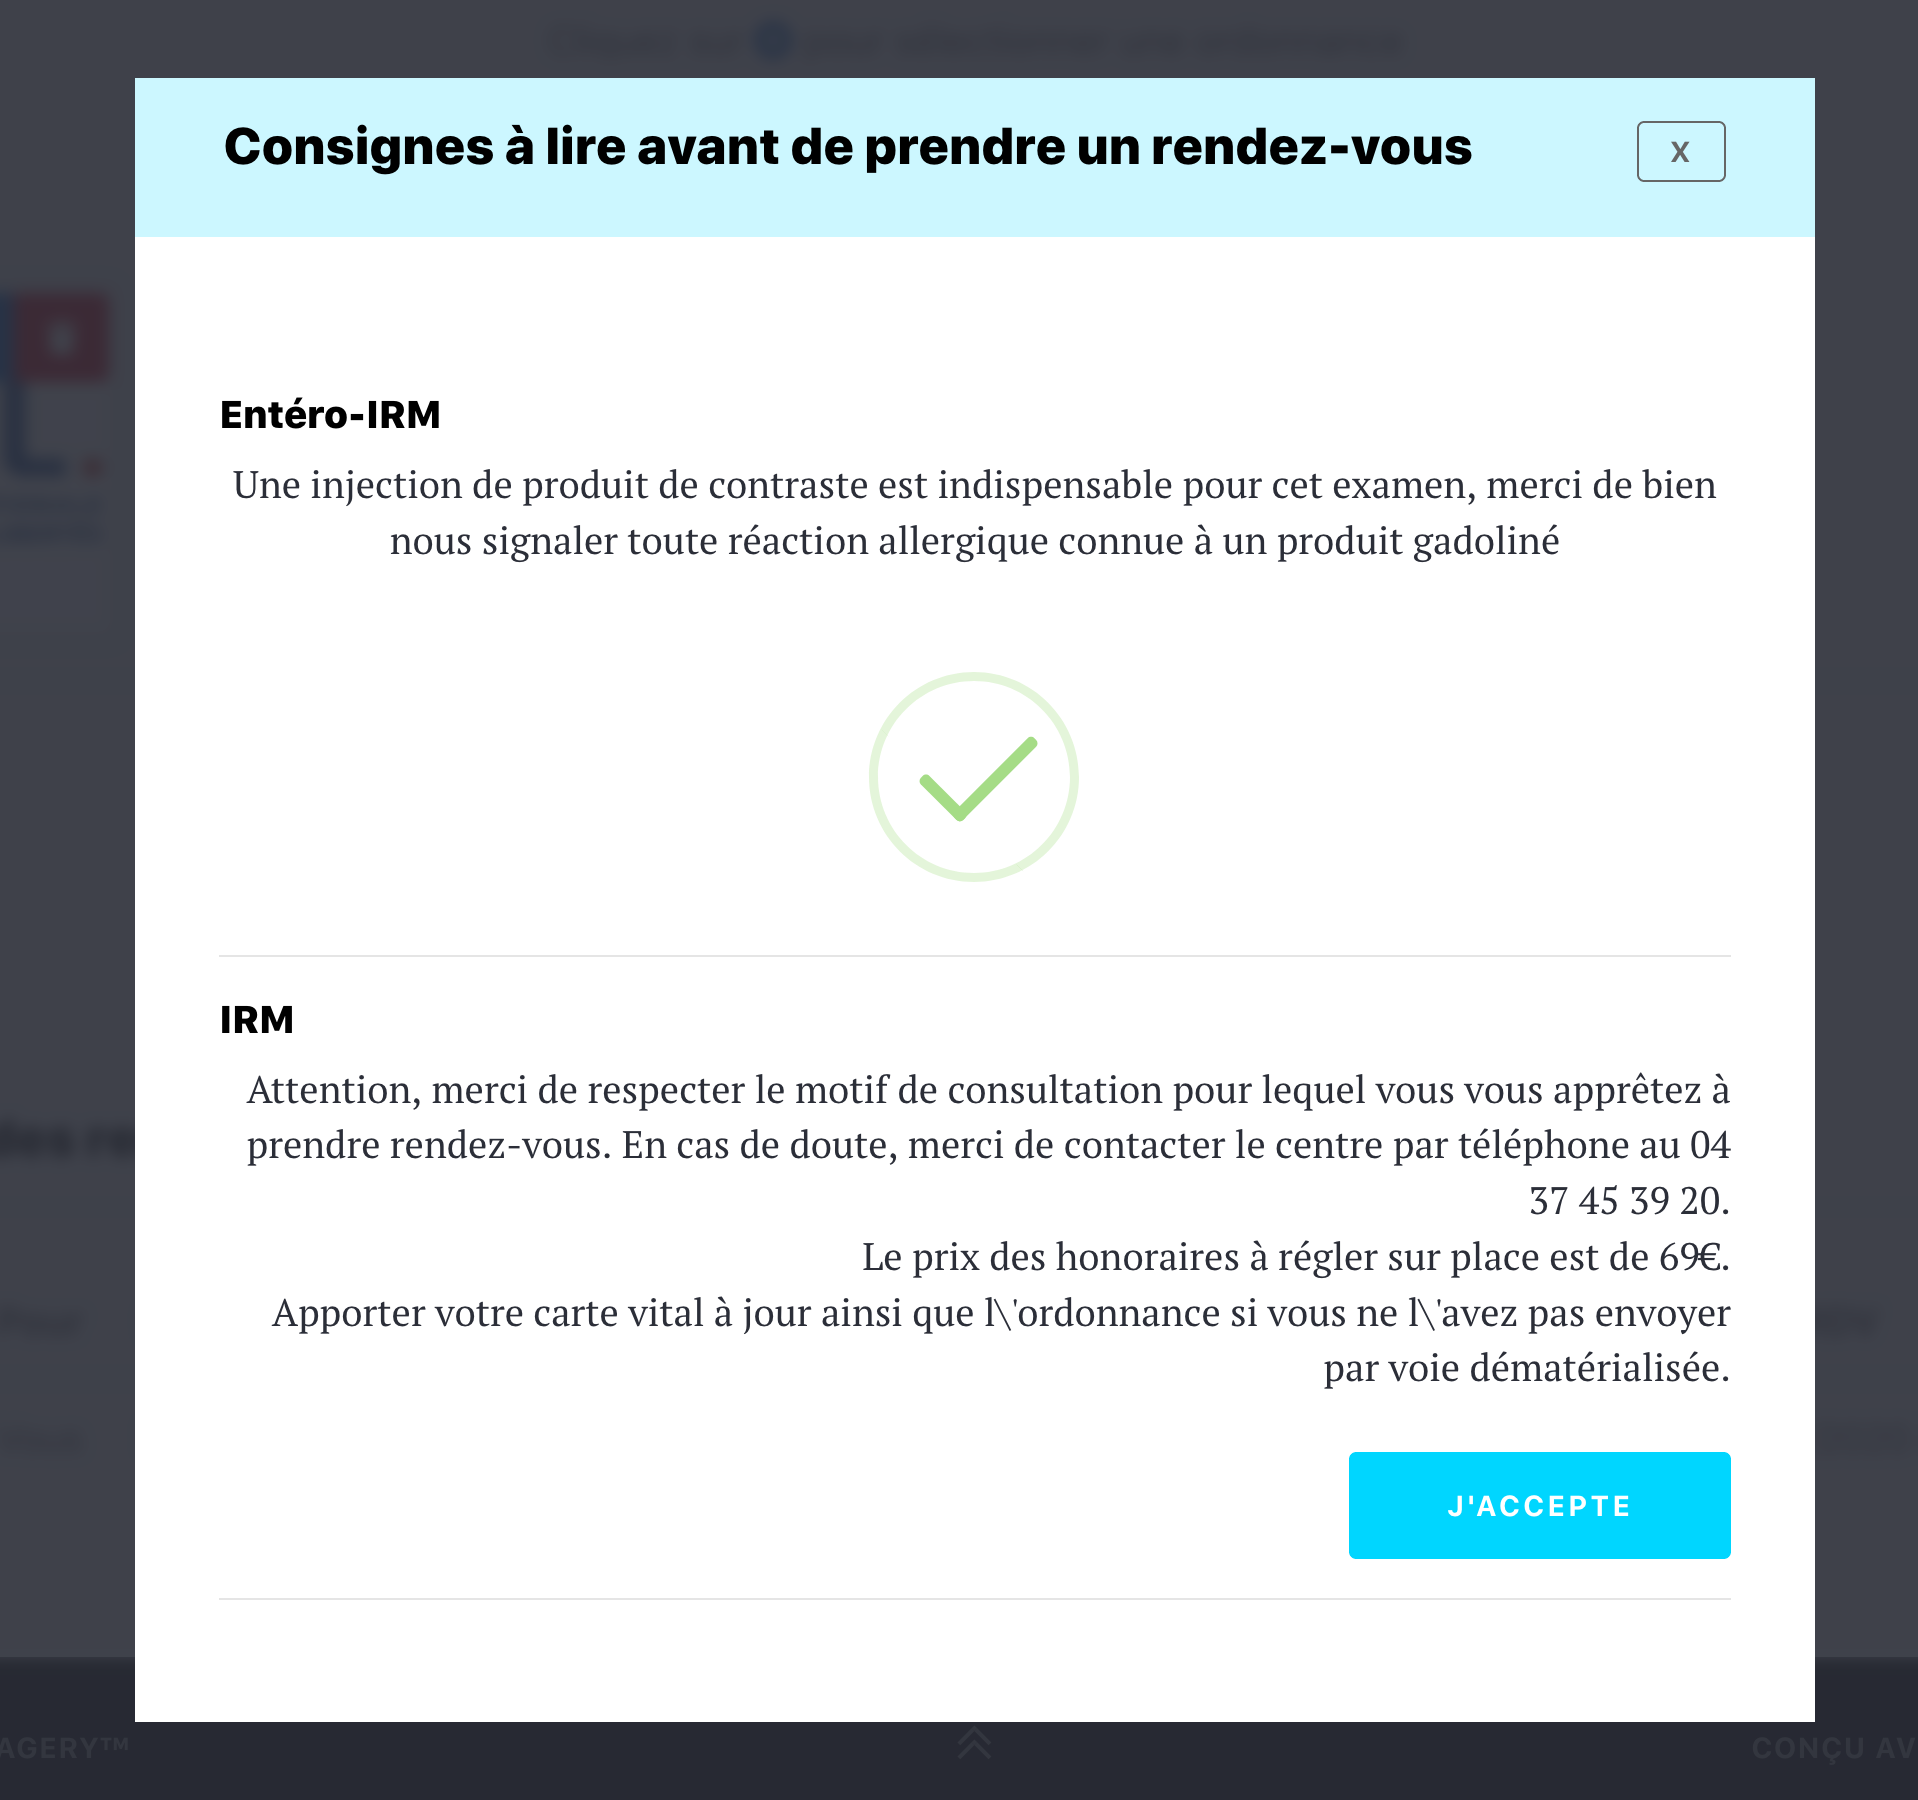
You are then prompted to read and accept the instructions related to the review.
Instructions related to the review
- Read the instructions and confirm by clicking on the light blue button "I accept"
You will be taken (e) to the page asking you to register or sign in to an existing account.
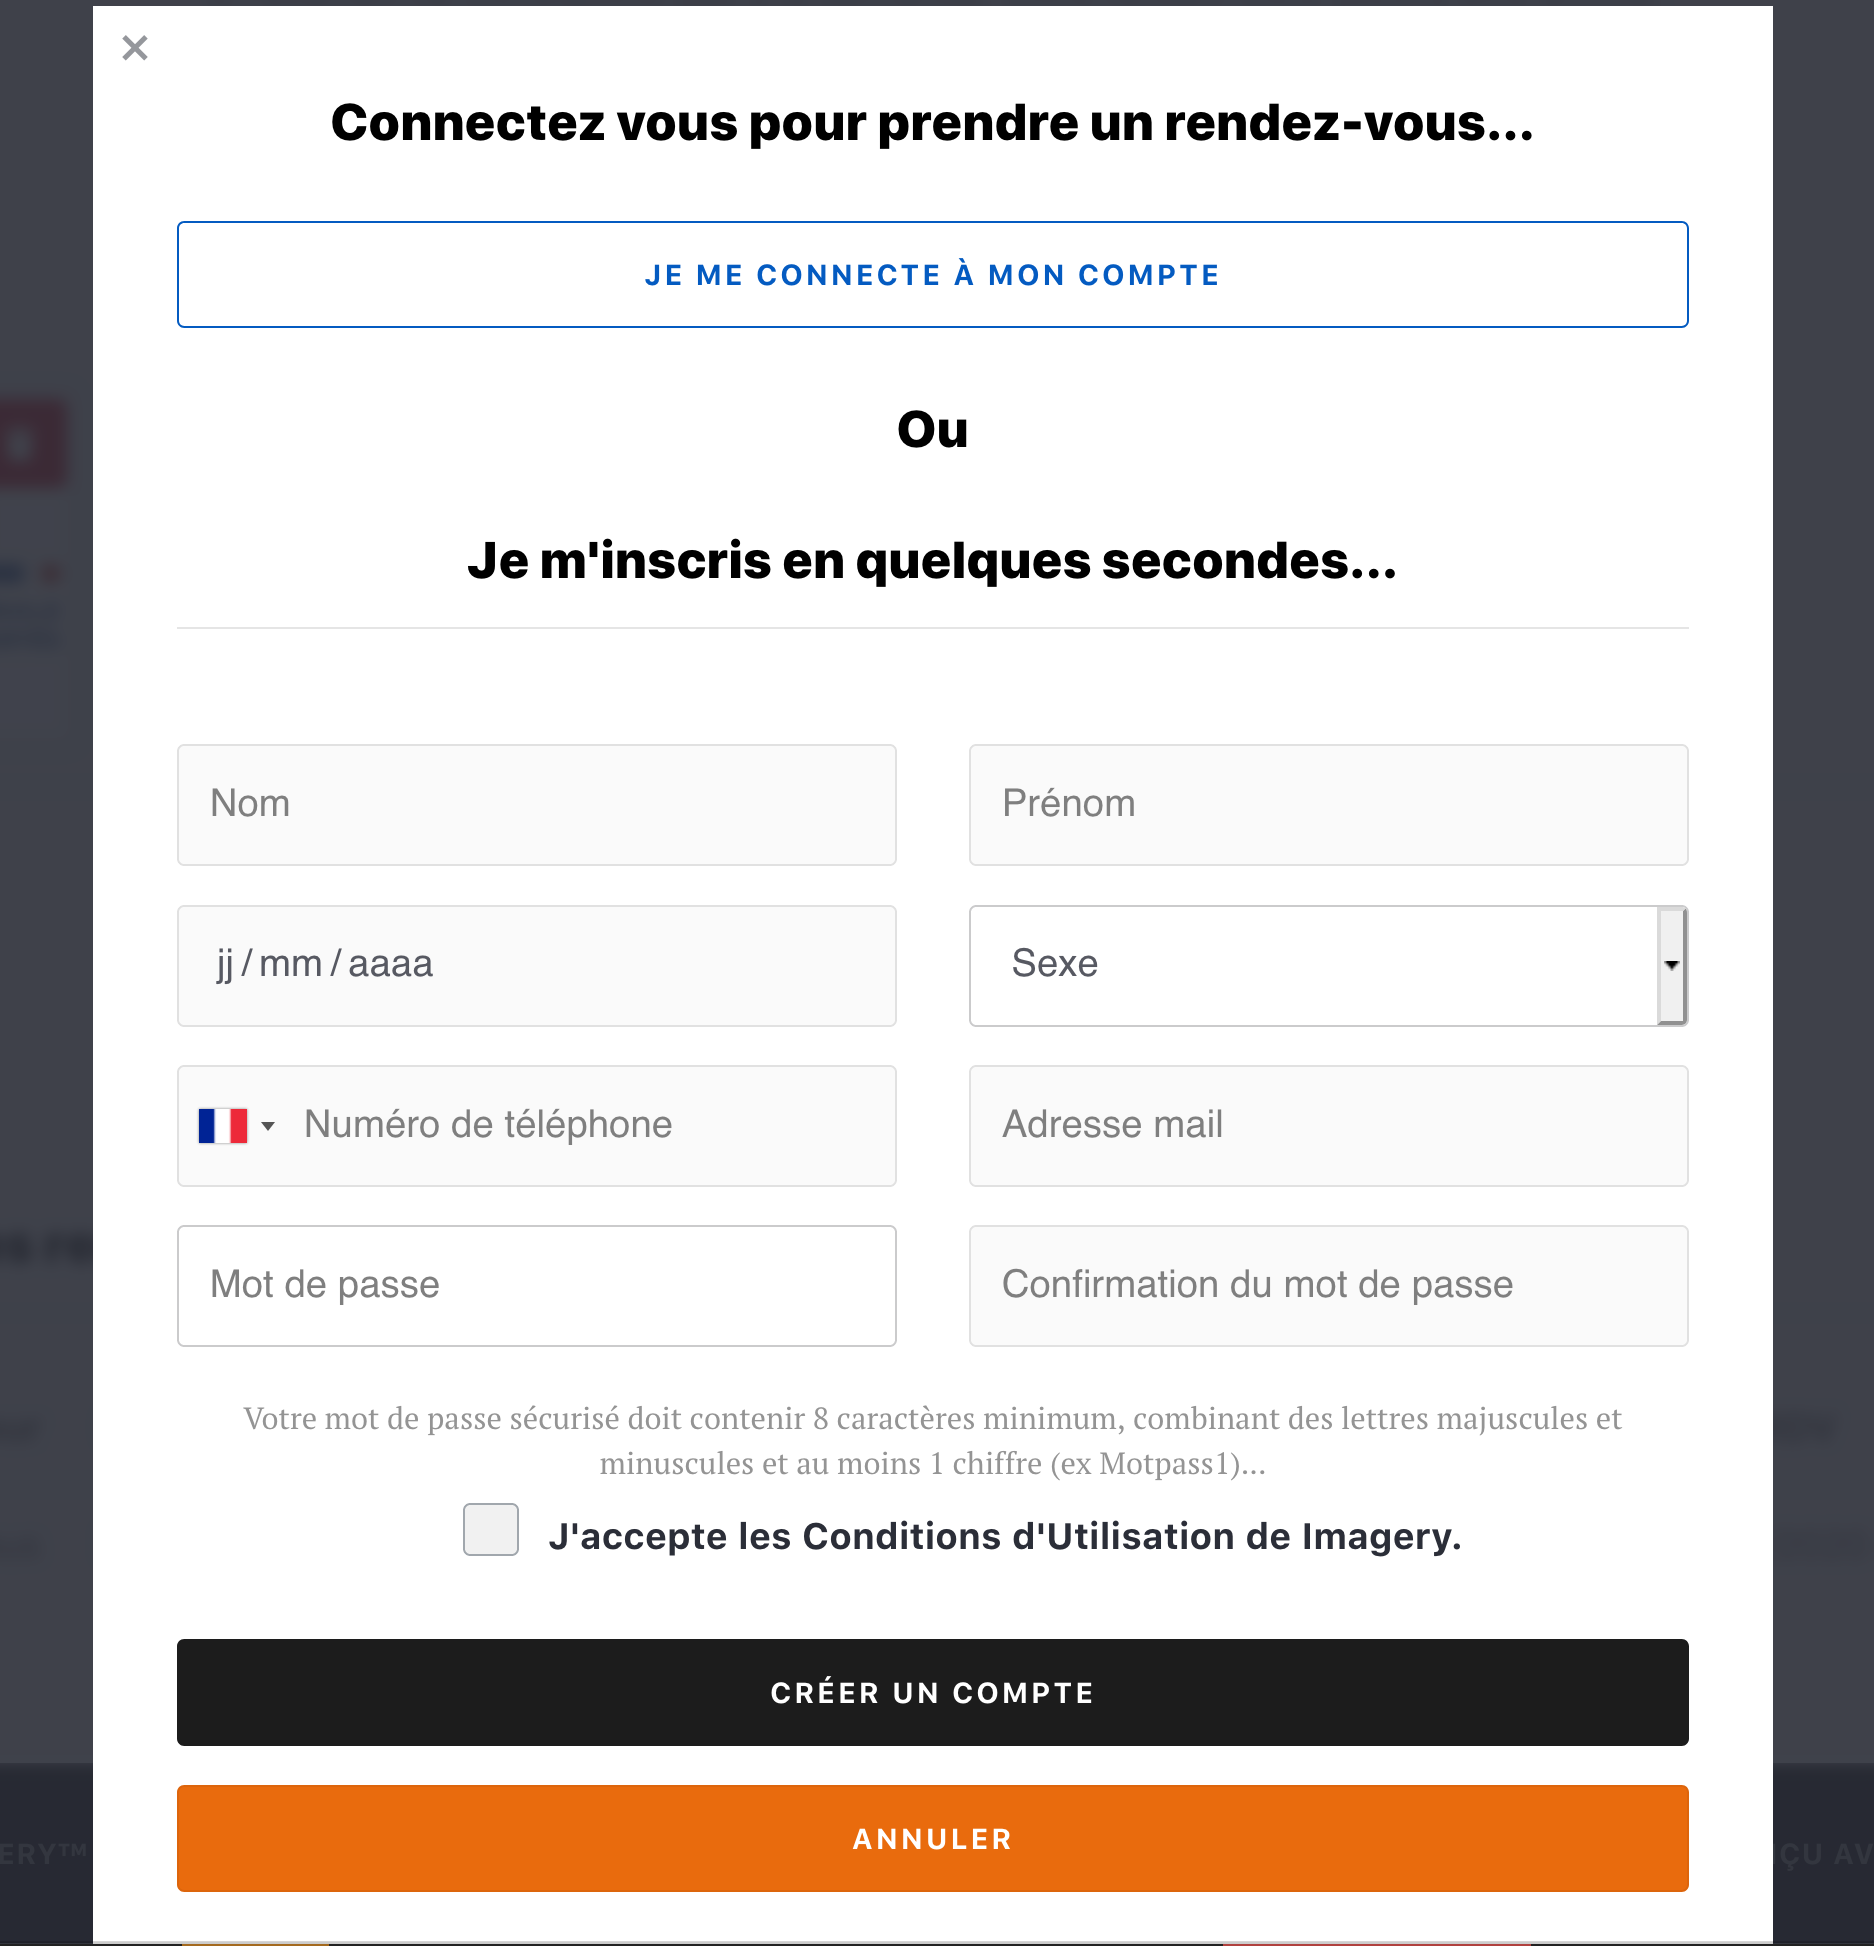
Login or create an account
If you already have an account
- Click the blue button "Login to my account" then contact the email address and password associated with your account
- Cliquez sur "Sign in" to validate.
Your appointment is confirmed and you are redirected to your account.
If you do not have an account
- Complete the form with your details (and not those of a third party)
- Accept the Terms and Conditions (which you can read by clicking on it)
- Click on the black button "Create an account" to validate your account opening
You will receive an authentication code 4 digit SMS on your cell phone. You will need to enter this code to verify your account.
Once verified your phone number, your appointment is confirmed and you are taken to your account.
Warning ! After selecting a niche appointment on the calendar of the practitioner, it is reserved for 15 minutes to allow you to confirm it. After this time, the niche appears again available on the calendar practitioner for all users of the site, and can therefore be taken by another person.
Email Validation of appointments
When your appointment is made, you receive an email defining the status of your appointment to the address associated with the account.
Your appointment is validated
The email informs you that your appointment is validated; is that your appointment was approved automatically by the center and you will receive 48 hours before your appointment an SMS asking you to Comfirmed.
You have 24 hours to confirm your appointment. If confirmation it will be pr remove the center and you will reprogammer another rednez you.
Your appointment is awaiting validation
The email informs you that your appointment is pending approval; is that your appointment has been taken into account and is registered in the agenda of the practitioner but this requires verification by the secretary and you're likely to be called to verify some information.
Once the appointment is validated, you receive a new email informing you the validated status and receive 48 hours before your appointment an SMS asking you to Comfirmed.
-
Make an appointment
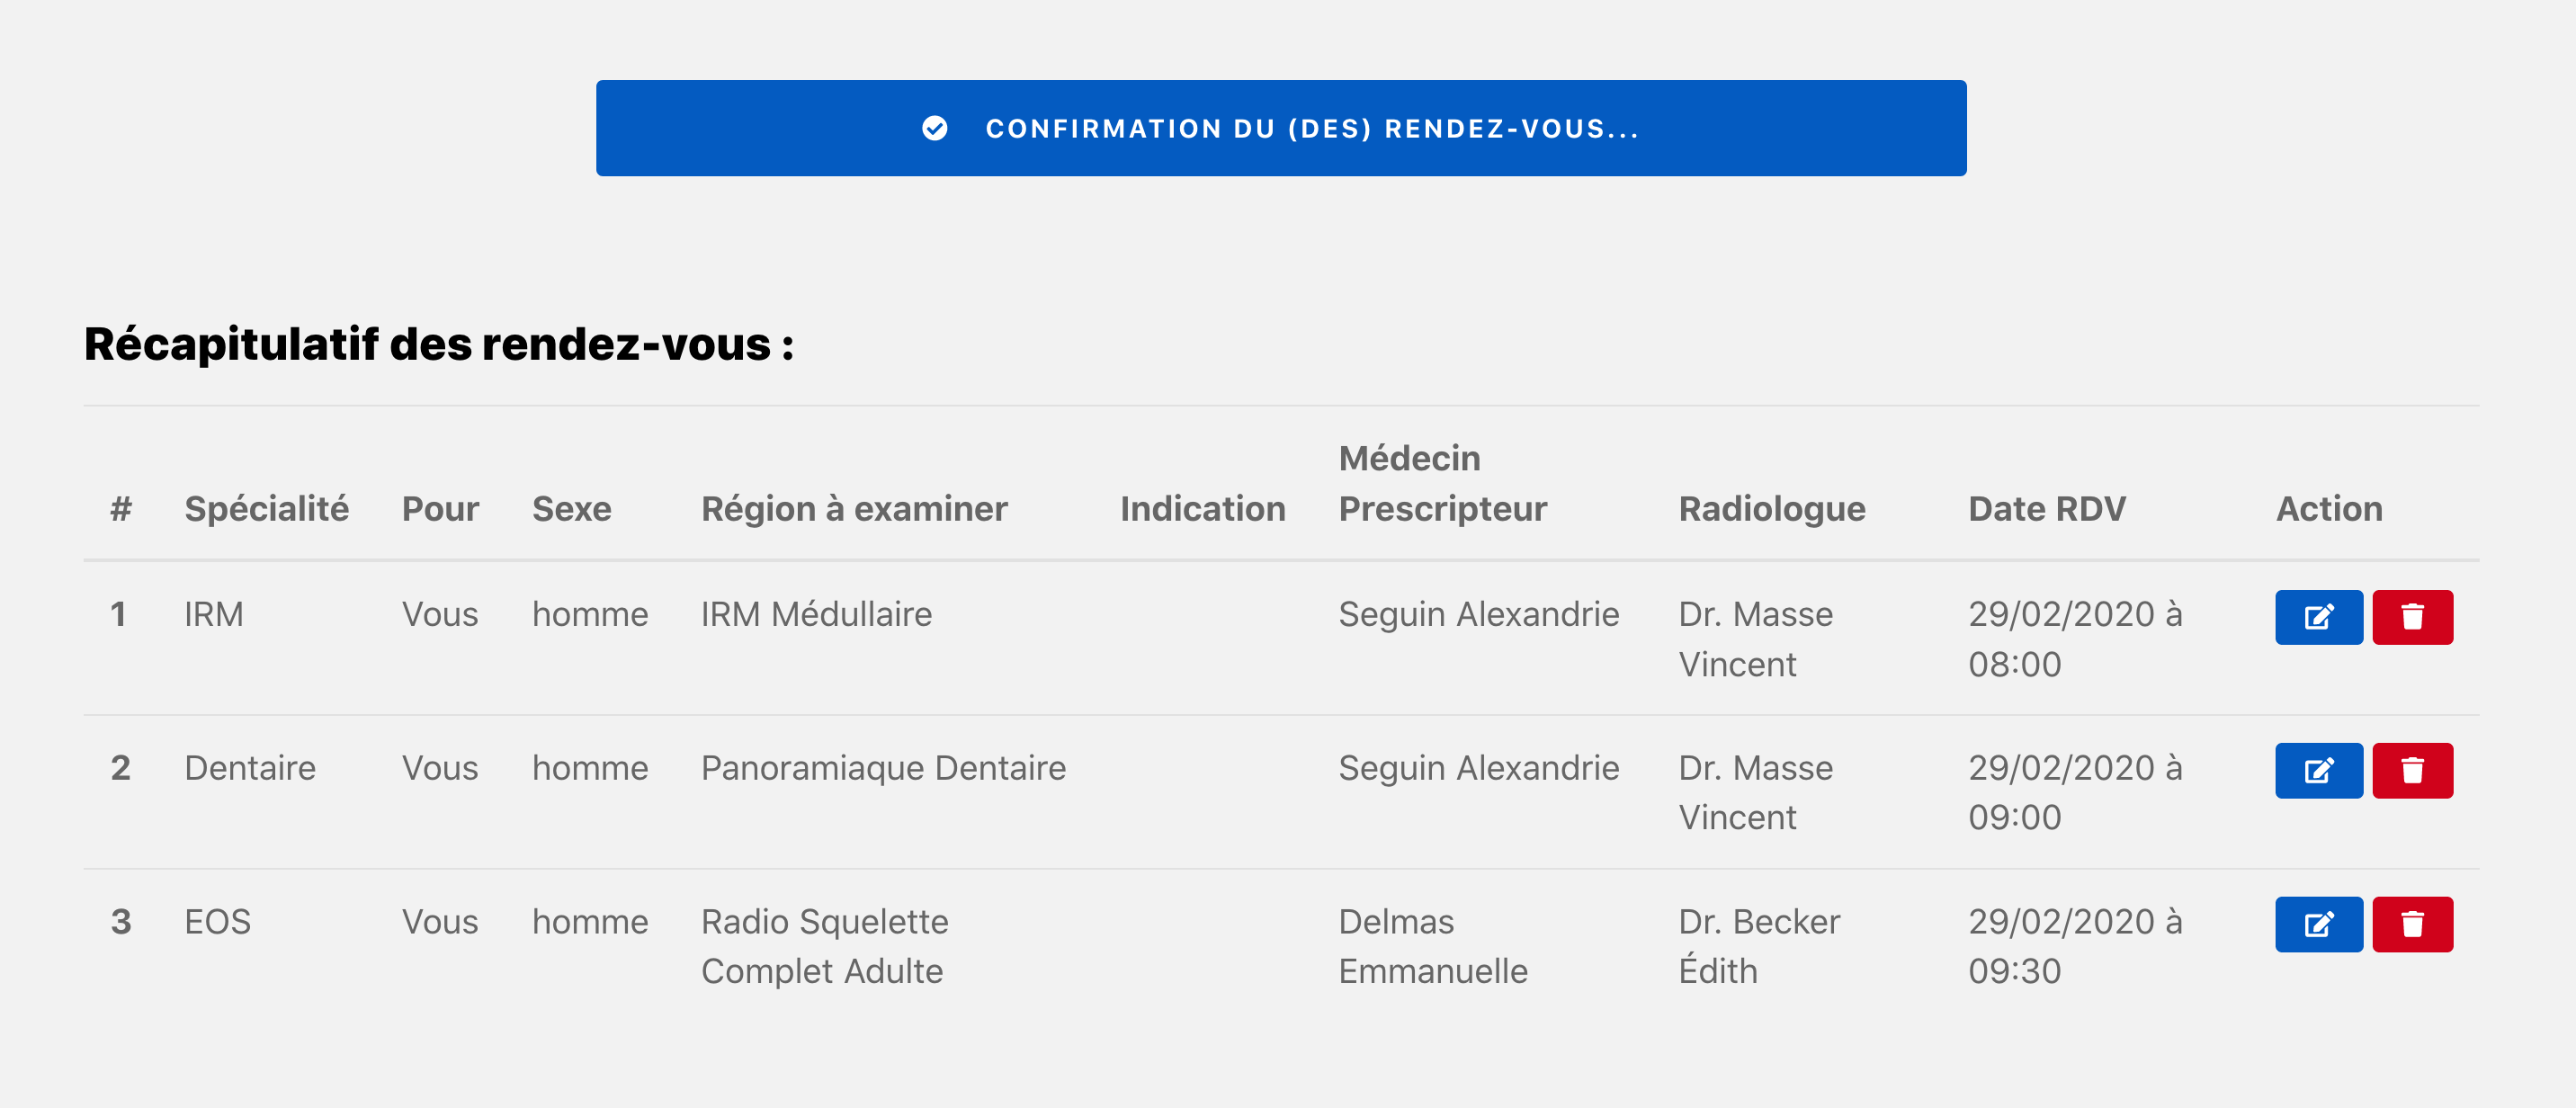
Take several appointments
Select several appointments
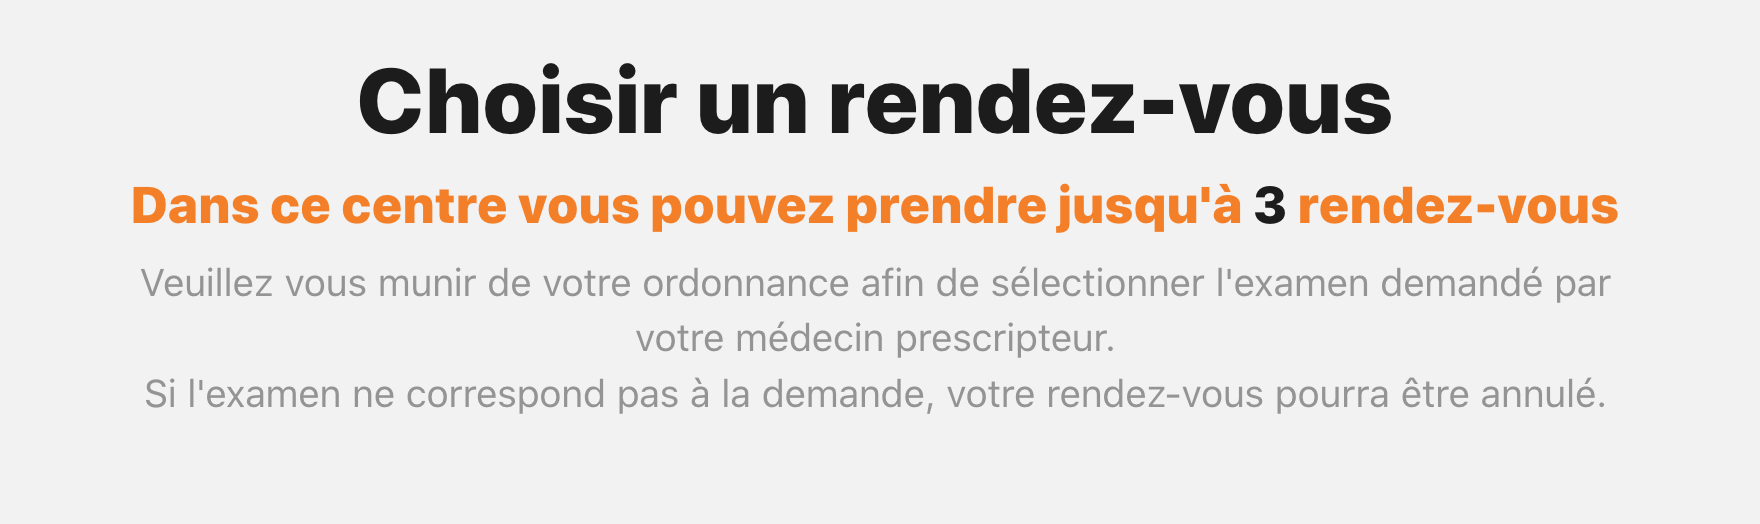
It is possible to book more appointments slots in one take.
The number of appointments that can be taken in a single dose depends on each center. This is indicated at the beginning of taking appointments :
- Follow the steps in making a niche appointments clicking on the link Choose and confirm a time slot
- Once all previous steps for choosing the first appointment, click the green button "Associate a second appointment".
You are then redirected to the top of the page to repeat the steps of choosing the exam.
After selecting all your appointments, click the black button "Search an appointment".
- Choose the hours that suit you among the available slots
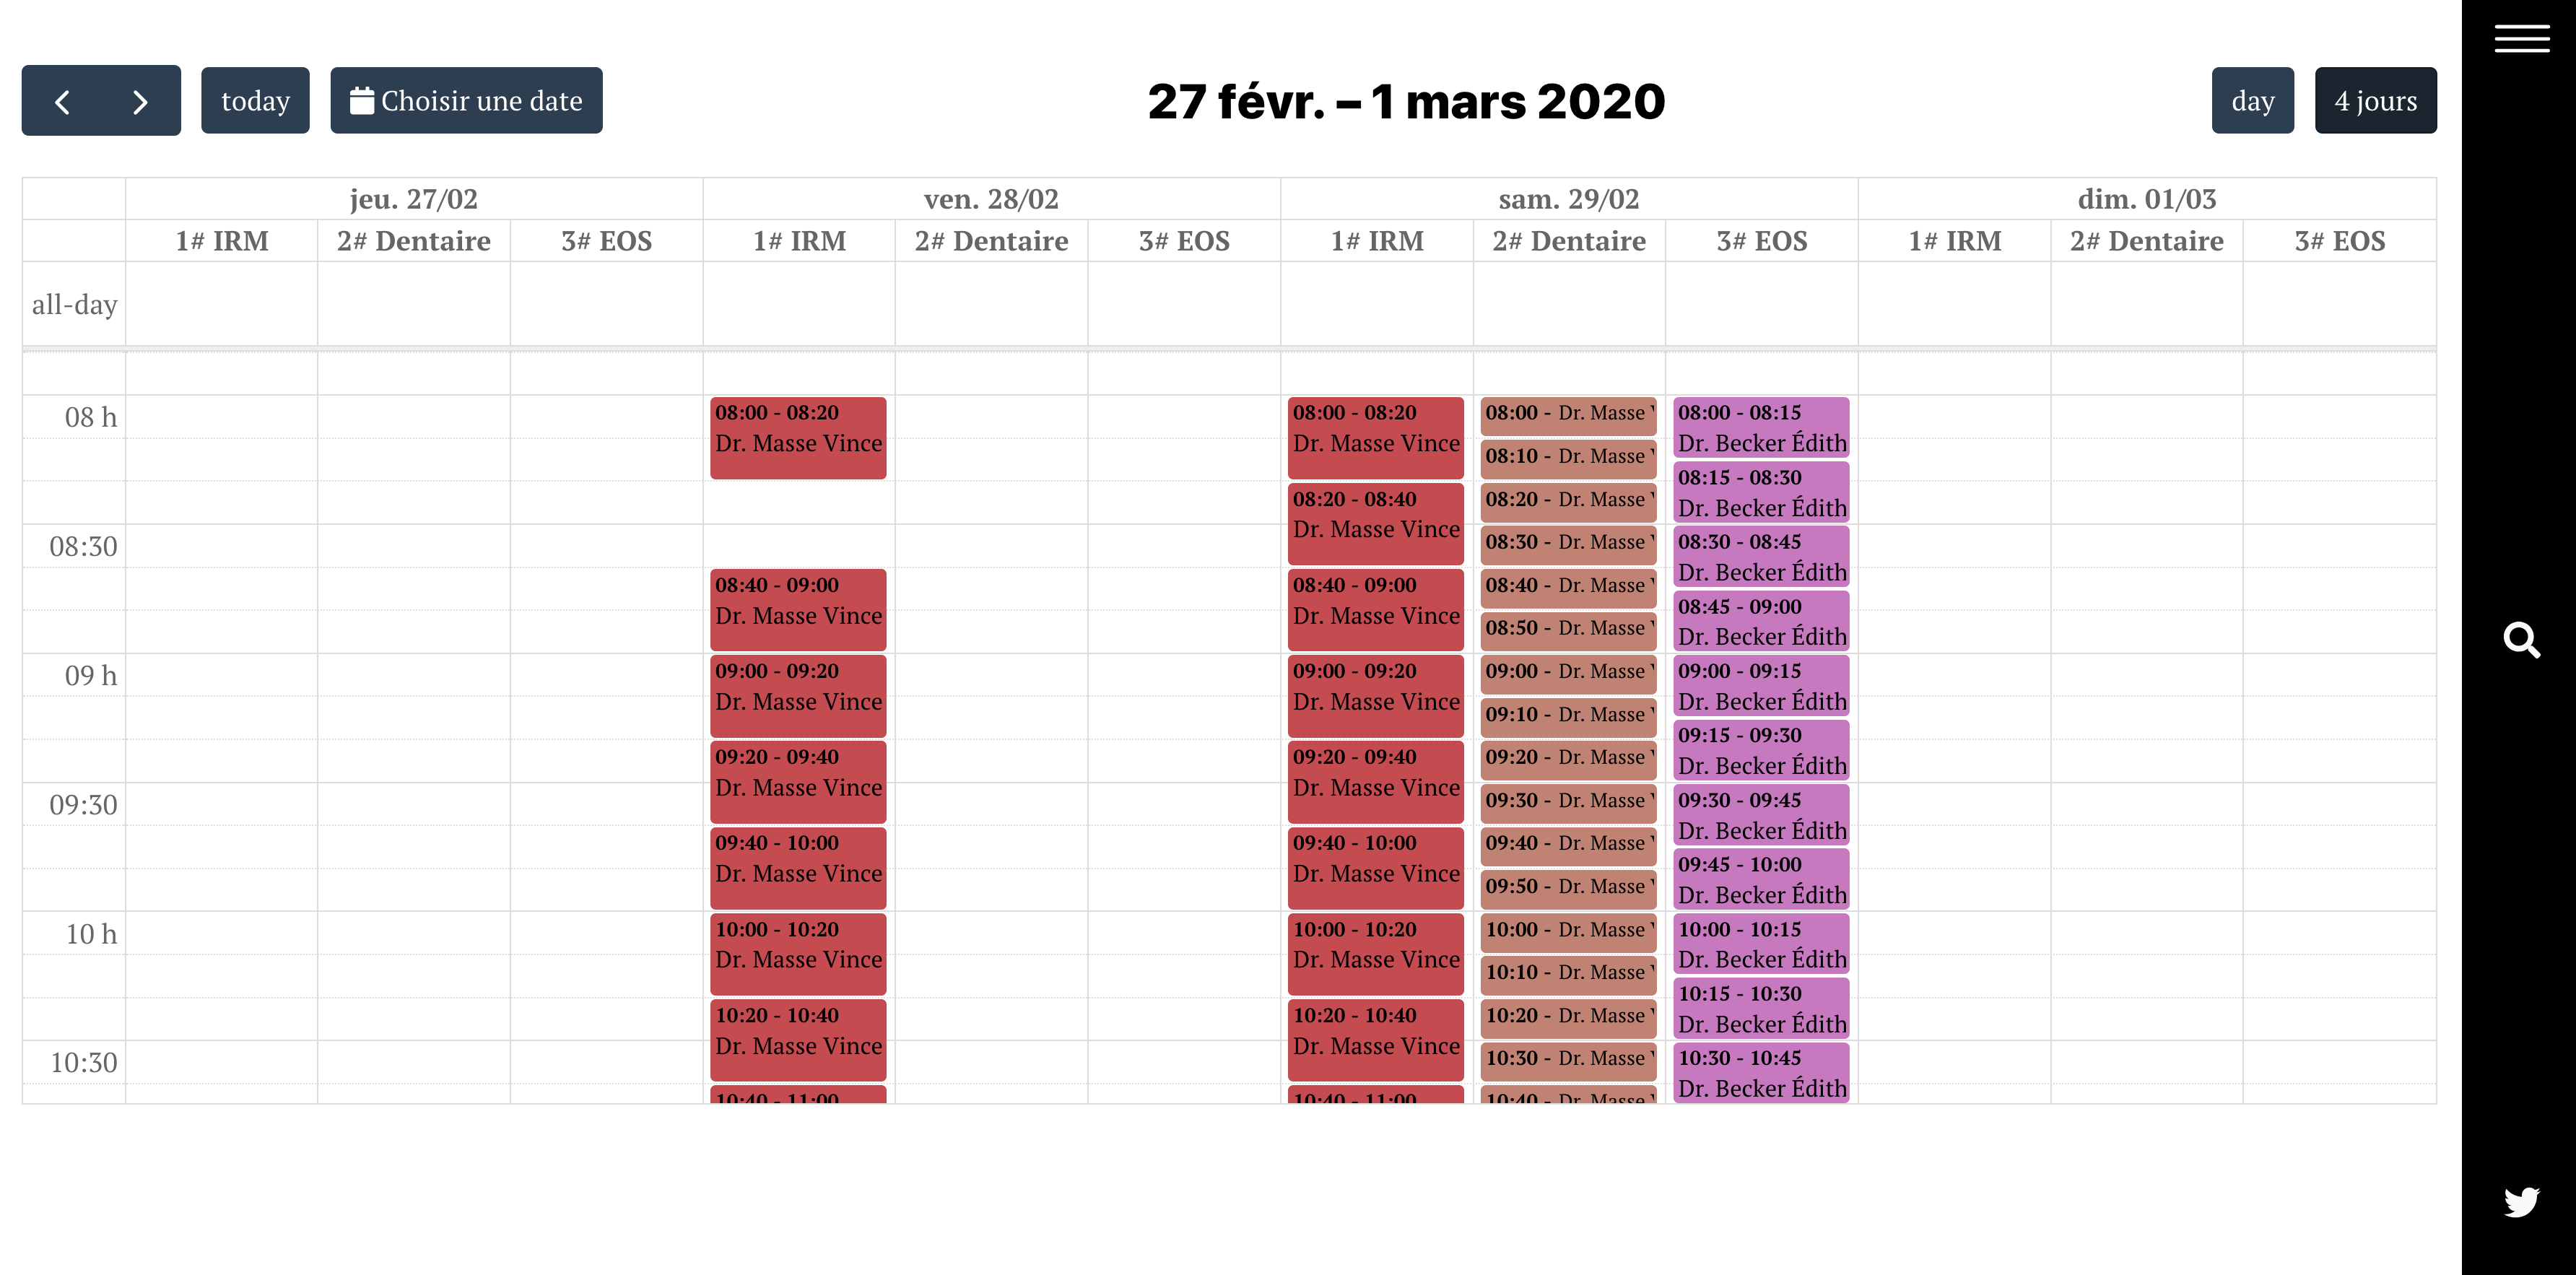
A color code allows you to easily differentiate different imaging specialties.
If you want to consolidate all your appointments that day and if the Center allows, you have the option to do so by clicking on the button "Group all appointments on the same day" at the top right of the calendar. In this case, the proposal times may lie.
- Once all your appointments selected, send a document if you have the opportunity. Check out this step by clicking the link Send a document
- Confirm by clicking on the blue button "Confirmation of appointment(s)"
- A summary table informs you of all your choices
- Confirm the instructions of the review. Check out this step by clicking the link Instructions related to the review
- Log into your account or register to finalize your decision appointment. Check out this step by clicking the link Login or create an account
- Check your mailbox to see validation of your appointment. Check out this step by clicking the link Appointment validation email
Constraints associated with making multiple appointments
Some medical specialties / paramedics are subject to a rule preventing the patient to hold two appointments on the same day with the same practitioner.
If at the time of confirmation the site tells you that you have a scheduled appointment on the same day, you are invited to choose another date or to change the niche of your appointment made directly into your account.
If you need to combine two appointments close together, it will be enclosed the center to complete the second appointment, by phone.
For shooting several appointments the same day, a delay between each appointment is necessary. You do not take two appointments at the same time.
-
Make an appointment
Enable disclaimer alert and be put on the waiting list
How to be registered on the waiting list
You can register for the waiting list and be alerted via SMS and email when a niche appointment is released before the one you have confirmed.
The discontinuance is activated alert from the confirmation page of your appointment.
If the alarm is not activated at the time of confirmation, however, you will have the opportunity to do so by logging into your personal space.
The alert is not automatically offered when making an appointment. It depends on the time of appointment.
The minimum time to qualify for the waiting list is 14 days.
- To register on the waiting list, check Yes the reservation message of a niche
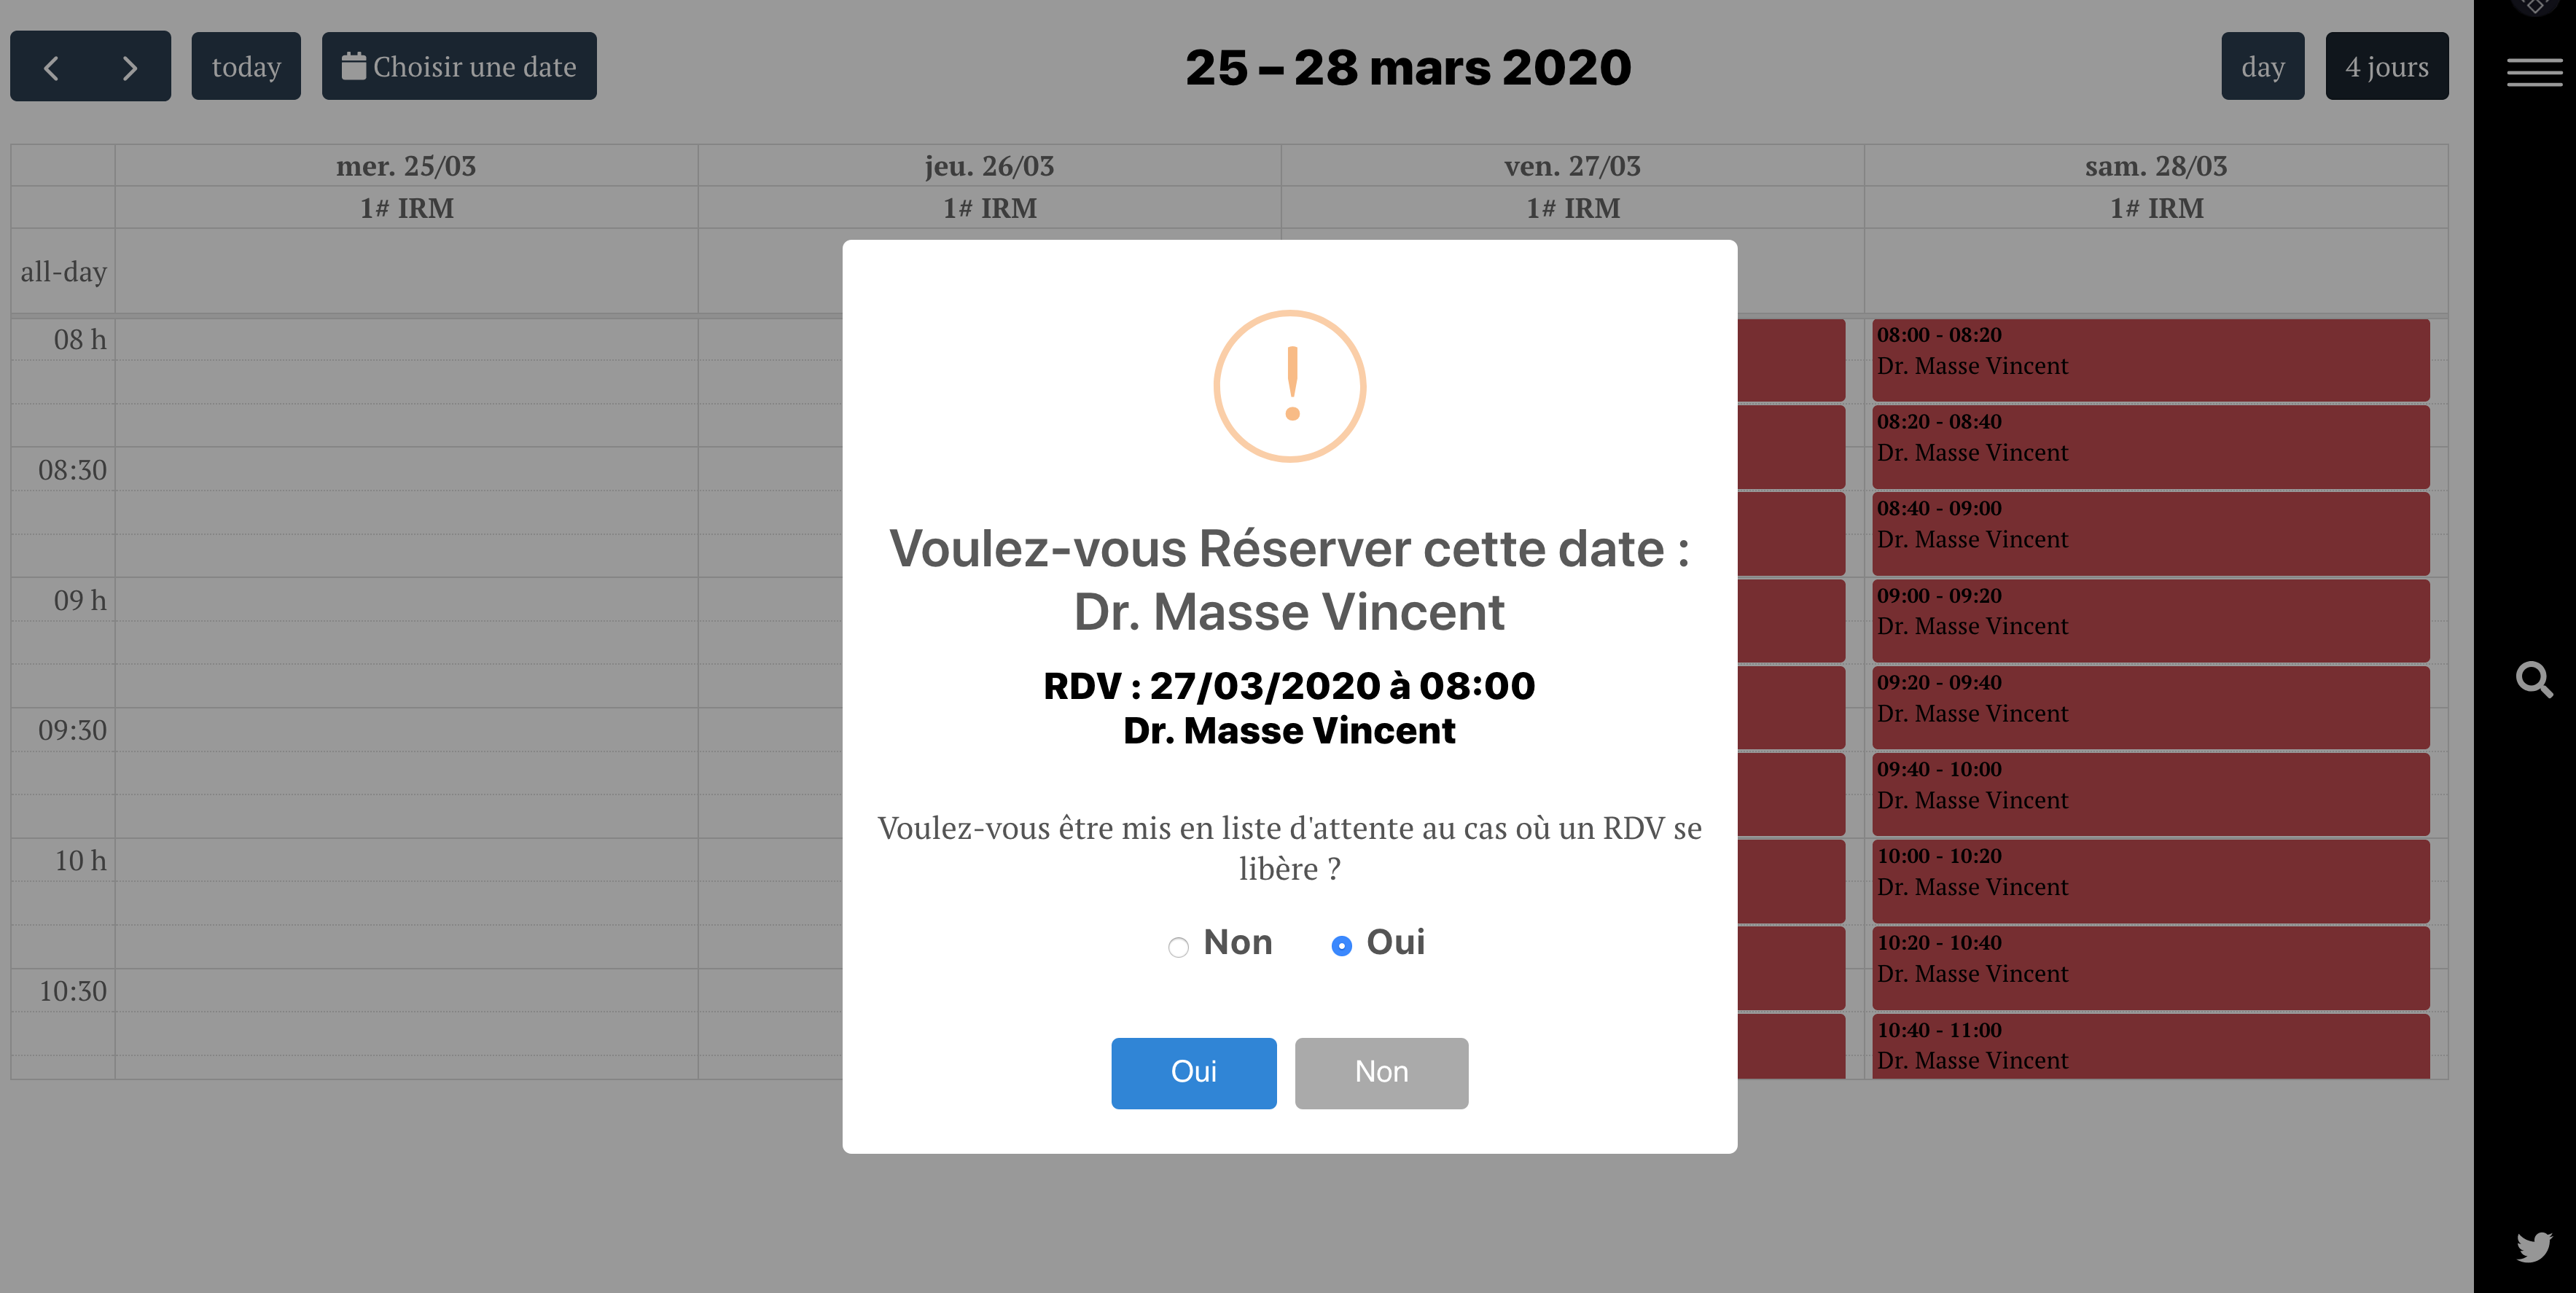
enabled alert; notifications
When an appointment is free, you receive a message with a link.
- Click the link to view the proposed appointment
- If the new niche appointment for you, click on the button "Take this slot". Your initial appointment will be canceled automatically and you will leave the waiting list that was associated only to the initial appointment.
If the new appointment does not suit you, click on the button "Keep the initial appointment". You are still on the waiting list and receive new notifications.
If opening the message the appointment has been made in the meantime by someone else, you will receive new proposals when appointment becomes available.
Warning ! the cancellation alert remains active until the date of your initial appointment if you have not accepted a new niche appointment. An appointment withdrew niche will be visible to all users on the agenda of the practitioner.
How to disable the alert
You can disable the alert at any time if you no longer need.
- Login to your account from the button Patient login
- Click on the button "My agenda" top left

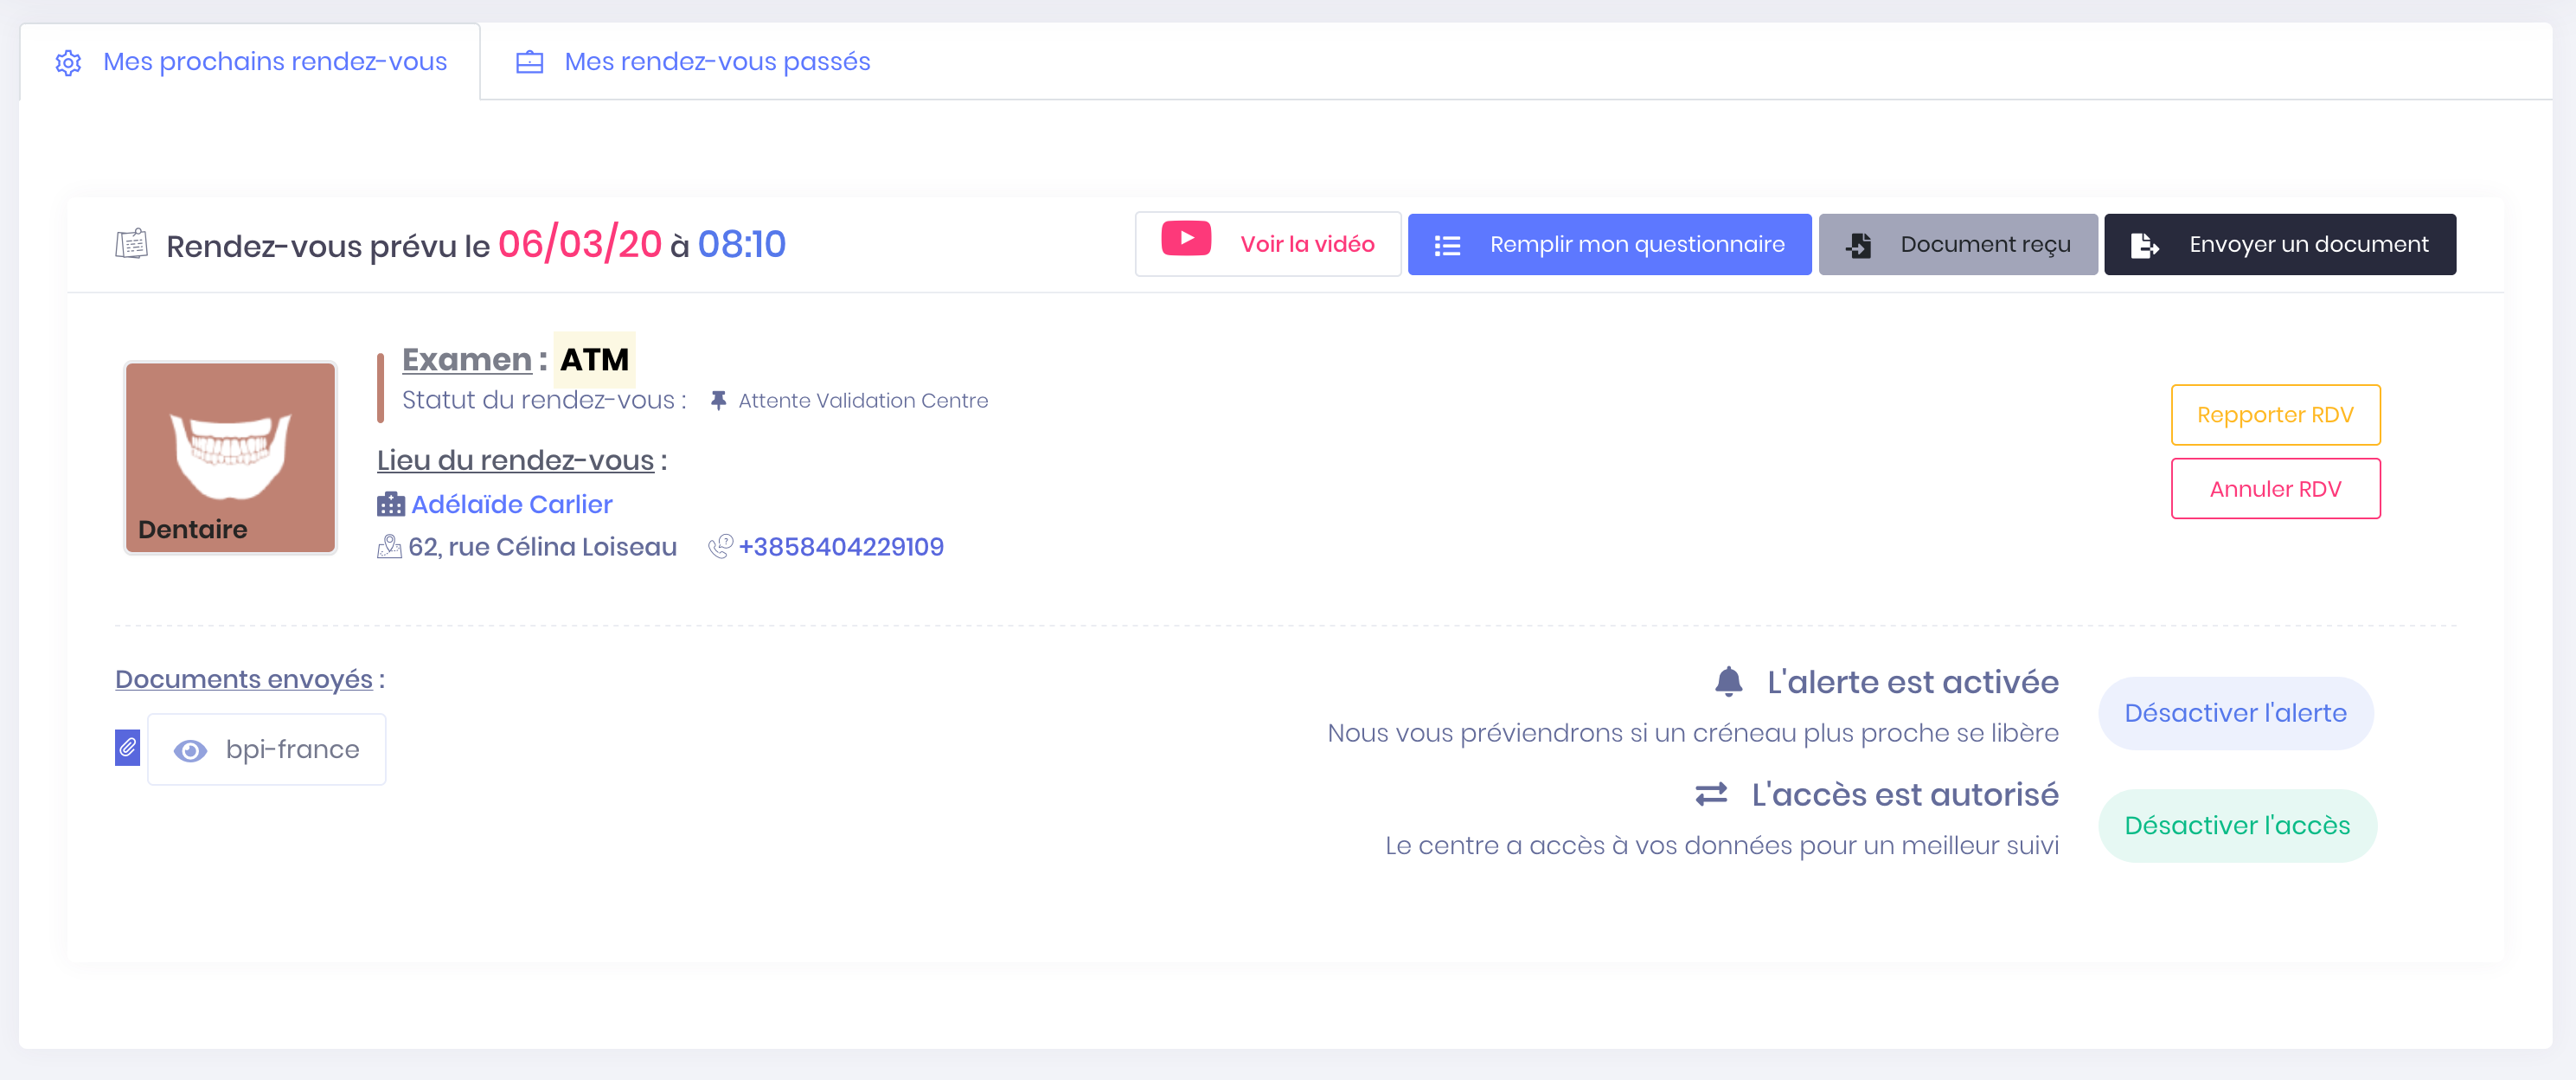
- In the section "My next appointments", Select the appointment in question and click the blue button "Deactivate the alert" to disable
A new button appears : "Activate the alert". You can activate the alert again by clicking it.
If the button "Activate the alert" no longer appears it means that your appointment is present in less than 10 days.
Cette partie est encore en cours de réflexion, des modifications sont possibles...
-
Make an appointment
Unable to make or confirm appointments
In progress...
Appointments history
-
Appointments history
Access your upcoming appointments
Access your recorded meeting after making an appointment
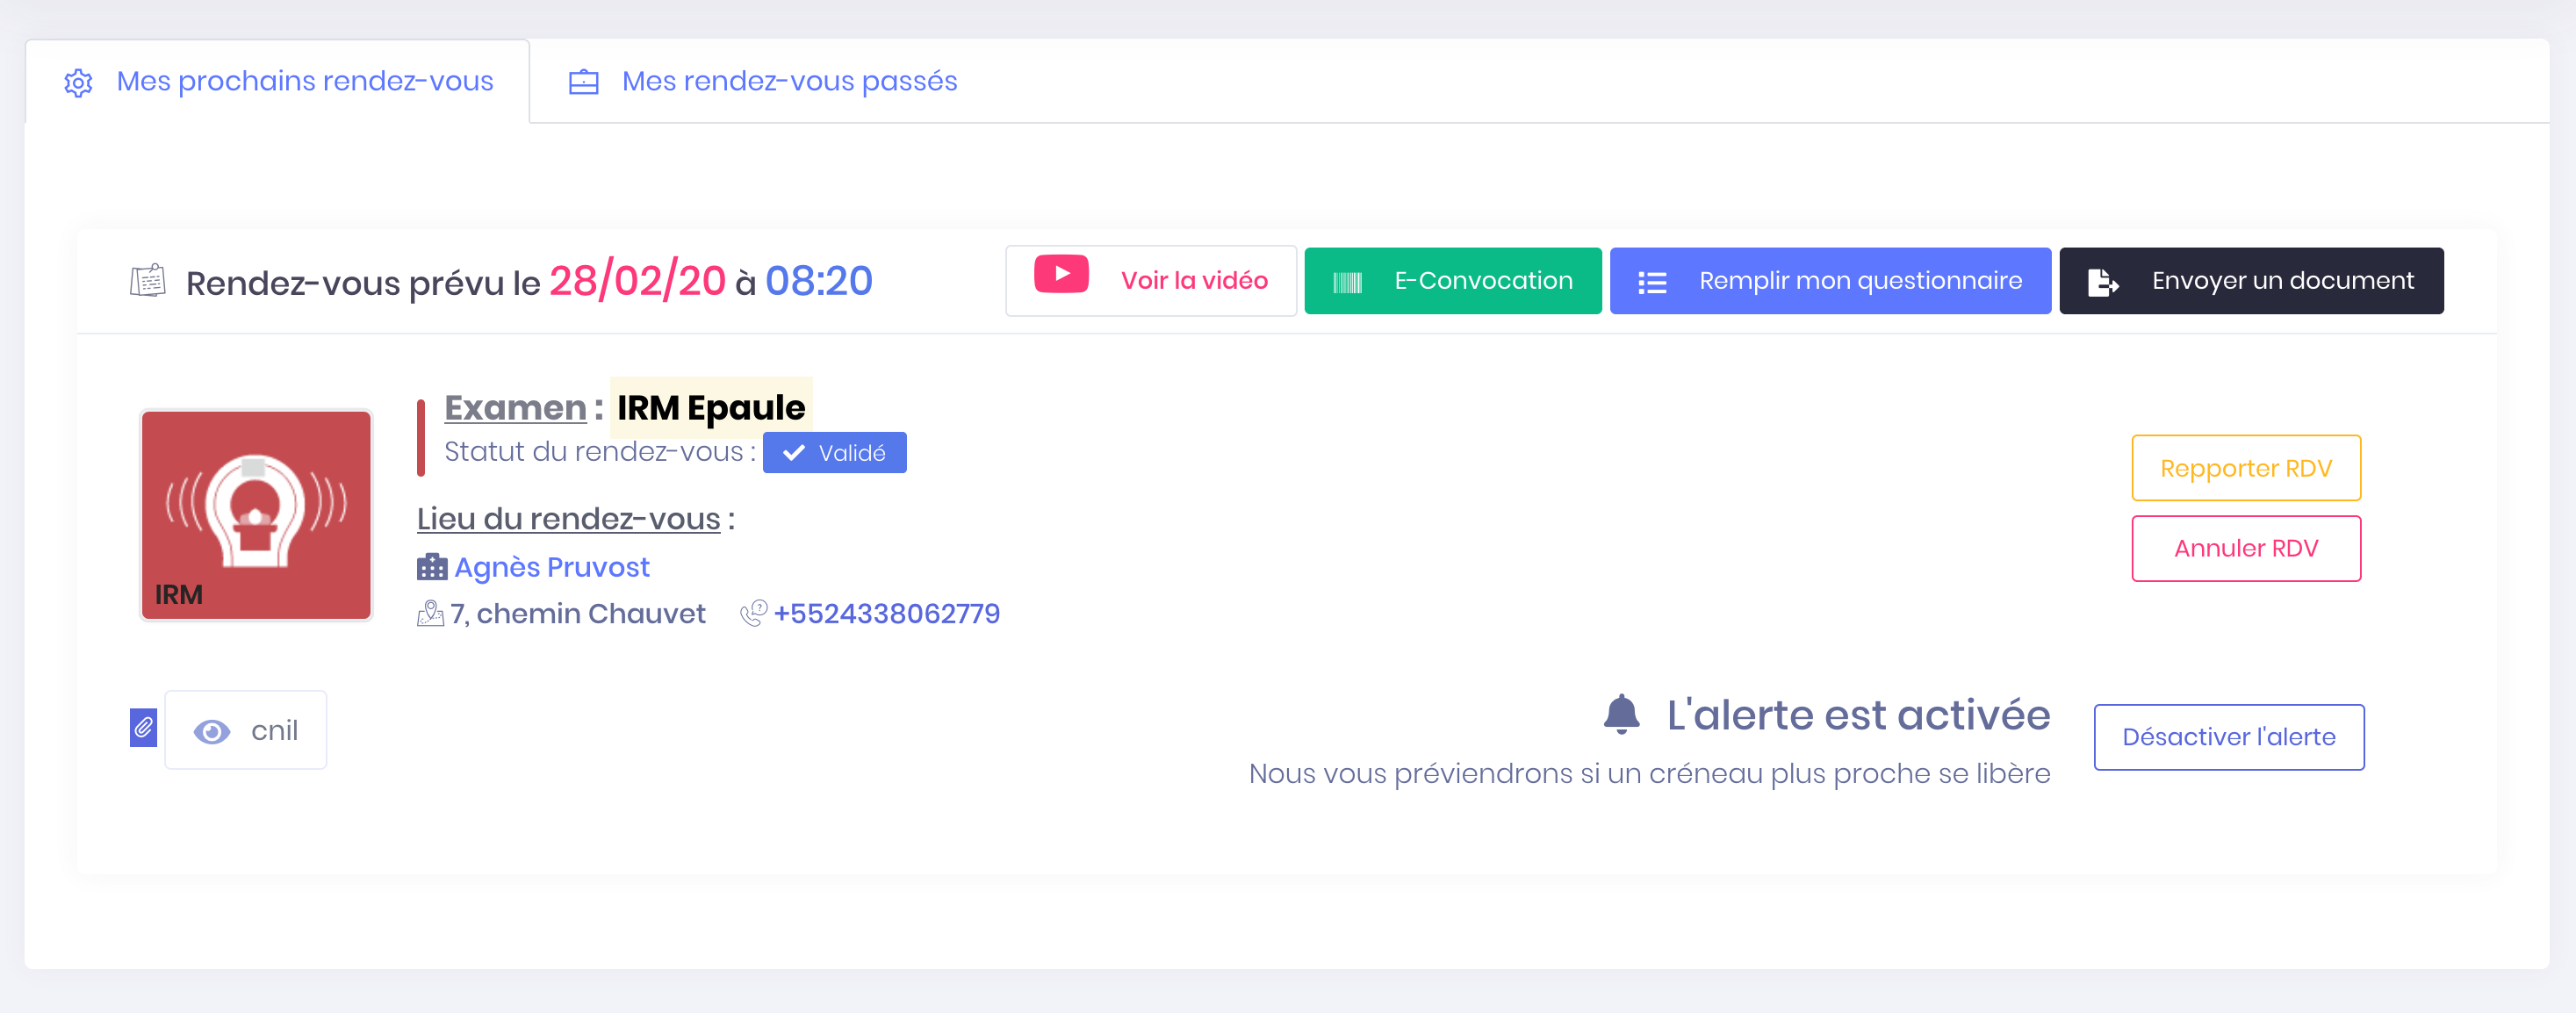
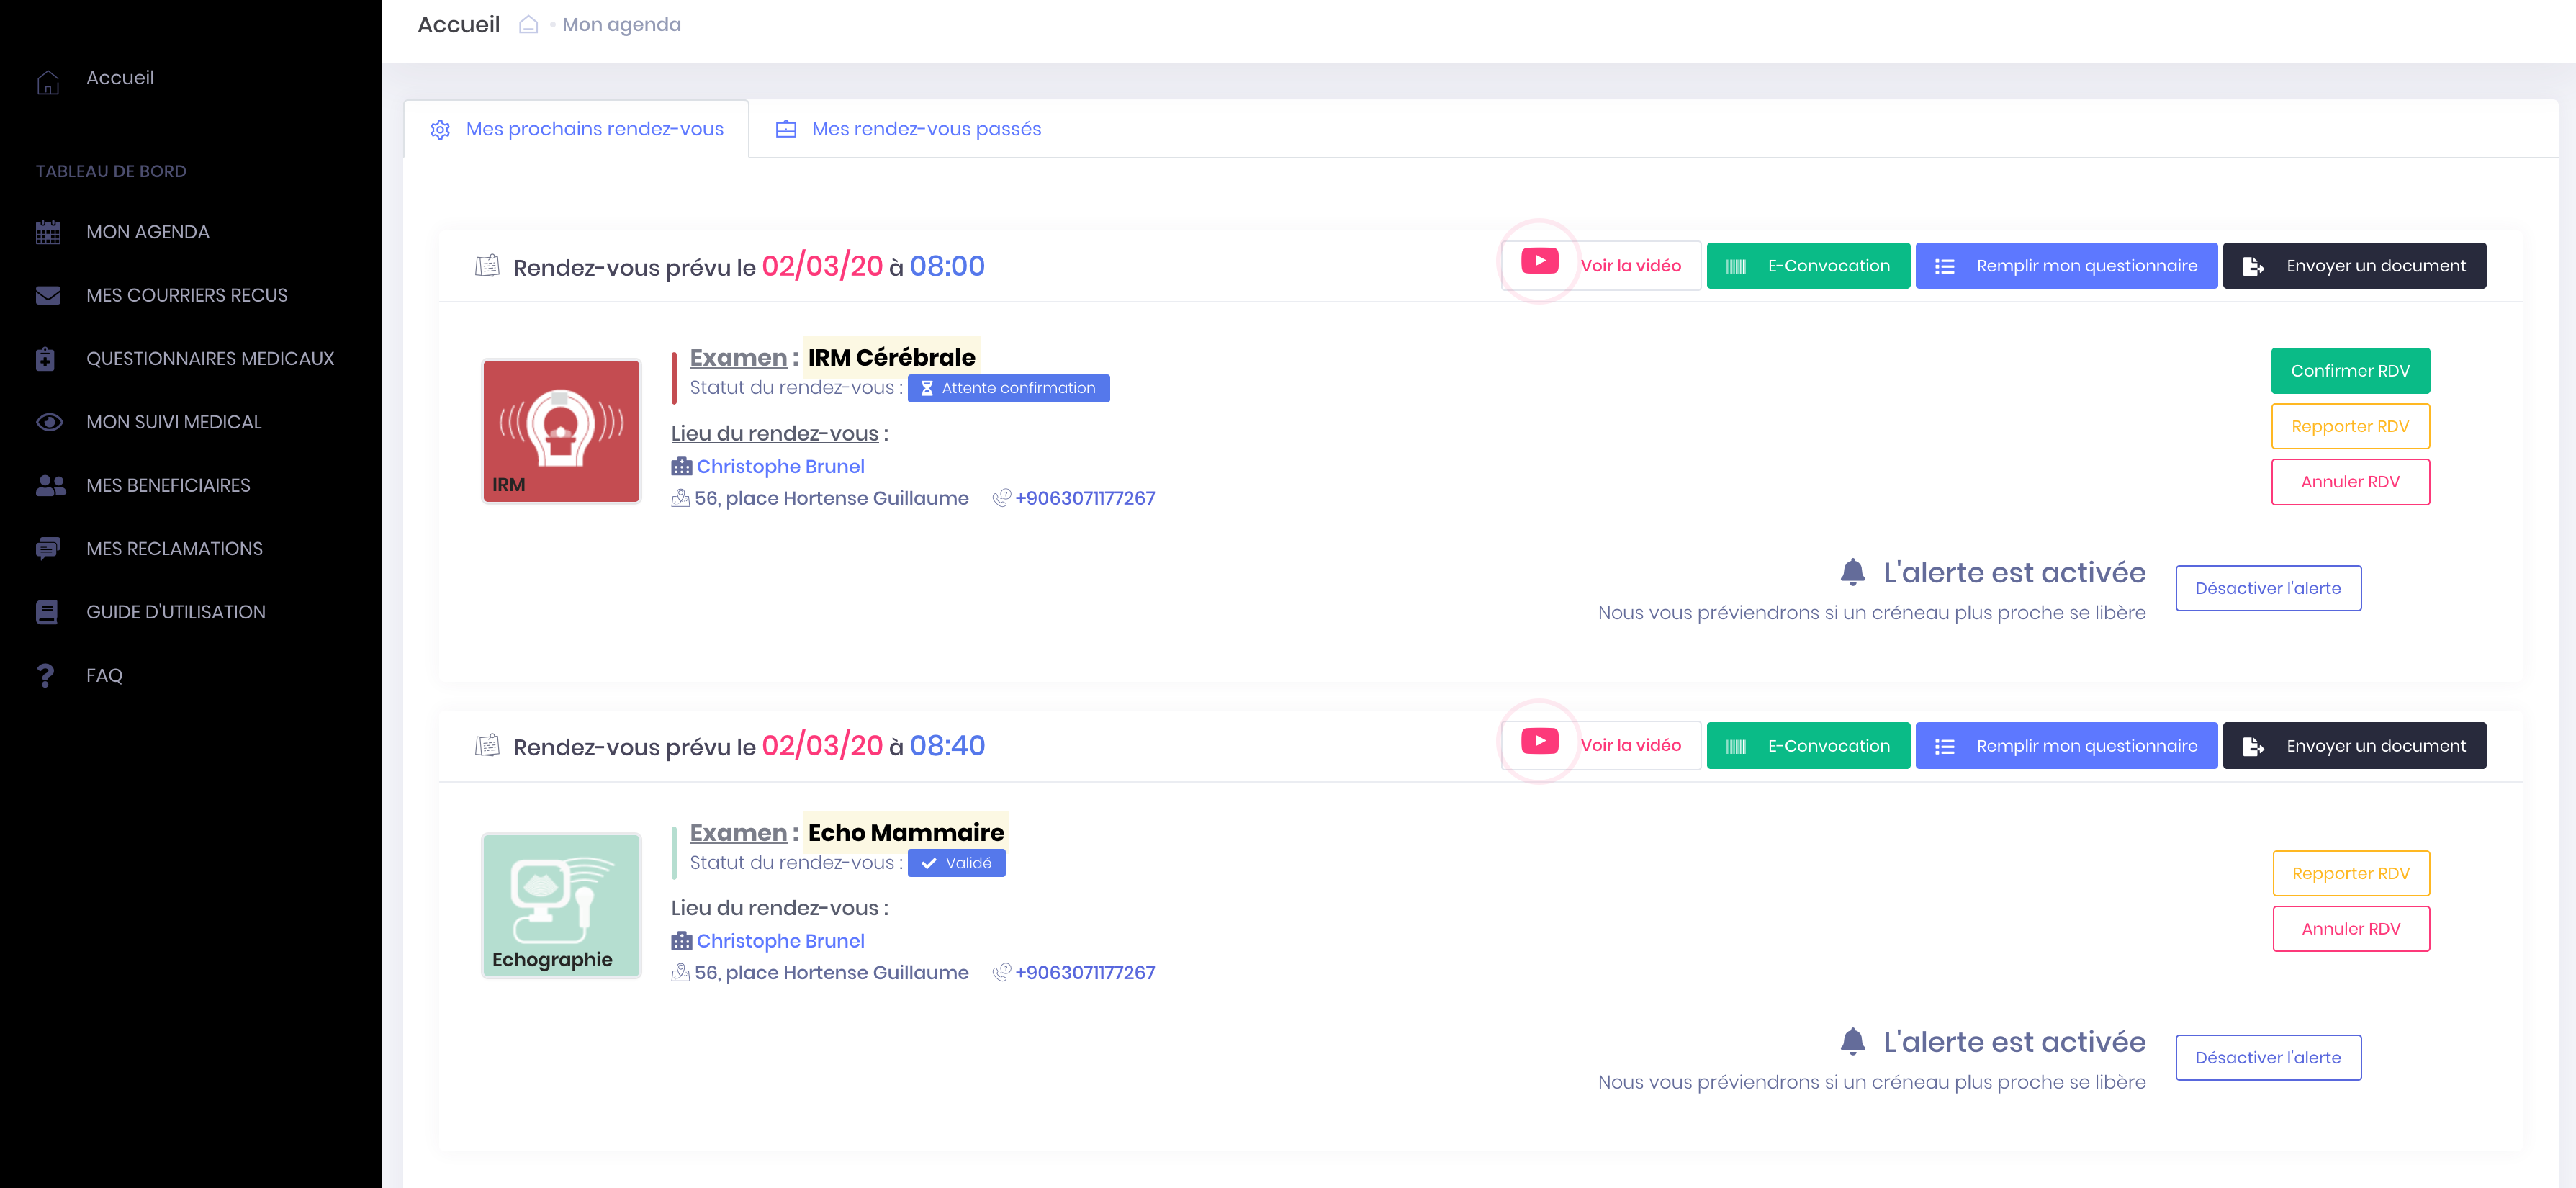
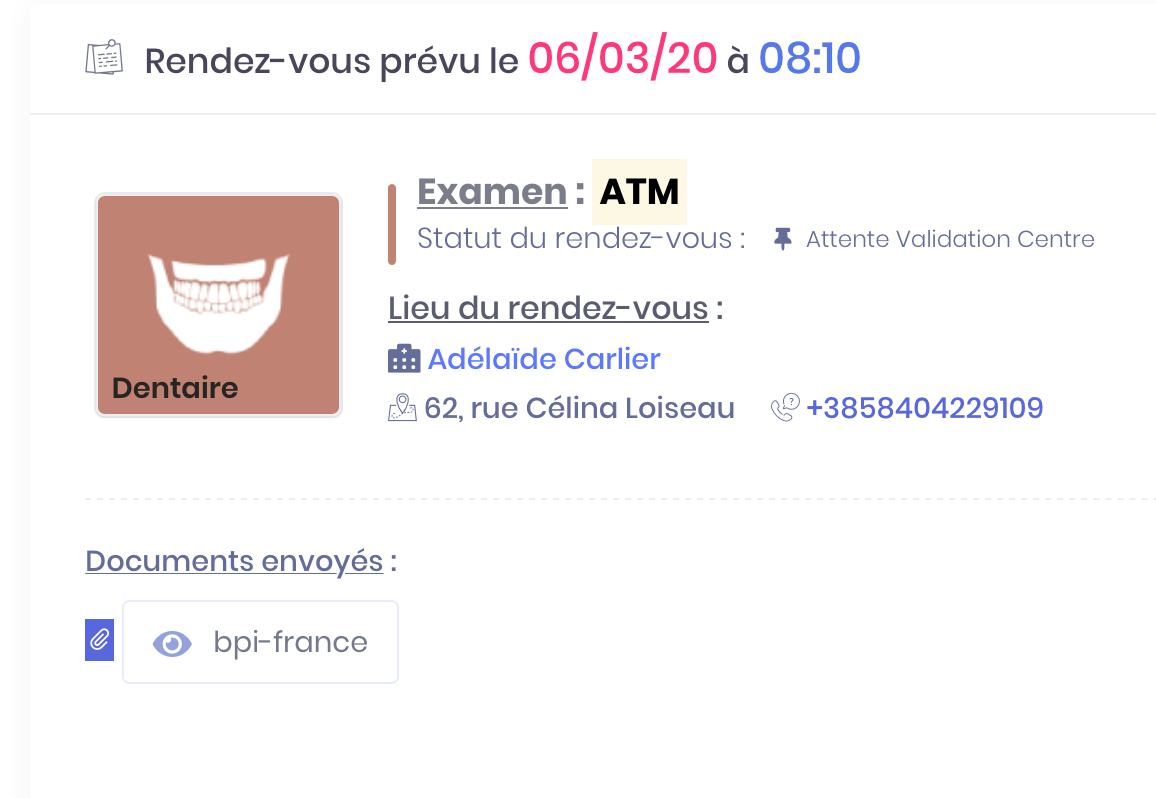
When you finalize taking an appointment online, you are redirected to your account under "My agenda".
- The appointments are displayed sorted the appointment to the nearest appointment later. If you have posted a niche, your new appointment should appear in this list.
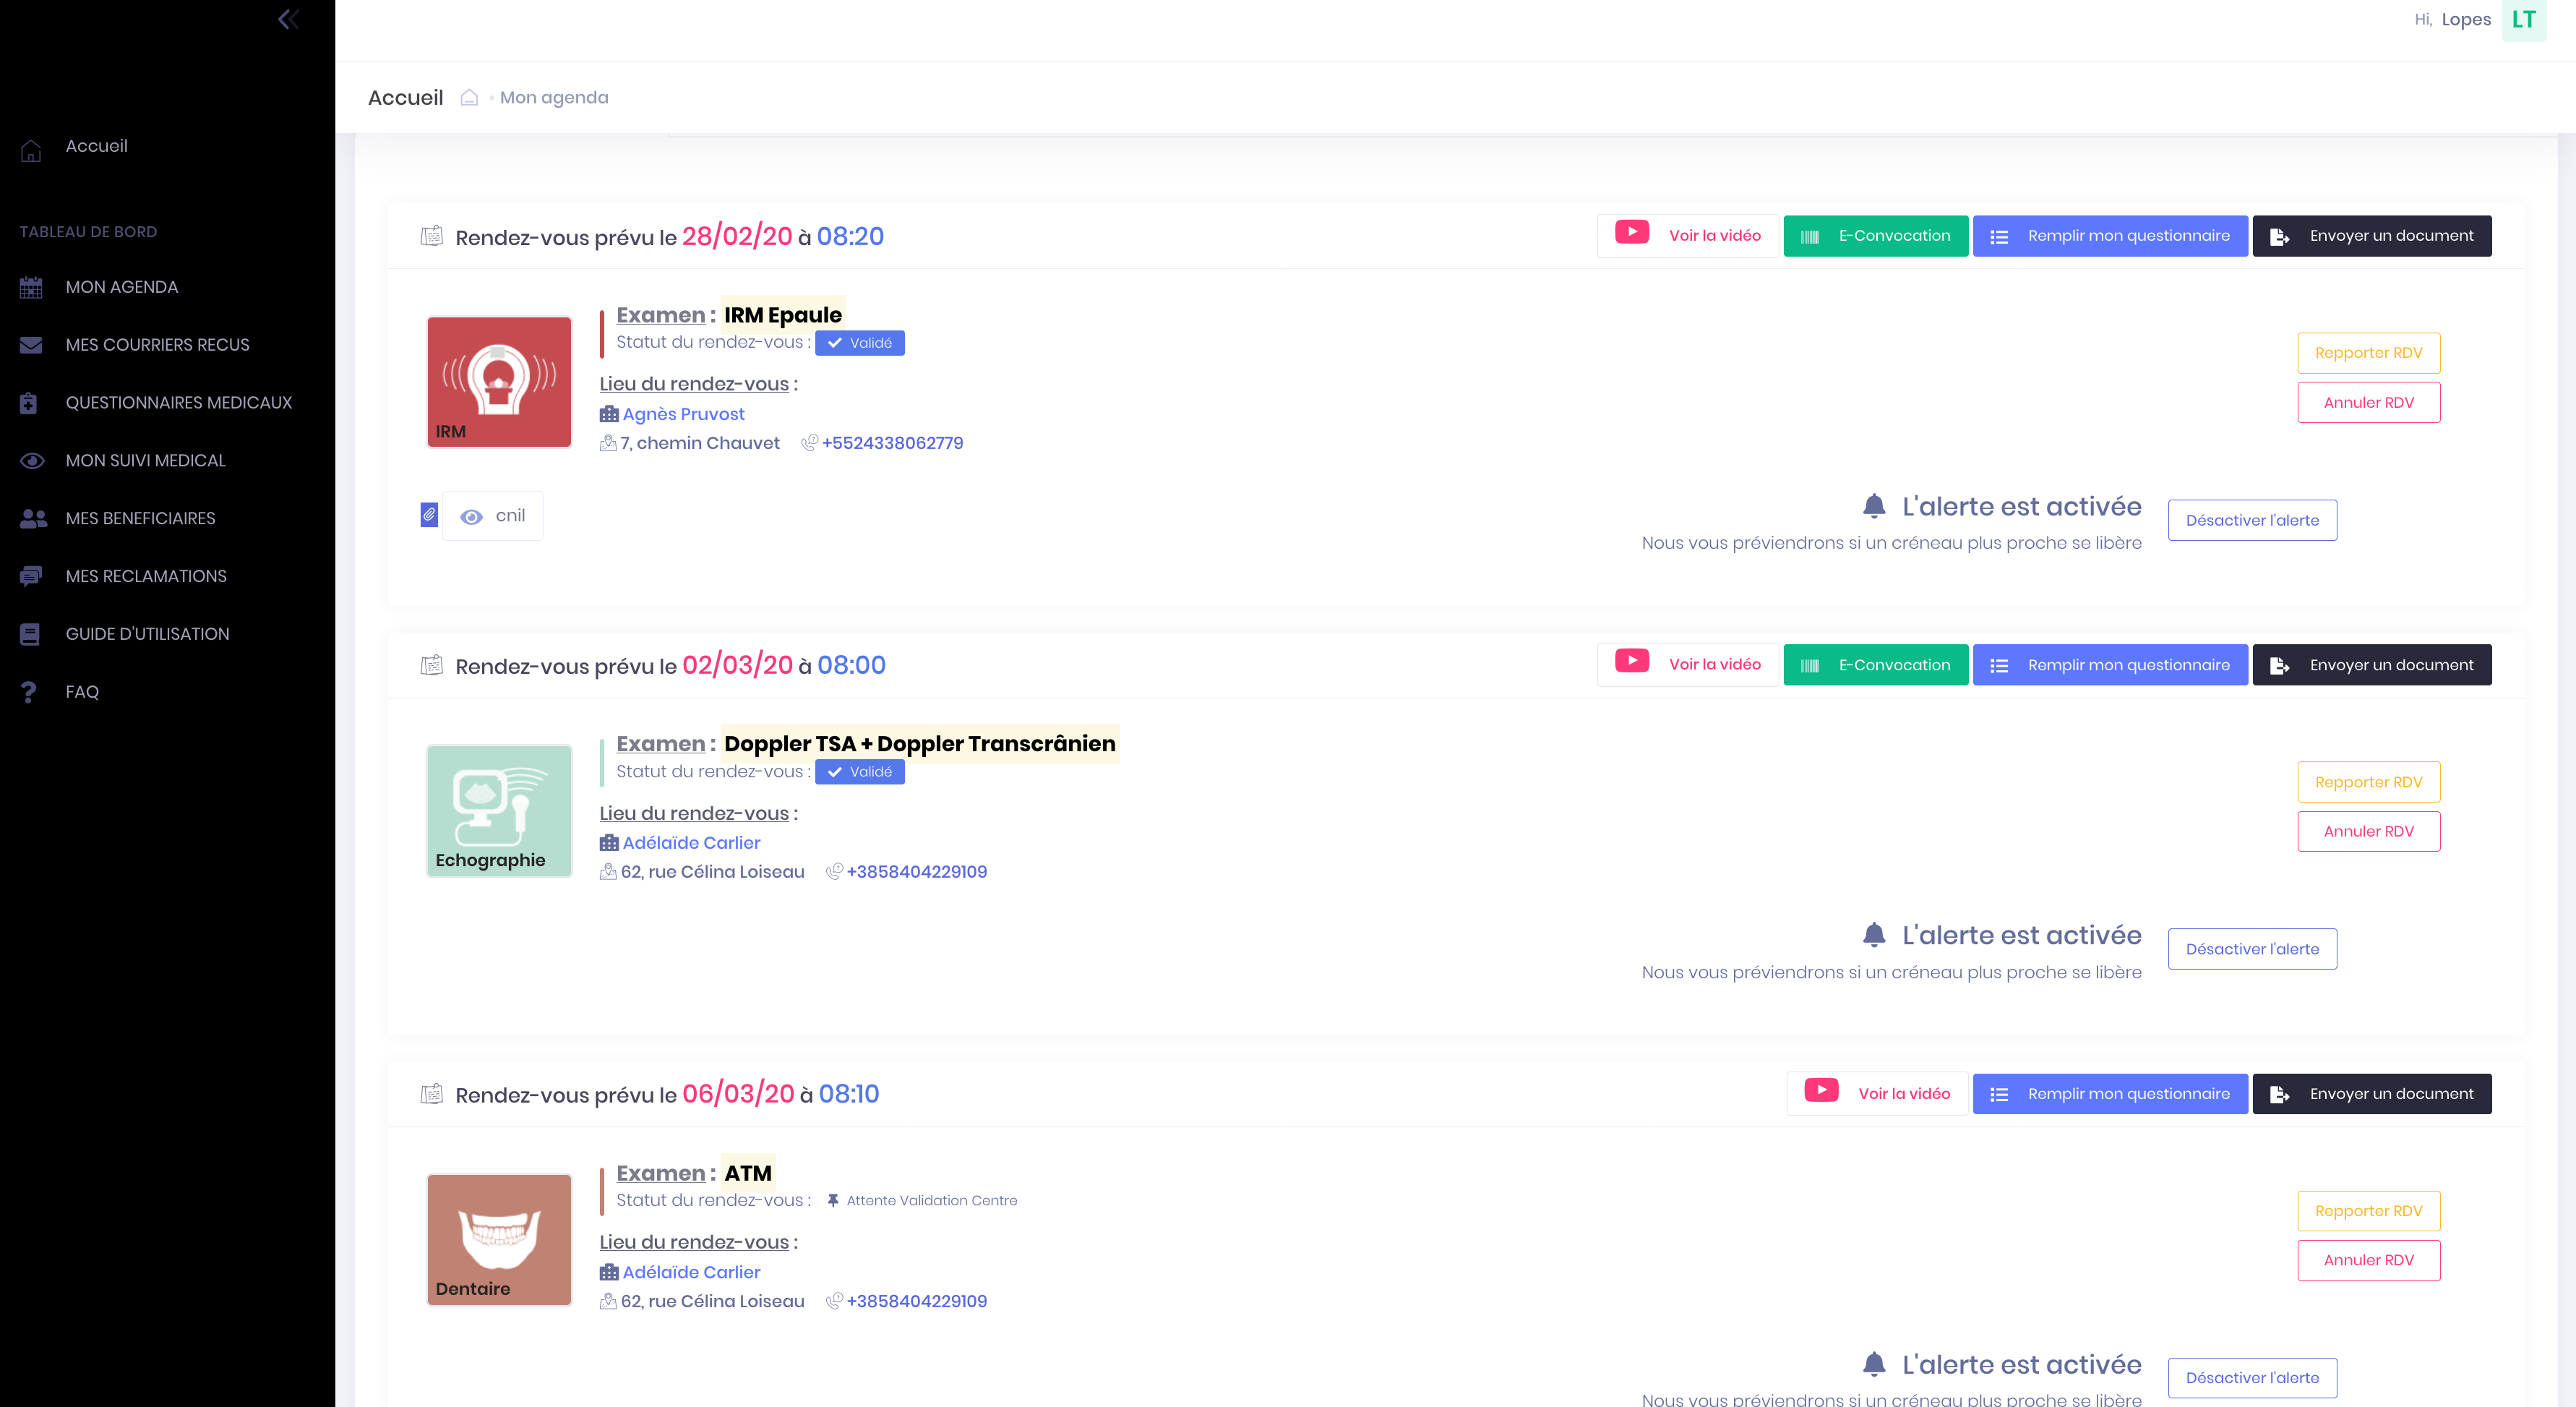
- The status of your appointment is reported under the title of the review.
- An email confirming that the appointment has been made is sent to the email address associated with the account (Remember to check your spam - spam - for that email can place it automatically).
Access your saved appointments by logging
- Click on the top right menu button to bring up the main menu
- Click on Patient connection to access your account
- Click on the button "My agenda" top left
- You are in section "My next appointments" with a list of all your appointments taken.
You are not redirected to your account and you do not receive an email
In this case your appointment was not taken into account. It will renew your decision process of appointment until you are redirected to the "My Calendar" on your account.
For information, when you choose a niche appointment on the calendar of the practitioner, it is reserved for you for 15 minutes, time for you to validate.
After this time, the niche appears again available on the calendar practitioner for all users of the website and can therefore be taken by another person.
-
Appointments history
Statutes of appointment
The different statuses before appointment
Taking appointments online (or by a center) until the day of the exam, different status will be assigned to indicate the status of your support of course.
Status Waiting Validation Centre
Your appointment is waiting for validation when :
- The center considers this a complicated examination (eg Hepatic MRI with injection)
- When it comes to appointments grouped (multiple appointments linked taken once, eg MRI of the lumbar spine lumbar + Radio)
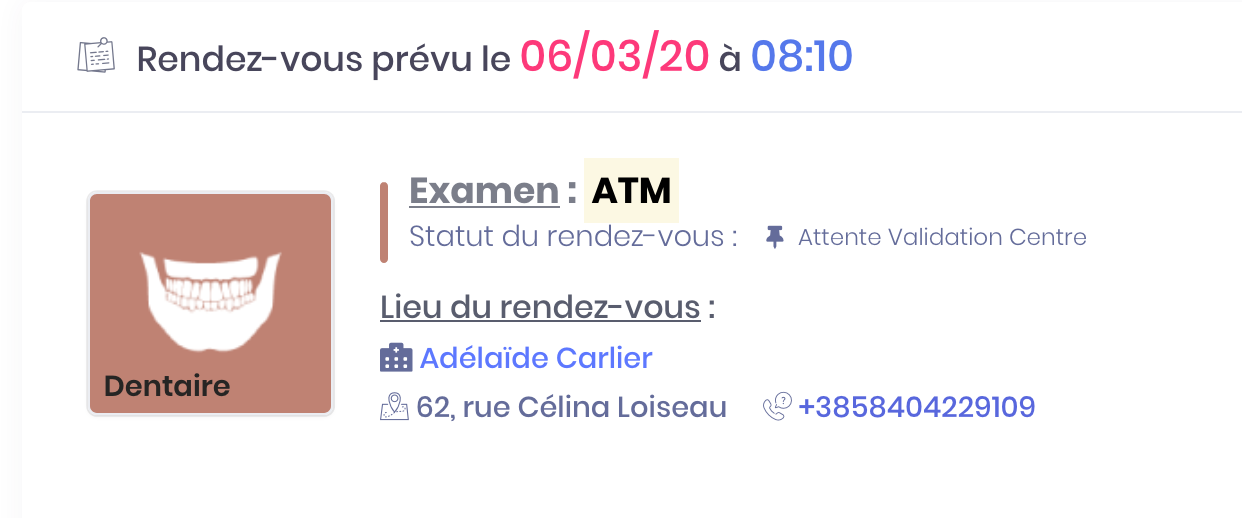
These complex considered exams require verification by the medical secretary for good management.
You're then likely to be contacted by telephone by a medical secretary who will check certain items including prescription.
Once the verification made, the Secretary will validate your appointment that will enter validated status.
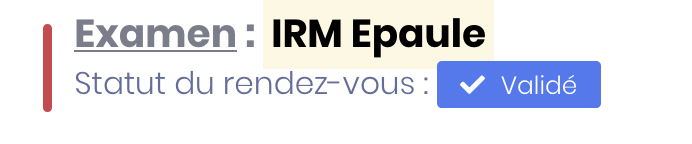
Status Validated
Your appointment is valid :
- Automatiquemet after having finalized your decision appointment when the center considers this a simple examination (eg MRI Knee)
- When he was awaiting validation and verified and validated by a medical secretary

Once validated, your appointment will be confirmed by status.
Status Waiting Confirmation
Your appointment pass waiting for confirmation when you are 48 hours of the scheduled time.
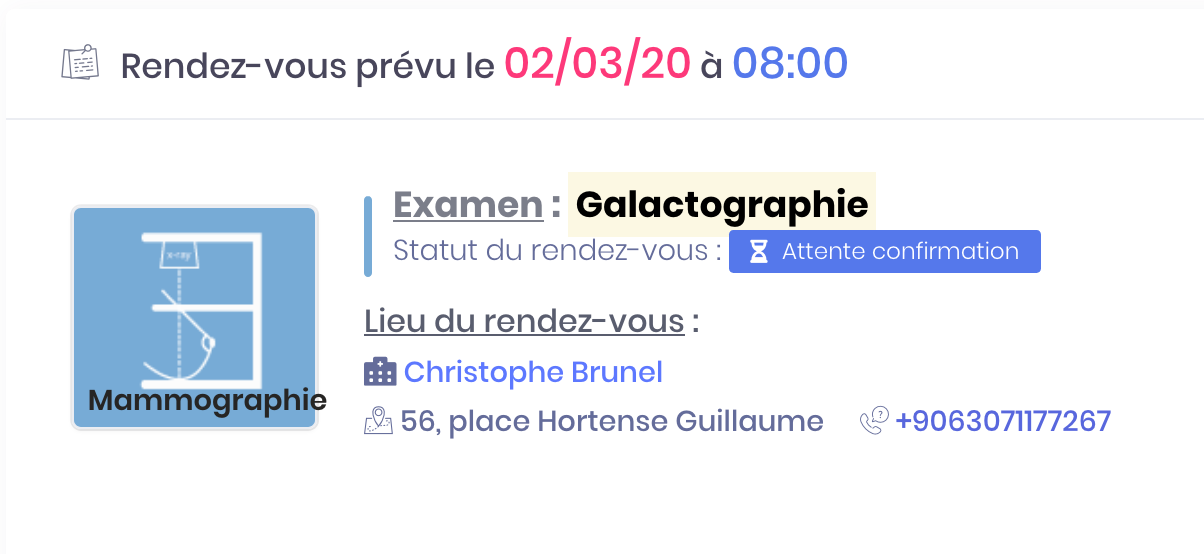
You must confirm your appointment until 12 hours before the scheduled time if you do not want to lose.
When you enable the confirmation, your appointment goes into status confirmed and it is maintained.
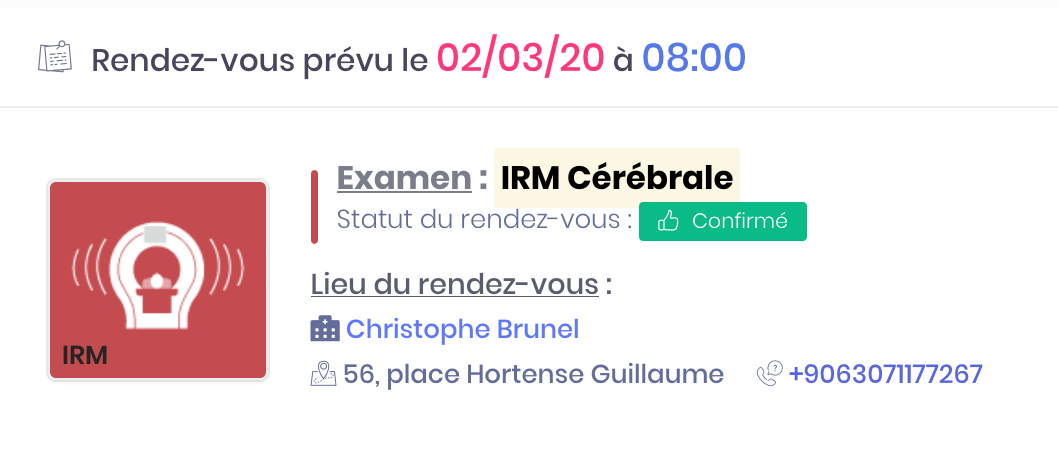
Status Confirmed
Your appointment has the status confirmed when :
- You manually confirmed your appointment between 48h and 12h before the scheduled time (by email, SMS or directly on your account)
- You make an appointment within 48 hours before the schedule proposed
The different statuses after appointment
Status Completed
Your appointment has the status completed when :
- You passed your exam and you have no jobs
- You have set your exam
- You have received and consulted your-report and pictures
Status Not Honored
Your appointment has the status dishonored when :
- You confirmed your appointment between 48h and 12h before the scheduled time (by email, SMS or directly on your account) but you did not go to your appointment
- You have not justified your absence by contacting the center
If you do not honor several appointments made, the center can arrange to limit your intake appointment online. You are invited in this case to contact by phone the center to get a new appointment.
Status Not Regulated
Your appointment has the status not set when :
- You passed your exam, but the settlement is still pending
You can pay your bill directly from the practitioner or pay online by logging into your account and clicking on the button "Pay my invoice".
Status Report & Images ready
Your appointment has the status report & pictures loans when :
- You passed your exam but you have not had your Results on the same day
- Your results are ready to be viewed and saved in your account
-
Appointments history
Move an appointment
Moving an appointment to another time and / or another date
You can change the date and / or time of an appointment from your account.
- Click on the top right menu button to bring up the main menu
- Click on Patient connection to access your account
- Click on the button "My agenda" top left
- In the section "My next appointments", Select the appointment in question and click the yellow button "Reporter appointment" to change
A page appears, you can choose a new time slot.
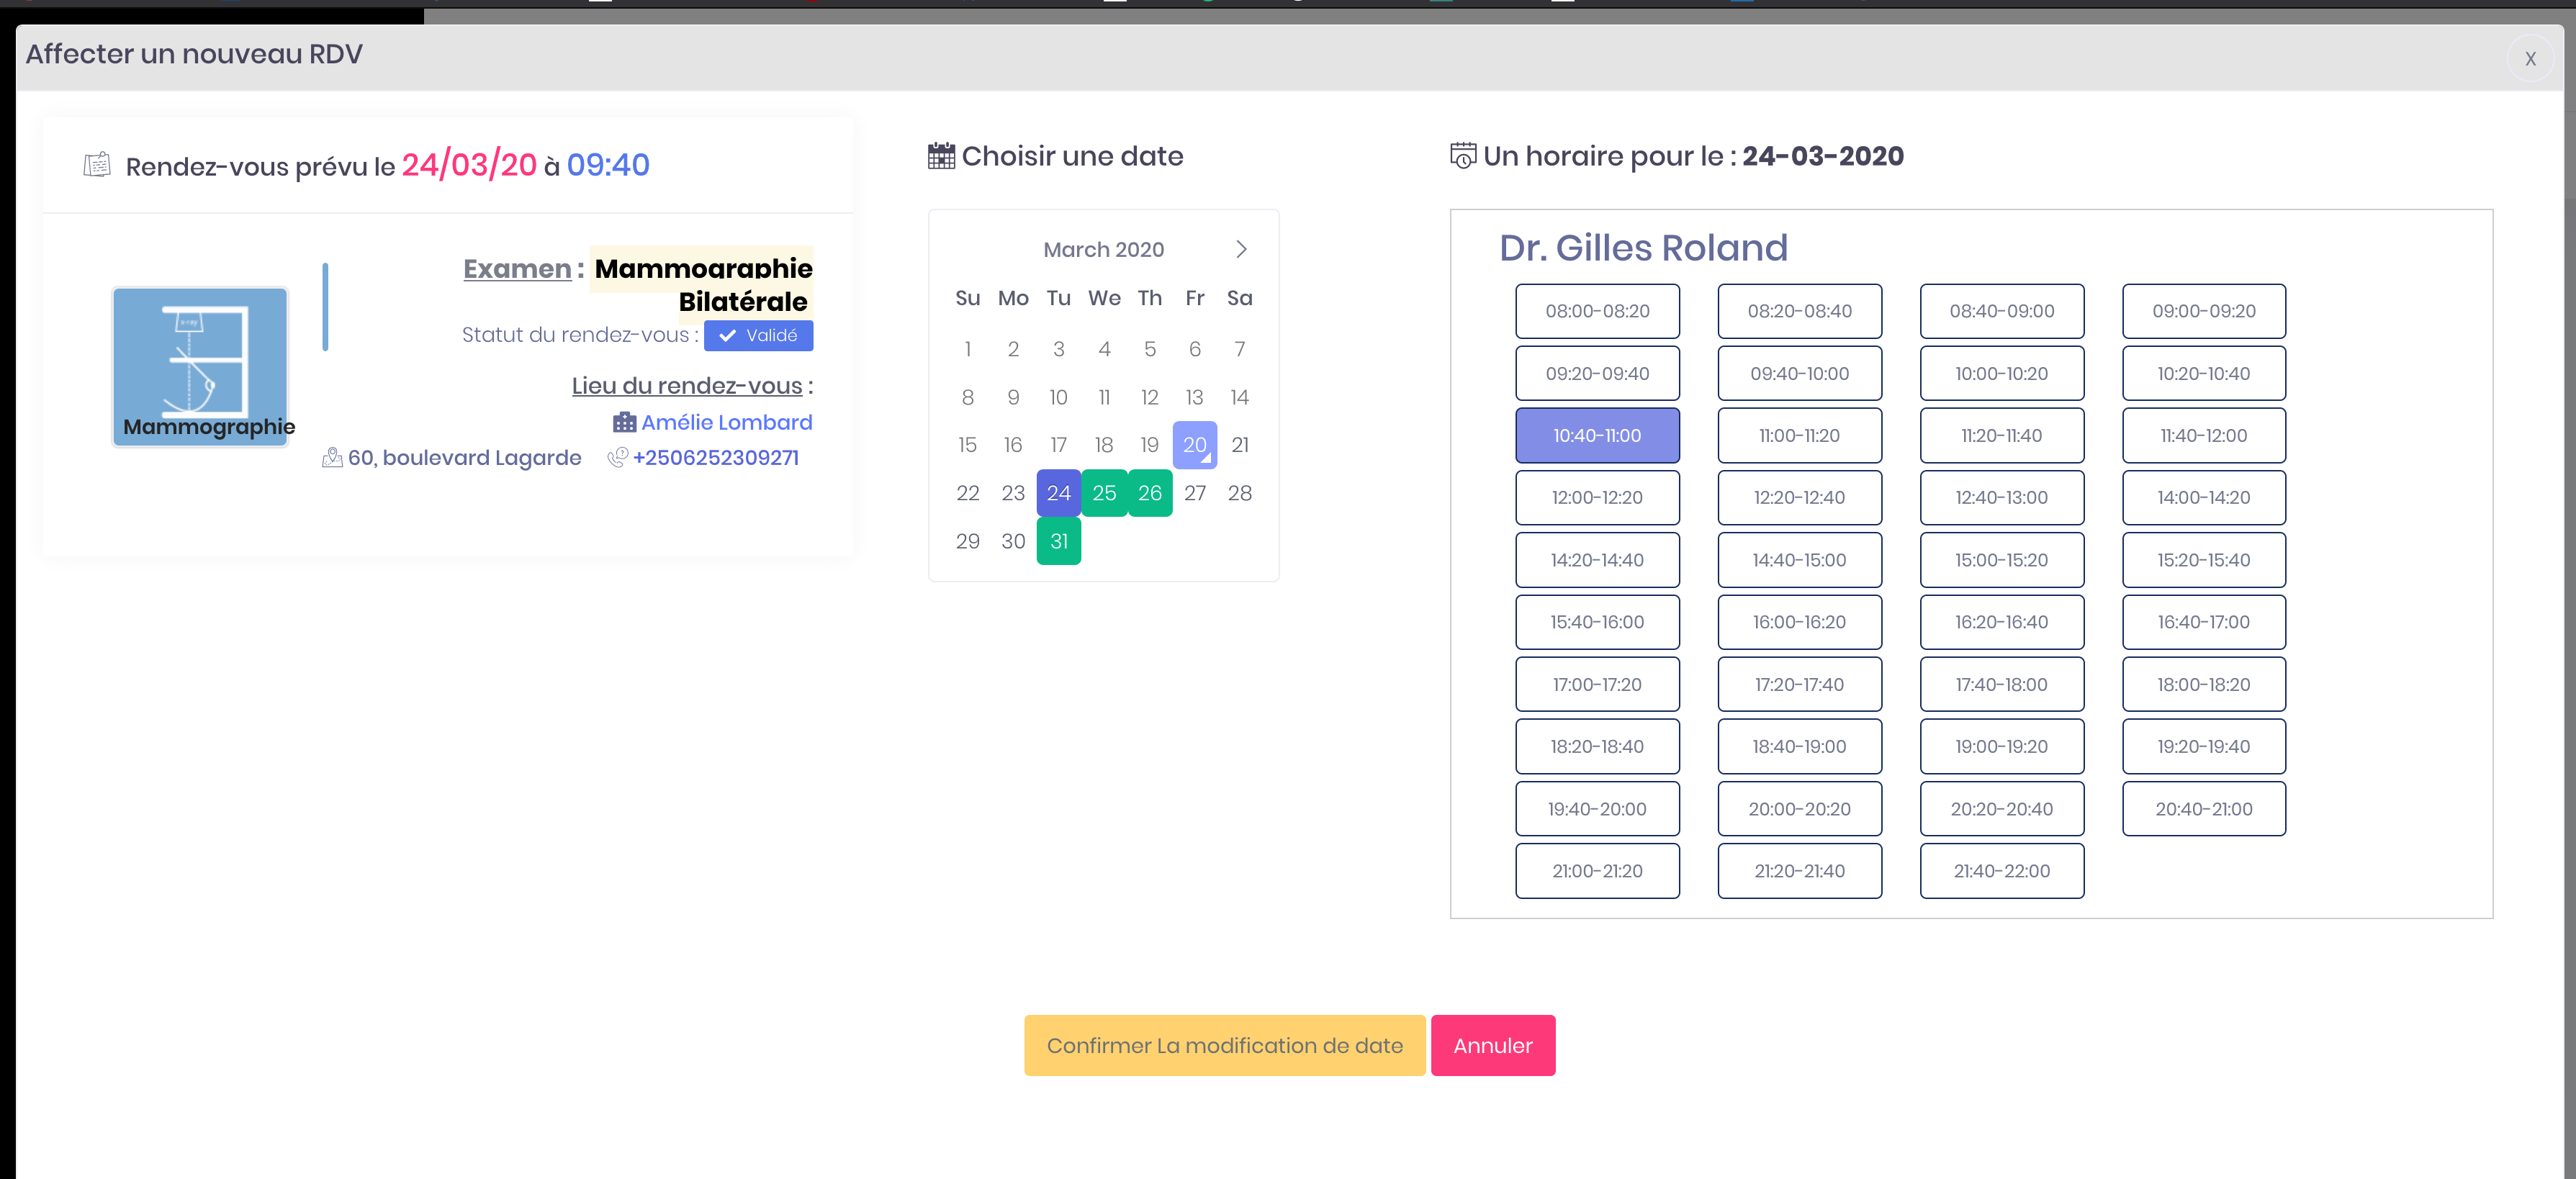
- Click on a new niche of appointments that you should then click the button "Confirm change of appointment" to confirm. You will come directly to your historic appointment and you will receive an email confirming the movement of the appointment.
- Click on the button "Cancel" if any niche you should do, then you concervez your initial appointment.
You can also repporter your appointment from your email confirmation or reminder. For that click on the link in the email and follow the steps in the procedure.
-
Appointments history
Confirm an appointment
Confirm an appointment 48 hours before the scheduled time
When you make an appointment at a center, you need to confirm 48 hours prior to the keep.
You have 24 hours to confirm your appointment. If confirmation it will be pr remove the center and you will reprogammer another rednez you.
Confirm an appointment by email
- Open the email you have received 48 hours before your appointment (Remember to check your spam)
- The email contains two buttons : Confirm my appointment"" and "Cancel my appointment". You must choose the option "Confirm my appointment" to keep your appointment
You receive an email confirmation of appointment and status is updated in your calendar.
Confirm an appointment by SMS
- Open the SMS you received 48 hours before your appointment
- The SMS provides two options : "Send 1 to confirm" and "Send 2 to cancel". You must respond to the message by sending "1" to confirm your appointment
You receive an email confirmation of appointment and status is updated in your calendar.
Confirm an appointment by logging into the account
- Click on the top right menu button to bring up the main menu
- Click on Patient connection to access your account
- Click on the button "My agenda" top left
- In the section "My next appointments", Select the appointment in question and click the green button "Confirm appointment" to keep
A message appears informing you of the confirmation of your appointment and you can check it with the new status :
Warning ! Automatic deletion of the appointment is made 12 hours before the scheduled time if the center has turned on automatic cancellation option appointments unconfirmed. This option allows the centers to have enough time to offer the time slot to other patients again.
If you confirm your appointment 48 hours in advance, you always have the option to cancel up to 12 hours before the scheduled time. For more information on canceling appointments : Cancel an appointment
No confirmation of appointment
If you do not confirm your appointment within the time (between 48h and 12h before the scheduled time), your appointment is likely to be deleted.
If this is the case, you receive an email informing you that your appointment has been removed by the center and you will remprendre another appointment online or by phone.
In an emergency, you can always contact the center to discuss the possibility of maintaining your appointment lost.
-
Appointments history
Cancel an appointment
Cancel an appointment more than 12 hours before the scheduled time
If you have made an appointment directly with the center and you do not have an account, the cancellation of the appointment must be made by phone with the practitioner concerned.
If you have made an appointment for the site, you can cancel up to 12 hours before the scheduled time.
- Click on the top right menu button to bring up the main menu
- Click on Patient connection to access your account
- Click on the button "My agenda" top left
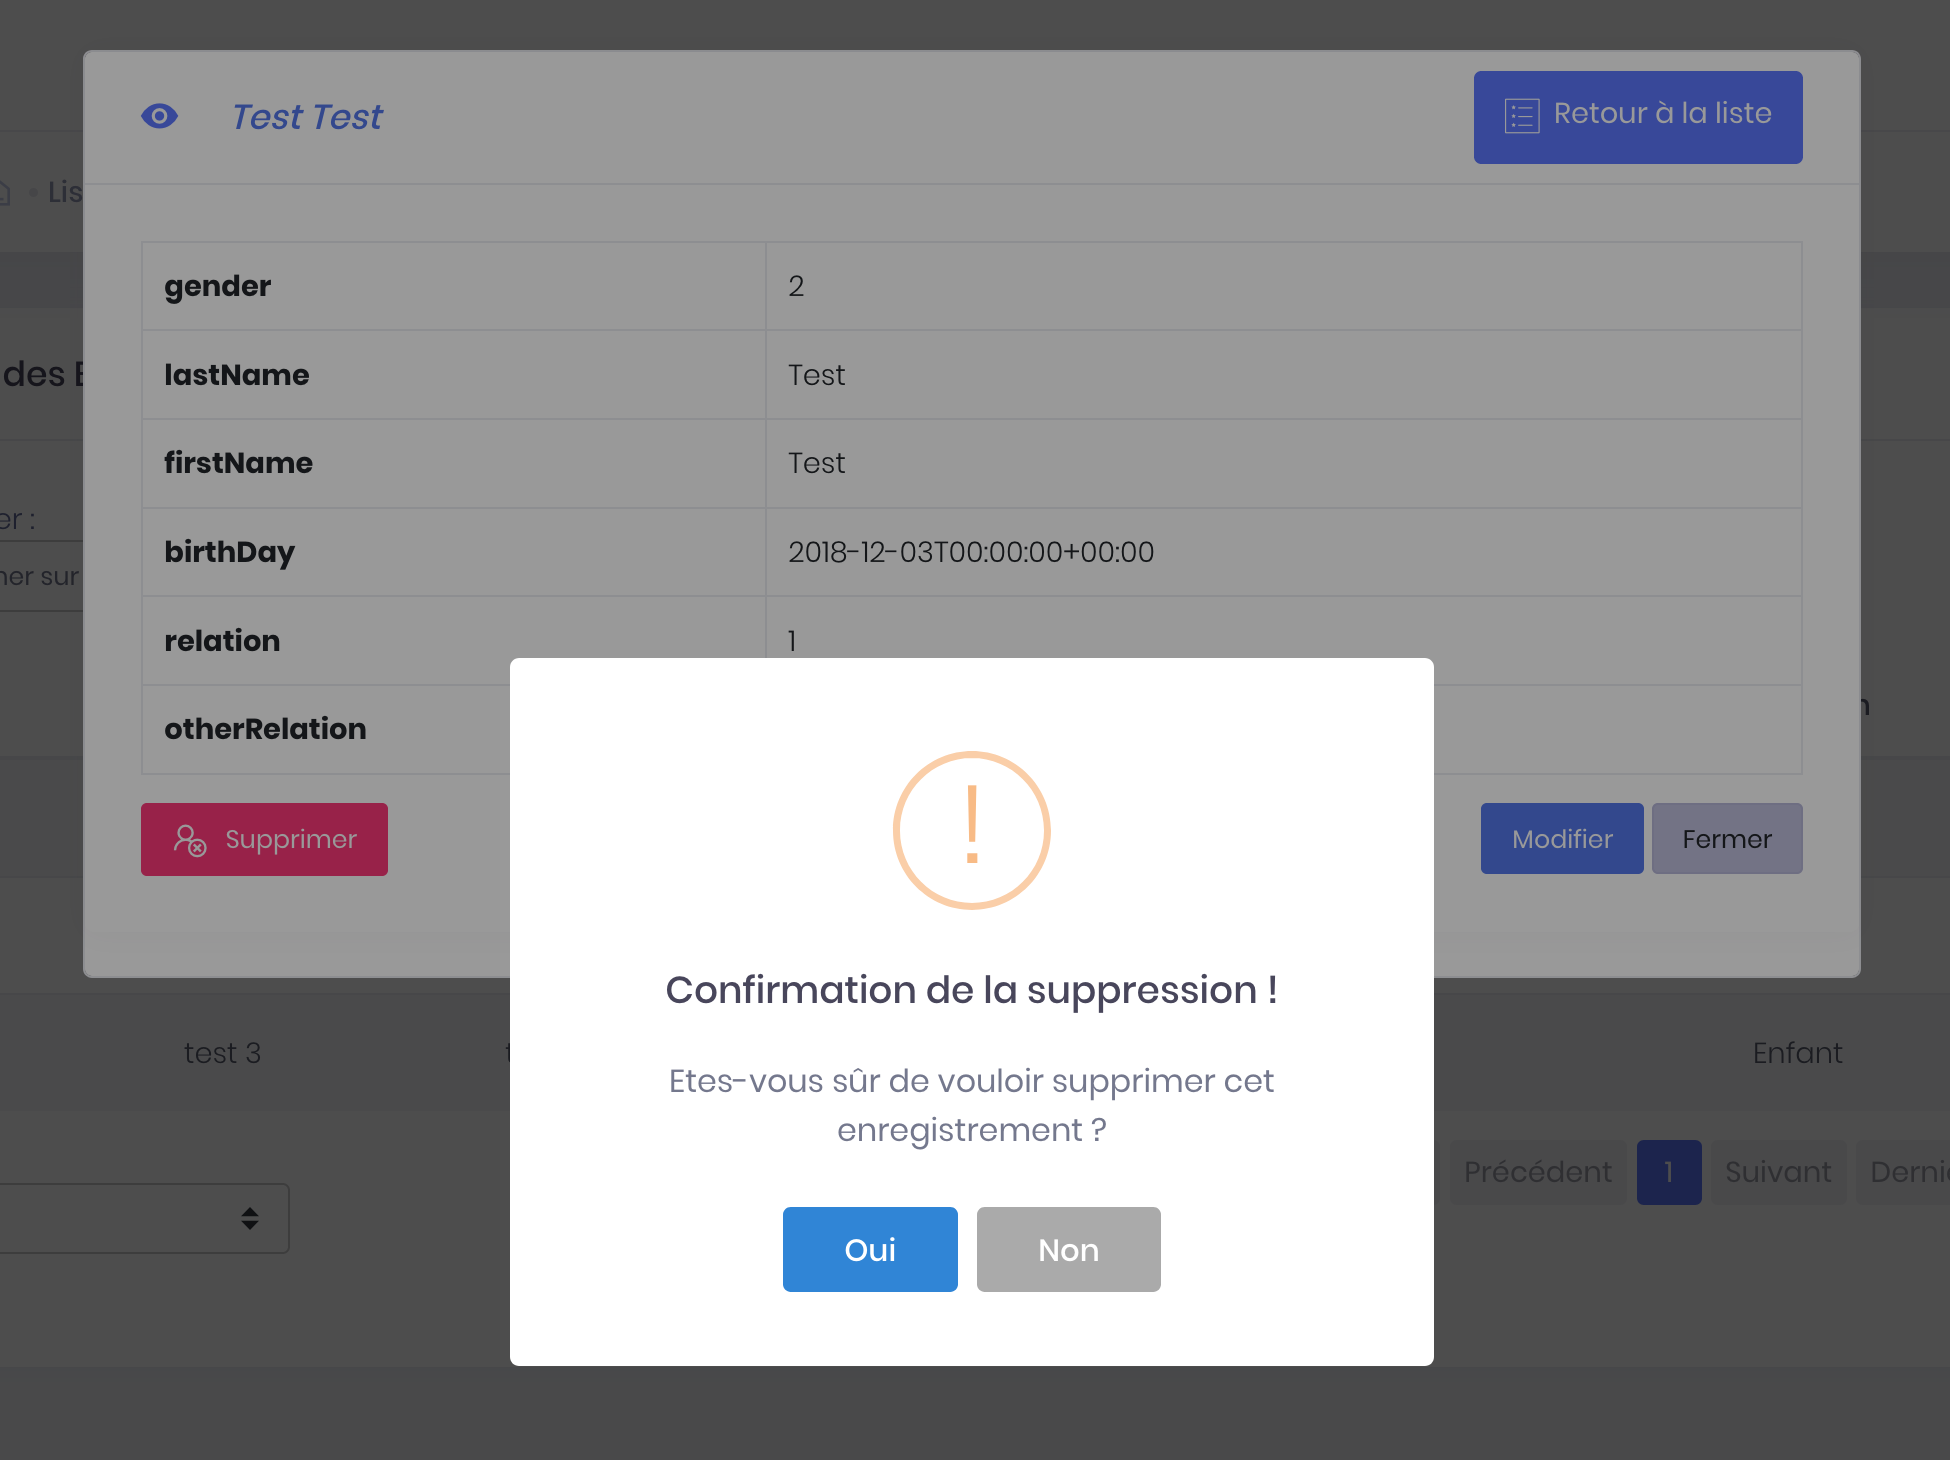
- In the section "My next appointments", Select the appointment in question and click on the red button "Cancel appointment" to remove it.
- A page appears, select the reason for cancellation and click the red button "Confirm the deletion of the appointment".
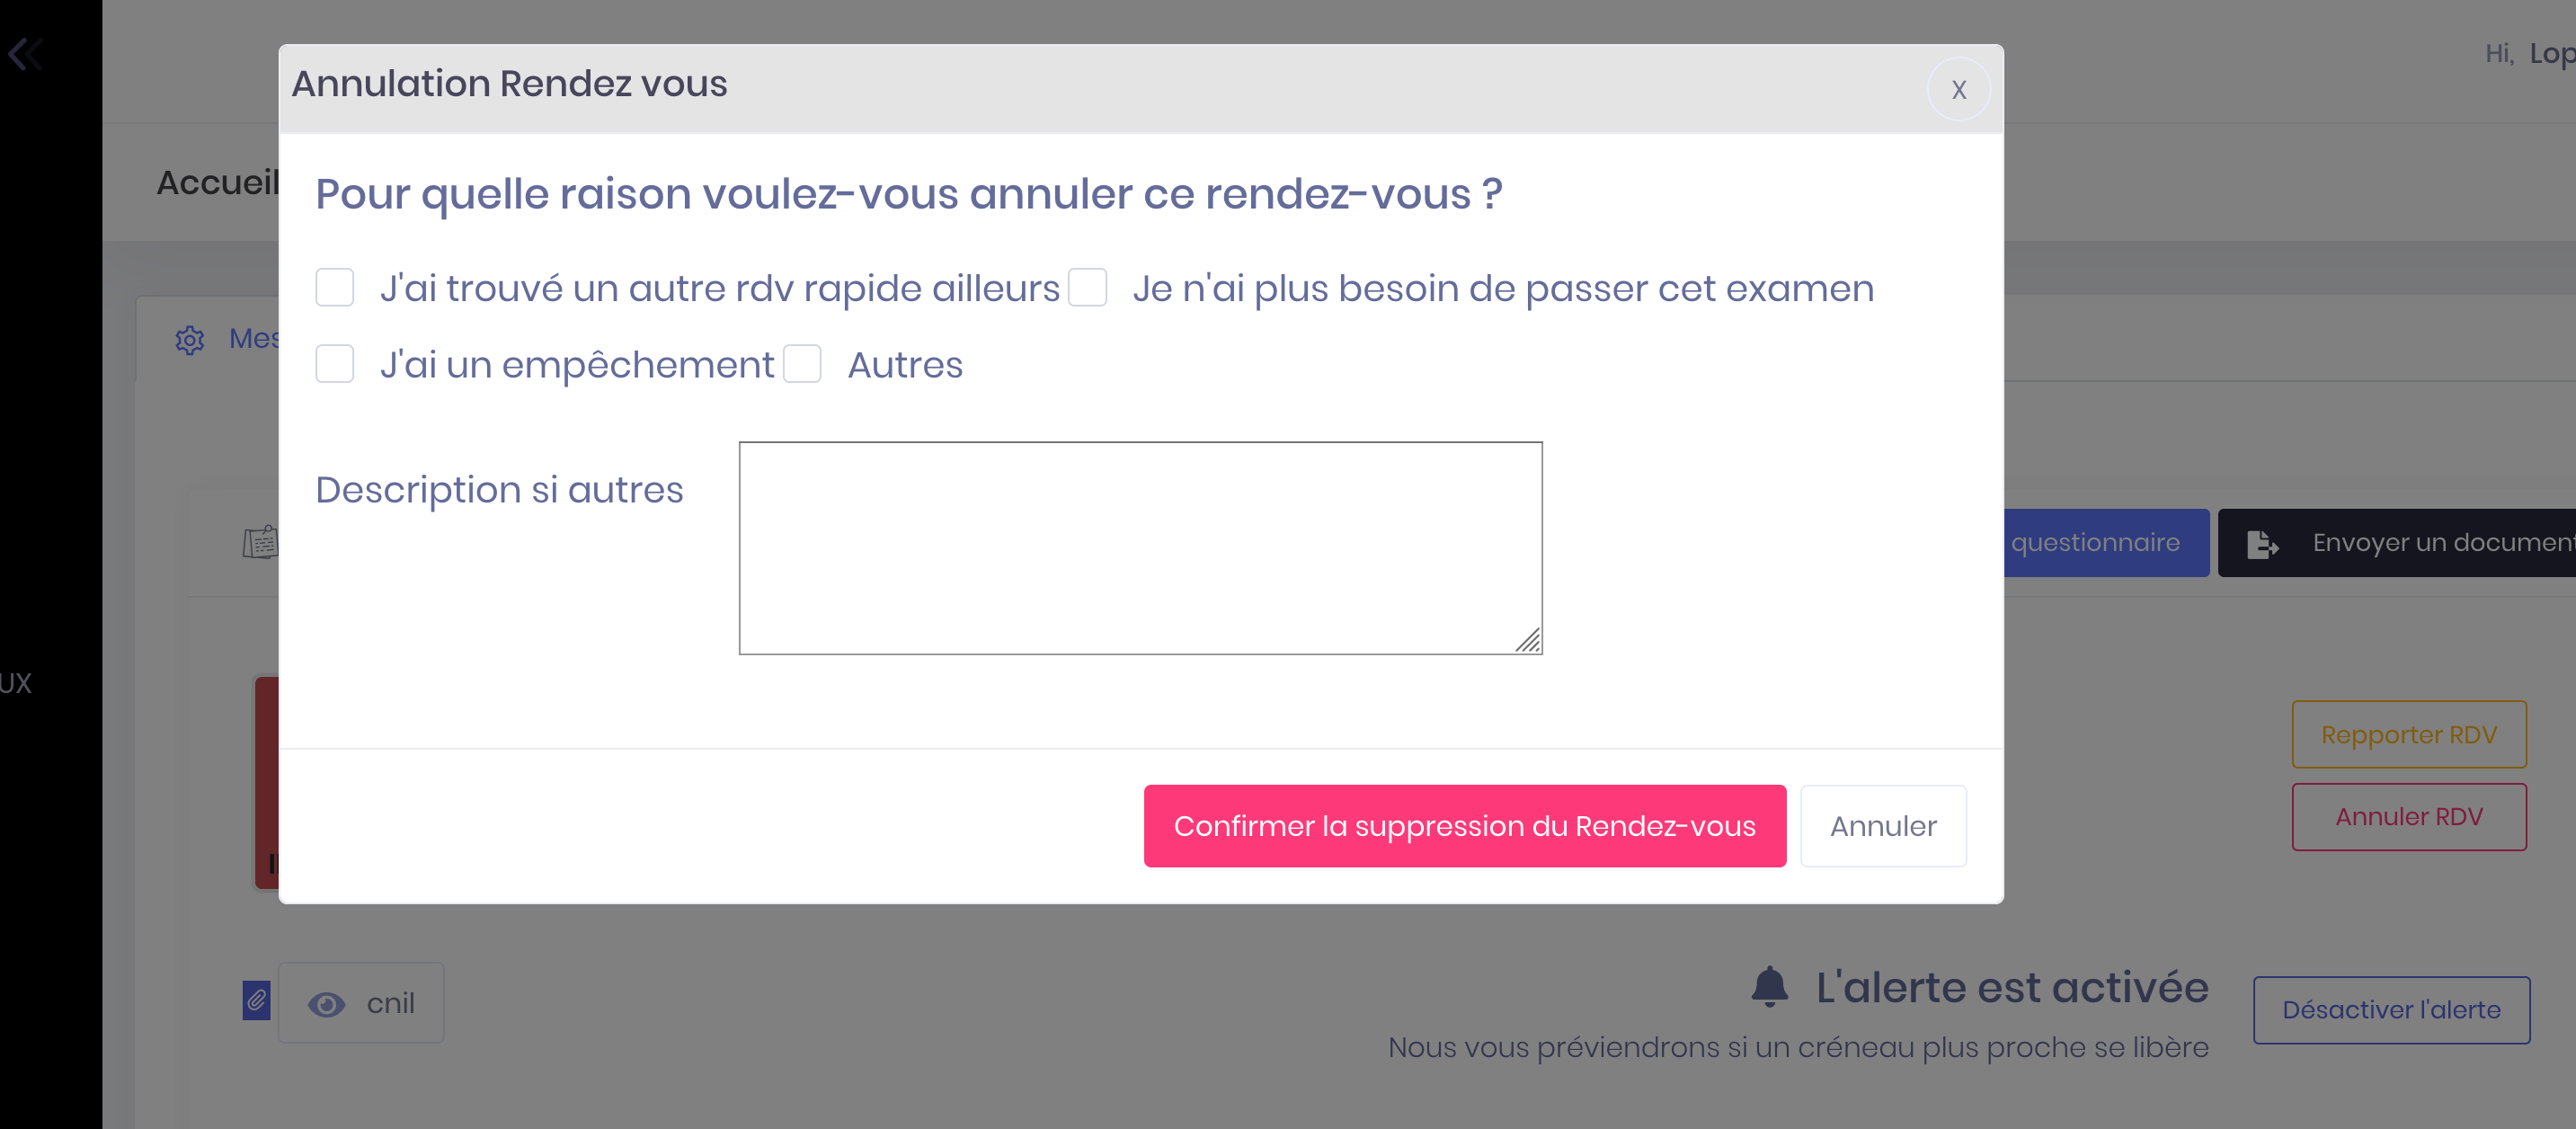
You receive an email confirmation of cancellation.
If you no longer wish to cancel your appointment, click the button "Cancel".
You may cancel your appointments from your email confirmation or reminder. For that click on the link in the email and follow the steps in the procedure.
Cancel an appointment less than 12 hours before the scheduled time
The cancellation of an appointment online (via an account, an email or SMS) is possible only when the appointment is in more than 12 hours.
If you must cancel an appointment less than 6 hours before the time at which it is expected, contact by phone the practitioner's office concerned.
You will find the center number in the SMS and mails you received.
For information, each practitioner or health facility is partner manager of his telephone line. If the Secretariat does not answer your call, thank you to renew your approach because our team can not assist you with this request.
Pas terminé, quelques modifications possibles...
-
Appointments history
Access your past appointments
Access the list of appointments made
You can find a list of all your appointments in the past 3 months preceding the date.
- Click on the top right menu button to bring up the main menu
- Click on Patient connection to access your account
- Click on the button "My agenda" top left
- Go to section "My past appointments" to list.
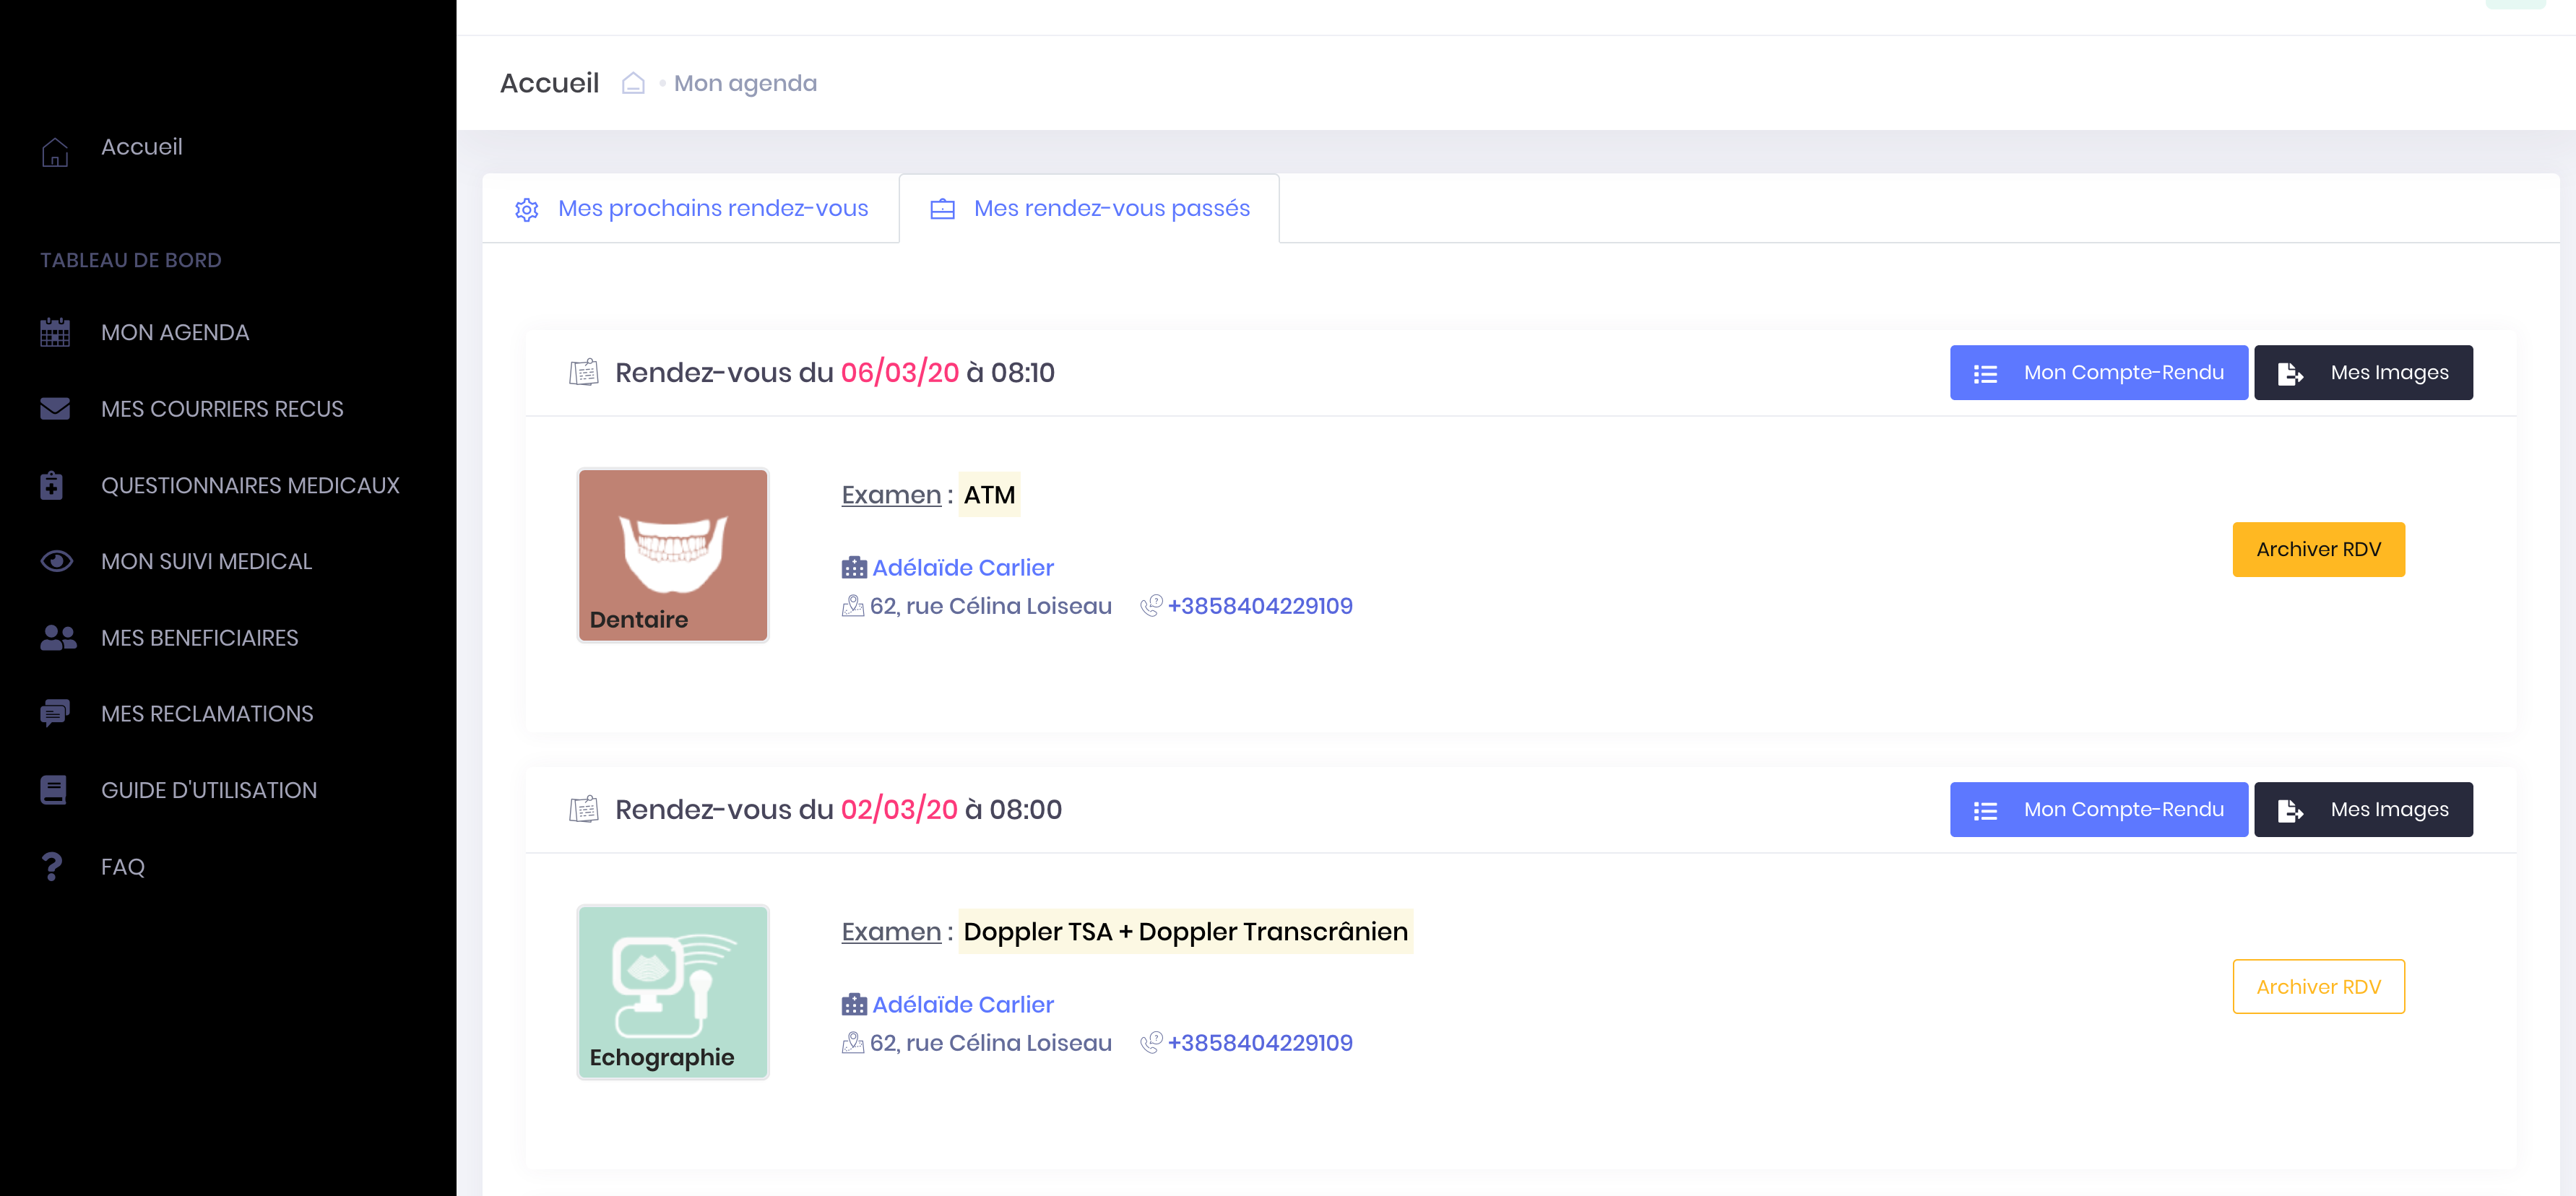
Appointments are archived in as and when the date exceeds the appointment within 3 months.
When an appointment is archived, images and health data are classified in category "My medical care".
You can archive earlier (before the period of 3 months) an appointment for that click on the yellow button "Archive appointment".
-
Appointments history
Archive an appointment
Archive one or more past appointments
If you no longer wish to appear some or all past appointments, you can archive them.
- Click on the top right menu button to bring up the main menu
- Click on Patient connection to access your account
- Click on the button "My agenda" top left
- In the section "My past appointments", Select the appointment in question and click the yellow button "Archive appointment"
Your appointment past will be deleted from this section and your data (images, reports, dose received ..) will be classified in the topics.
You find your pictures and reports (if you did) in the category "My images" and your doses in the category "My medical care".
Recall; appointments went shared data between you and each practitioner concerned, they are not removed. If you want to delete all your past appointments with a dentist you must ...
A terminer...
Shared documents
-
Shared documents
Send a document to a practitioner
Share a document while taking appointments
When you make an appointment with a practitioner, you can share a document.
Send a document from the website
- Follow the instructions in the article Choose and confirm an appointment slot paragraph "Send a document".
Send a document from mobile
- After choosing your date of appointment, click the pink button to import a document.
- Click on "Send a document" if you have access to your documents from your mobile or "Take a photo" to take pictures of your prescription and send.
- The file share is displayed in the section "Documents sent", your practitioner will consult from his agenda once the validation of appointments over.
Share a document from your patient space
- Click on the top right menu button to bring up the main menu
- Click on Patient connection to access your account
- Click on the button "My agenda" top left
- In the section "My next appointments", Select the appointment in question and click the black button "Send a document".
A page appears, select the document type and select the file to send by browsing your computer or take a picture of your document if you're on mobile.

- Confirm by clicking the green button "Join".
The document sent is displayed on the bottom left of the appointment. Your practitioner will visit since his professional space.
View, download or delete a document already sent
- Click on the button "My documents" top left
- In the section "Documents sent", displays a table of all documents sent to all practitioners consulted.

- Select the document you wish to view
- In the menu on the right, click "Overview" to visit only on "Download" to start the download or "Delete" to permanently delete
When you delete a document sent to the practitioner are more access.
You also have the ability to perform all these actions (View, download, delete a document sent) from your calendar in the "My next appointment." Documents sent for an appointment are displayed at the bottom left.
-
Shared documents
Access and download a received document
Access and download a document shared by a practitioner or center
A center or practitioner can send you documents (orders, reports, administrative document, other ...) in your account to one of your upcoming appointments or appointments past.
An email is sent to you when a document has been shared by your practitioner.
- Click the link to be redirected to the login page
- Click on the button "My agenda" top left
- In the section "My next appointments", Select the appointment in question and click the gray button "Documents received".
A page appears with all documents that the practitioner has sent you to prepare your exam.
You can using the buttons at the top right download to your computer, print, enlarge the documents in the gray box.
History of all documents received
You can view all documents received for all your past appointments and come and sort.
- Click on the button "My documents" top left
- In the section "Documents received", displays a table of all documents received by all practitioners and all appointments made.
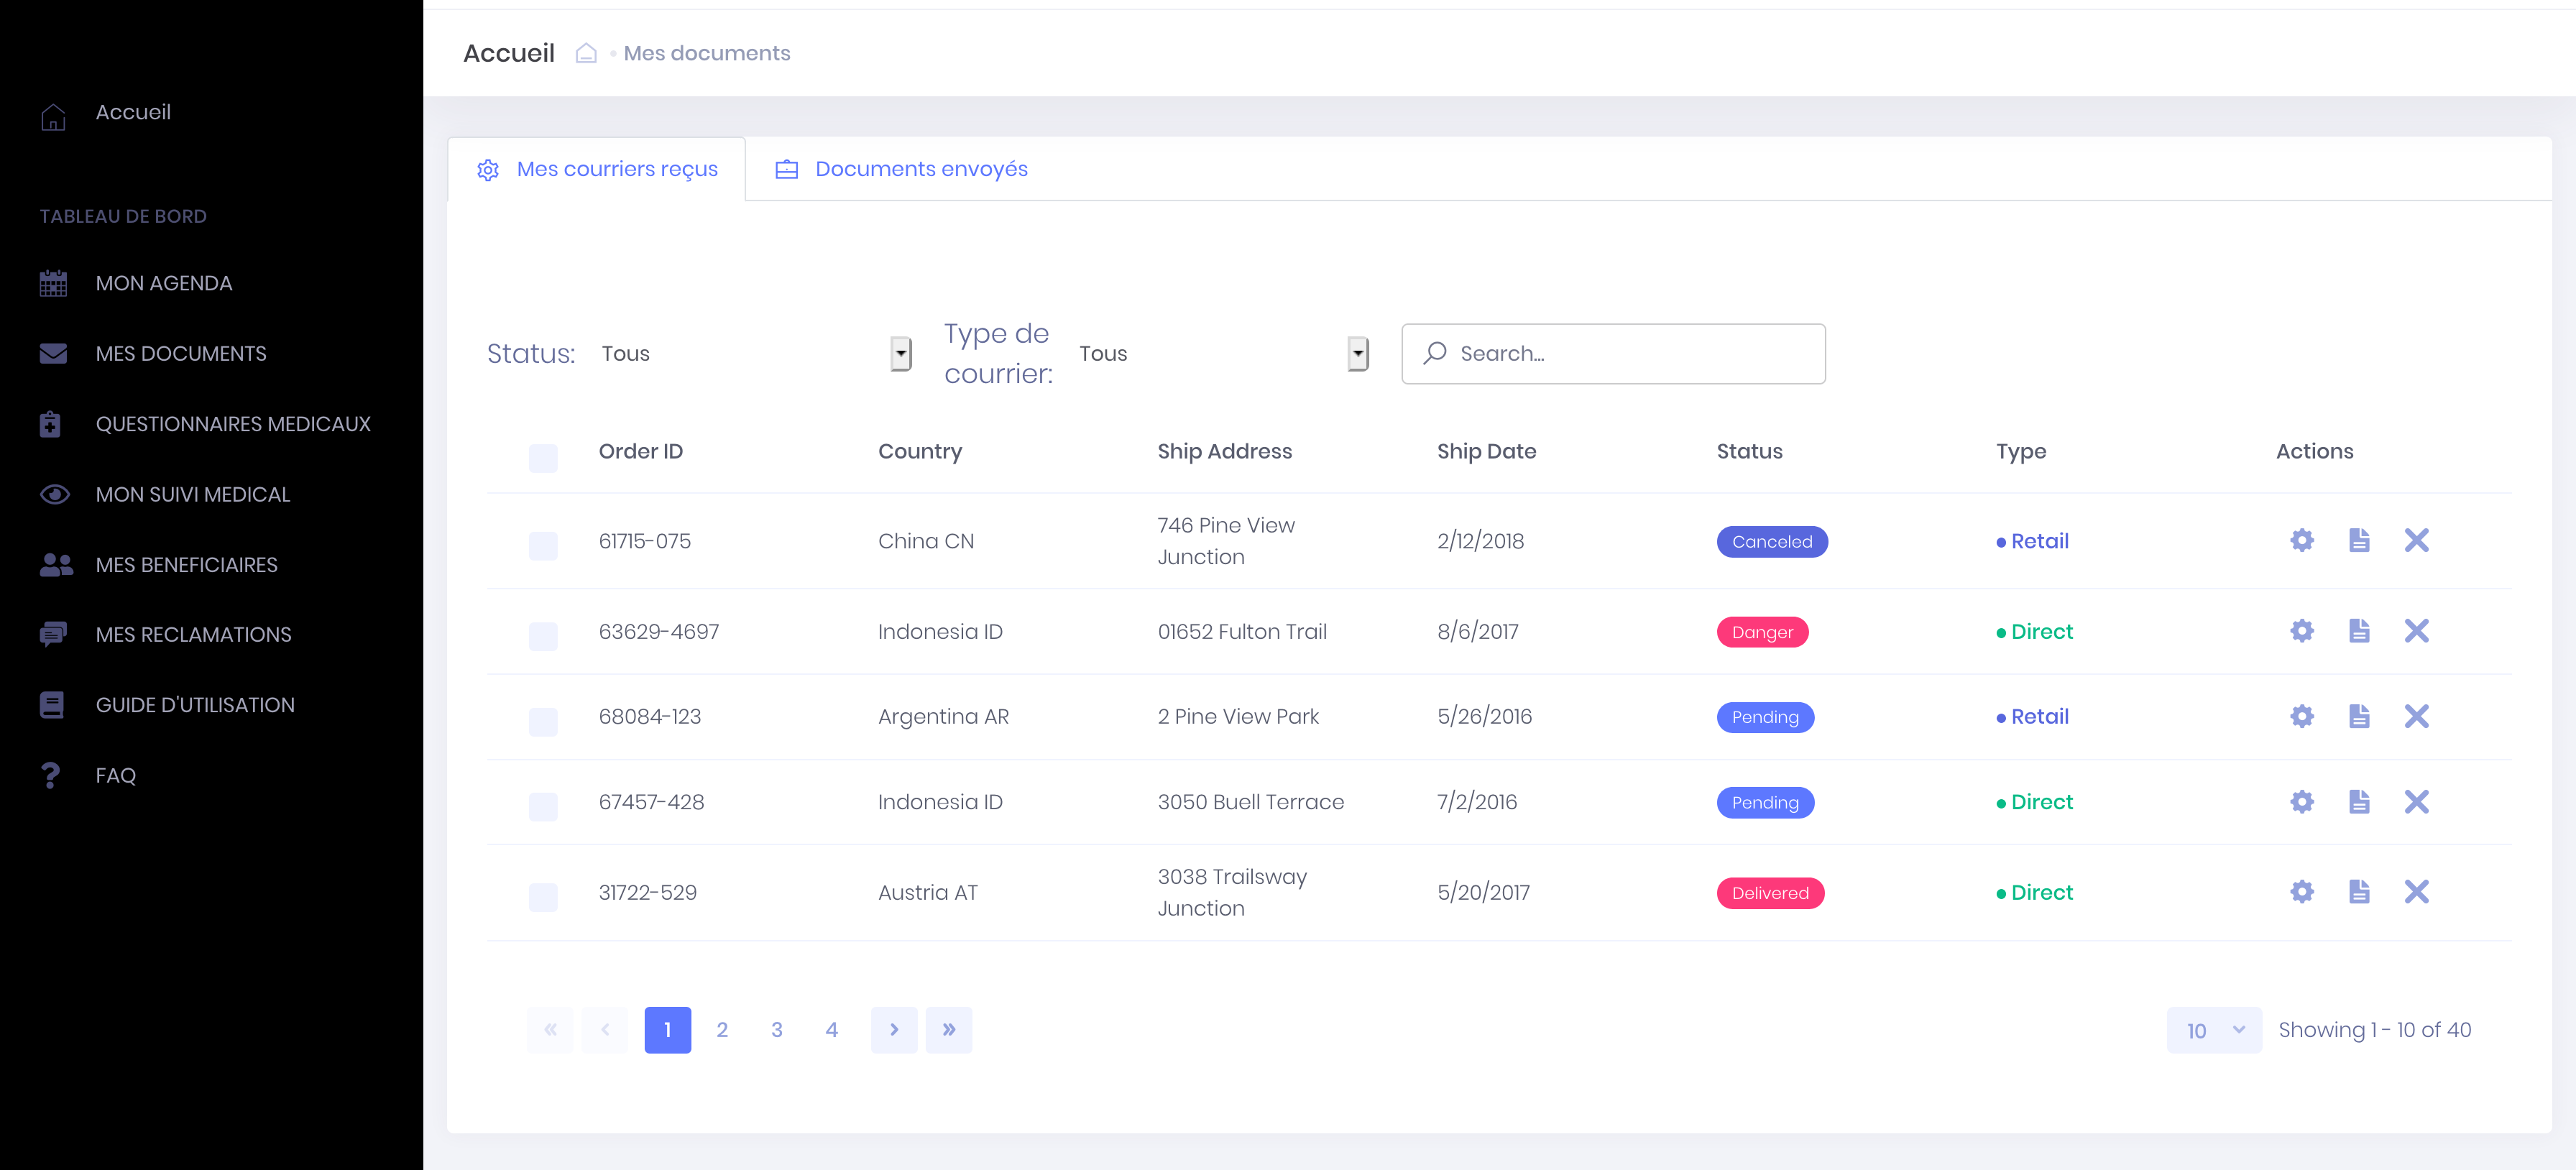
You can search a document received by the center, document type, date, and downloading and / or printing.
You do not have access to the shared document
There are several possible reasons for the inability to access a shared document.
You do not receive an email
If you have not received mail stating shared document and the document does not exist in the "My Documents" folder of your account or directly into your upcoming appointments (button gray), it means the firm or practitioner do not send it. It will bring you directly to the telephone center to request sending the document. Make sure the firm has good email address and phone number associated with your account that sharing works.
The document is unreadable
The document was saved in the wrong format by the center or the practitioner. It will bring you directly to the center by phone to request a new shipment in a readable format.
The appointment is made for a major close
If you have given an email address and a personal phone number of your nearest, the document will be sent only to your porch.
The appointment has been removed by the center
If your appointment has been removed by the center the document is no longer shared. It will bring you directly to the center by phone to learn more.
-
Shared documents
Allow access from one practitioner to my documents, my information
In progress...
The account's relatives
-
The account's relatives
Add a close an account
Add a close by connecting to the account
- Click on the top right menu button to bring up the main menu
- Click on Patient connection to access your account
- Click on the button "My relatives" top left
- Click the blue button "Add a family member"
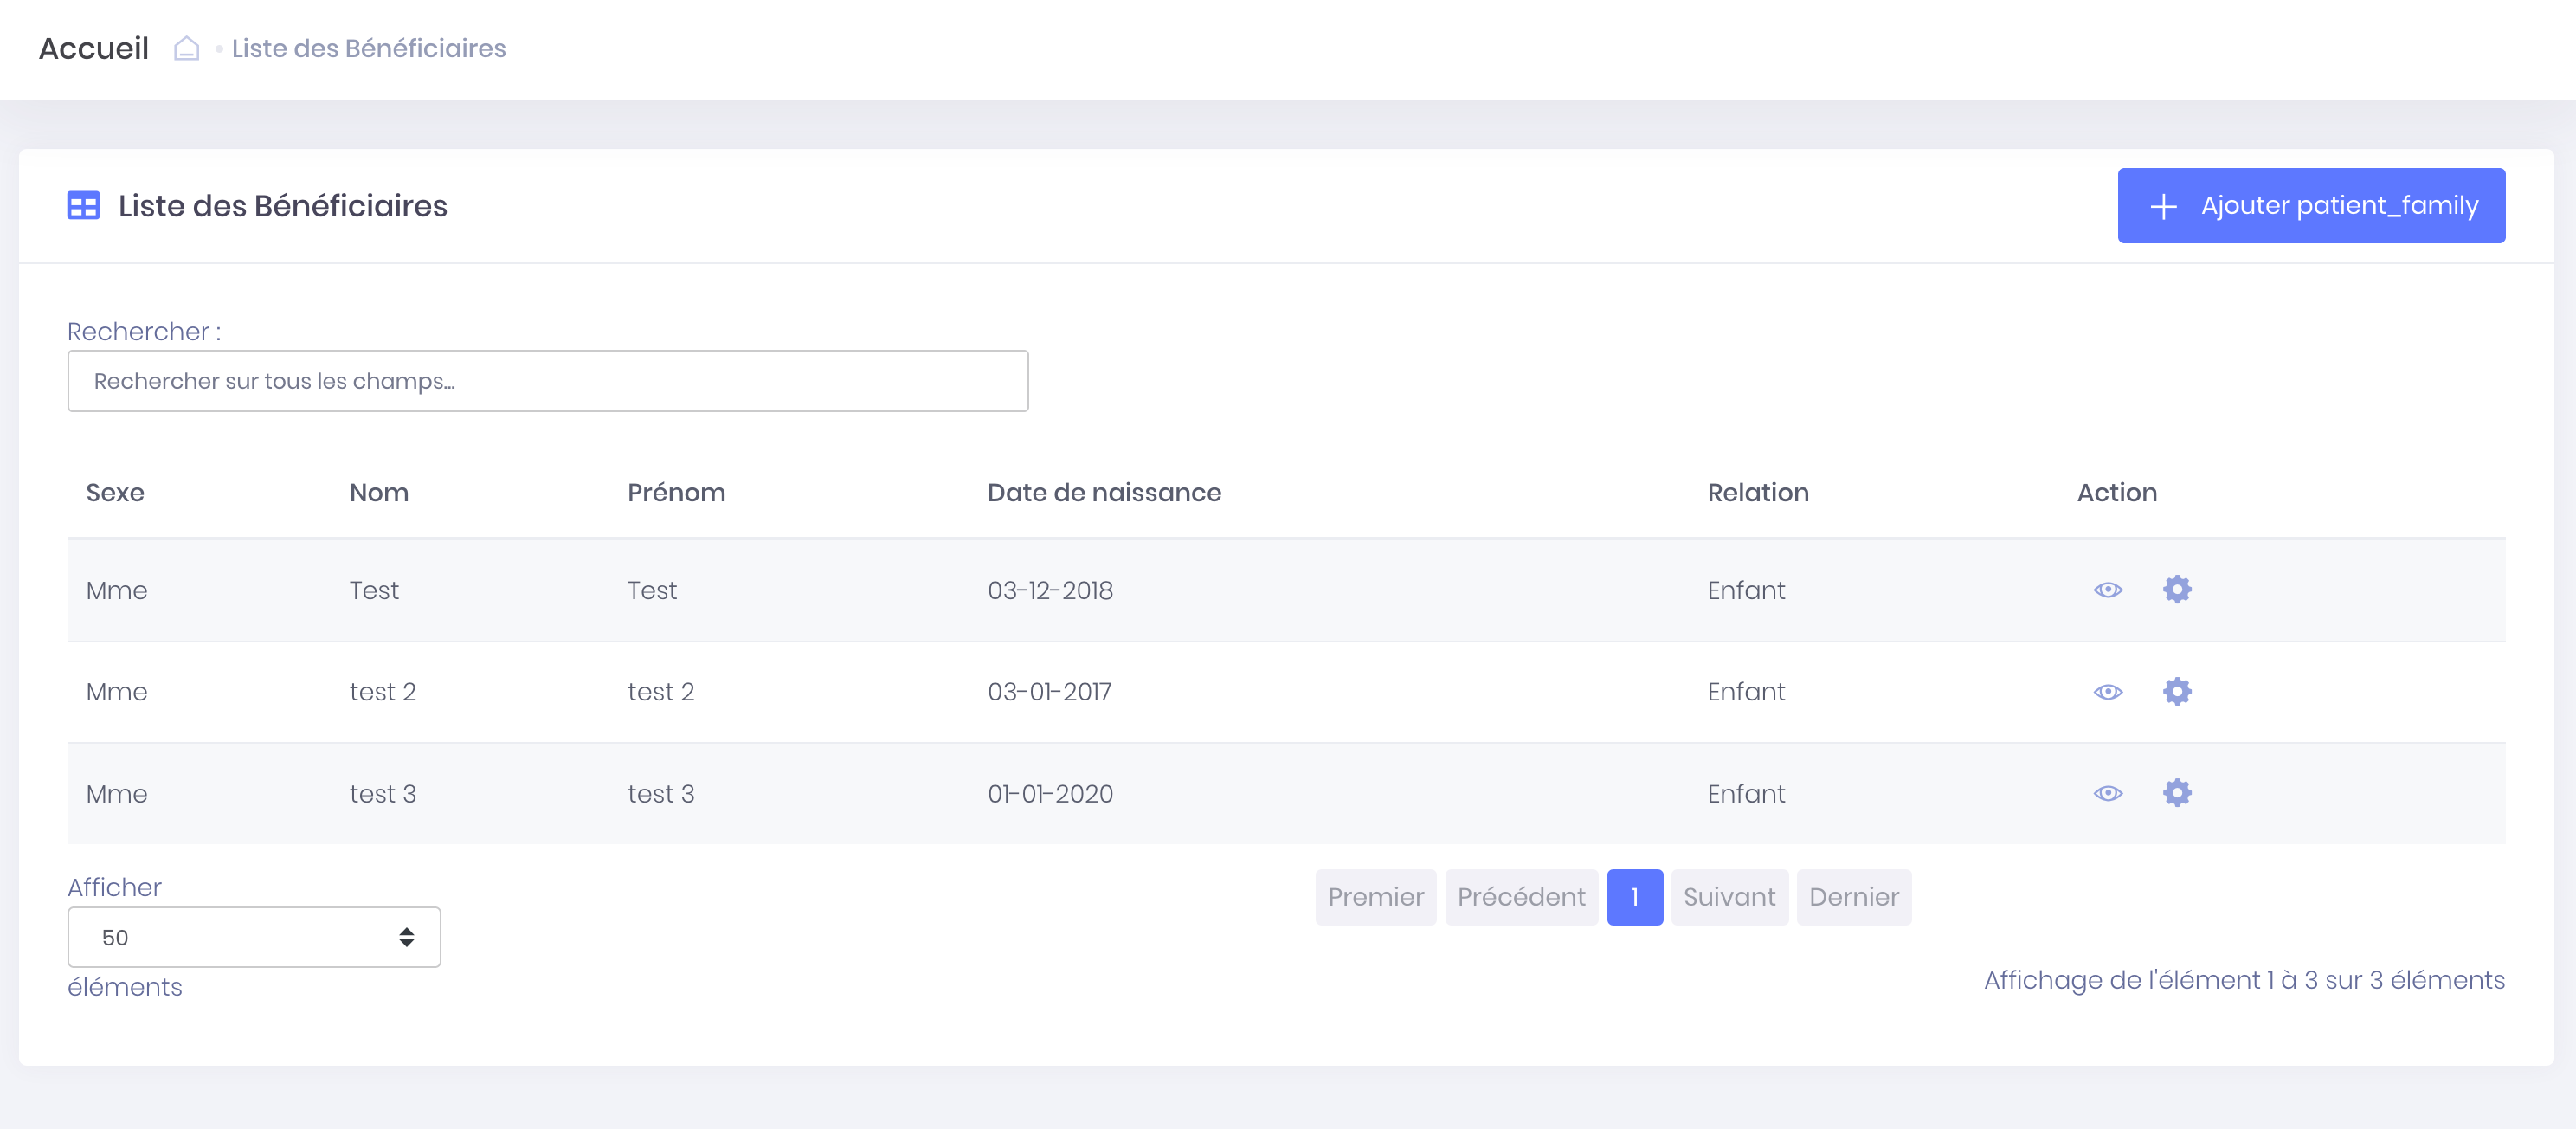
- Fill in the information about your nearest and click "Add"
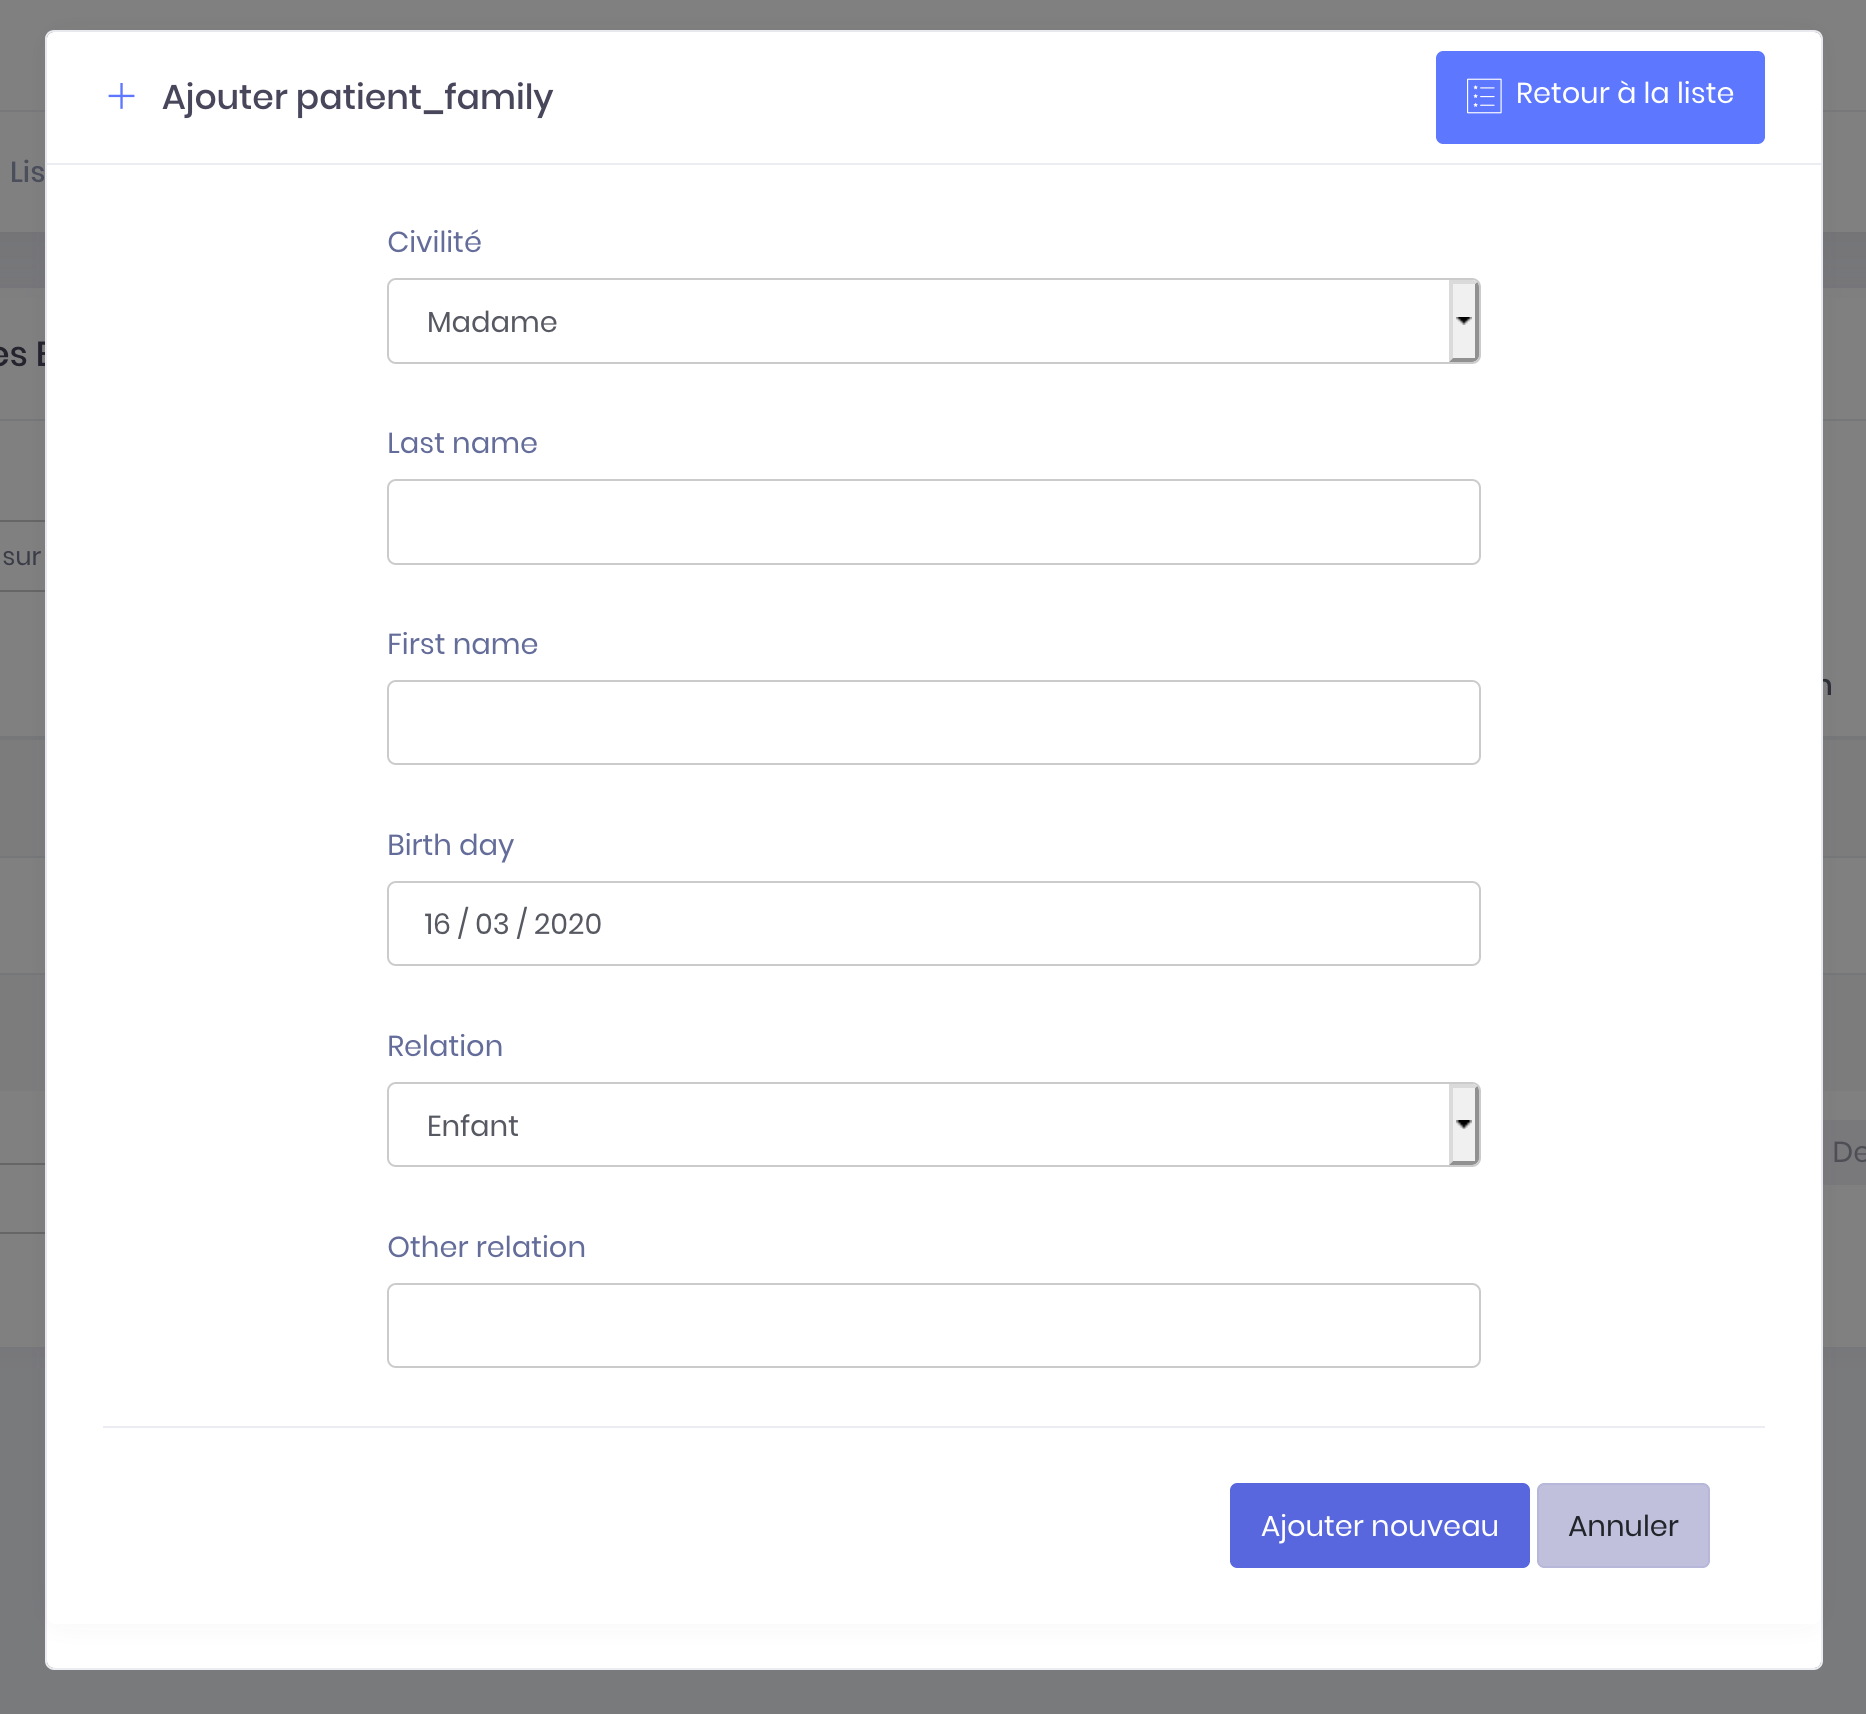
Your loved one is added to your account if it appears in the list of the pockets. You can now make an appointment for this close.
Add a close during the making appointment
In the first step of the booking process, it is possible to take the appointment for a relative who is not yet registered on the account.
- Click on "A relative" then complete the form
Registration of prohes information will register during the validation of the appointment.
For information, email address and telephone number of a major close can be added to his record so he can receive confirmation notifications and reminders for appointments. The account holder will also receive email notifications. However the return SMS will be sent only to close.
The center in which you take makes you the nearest will have both the coordinates of the nearest to attach but also those of the account holder.
If no email address and / or phone number is communicated (e) on the plug of a close, so the account holder will receive all notifications (email and SMS) for the appointment of close.
Quelques modifications possible...
-
The account's relatives
Delete close an account
Delete close by connecting to the account
You can delete information from the near recorded on your account. For that :
- Click on the top right menu button to bring up the main menu
- Click on Patient connection to access your account
- Click on the button "My relatives" top left
- Select the nearest you want to remove
- Click the trimming then "Delete"
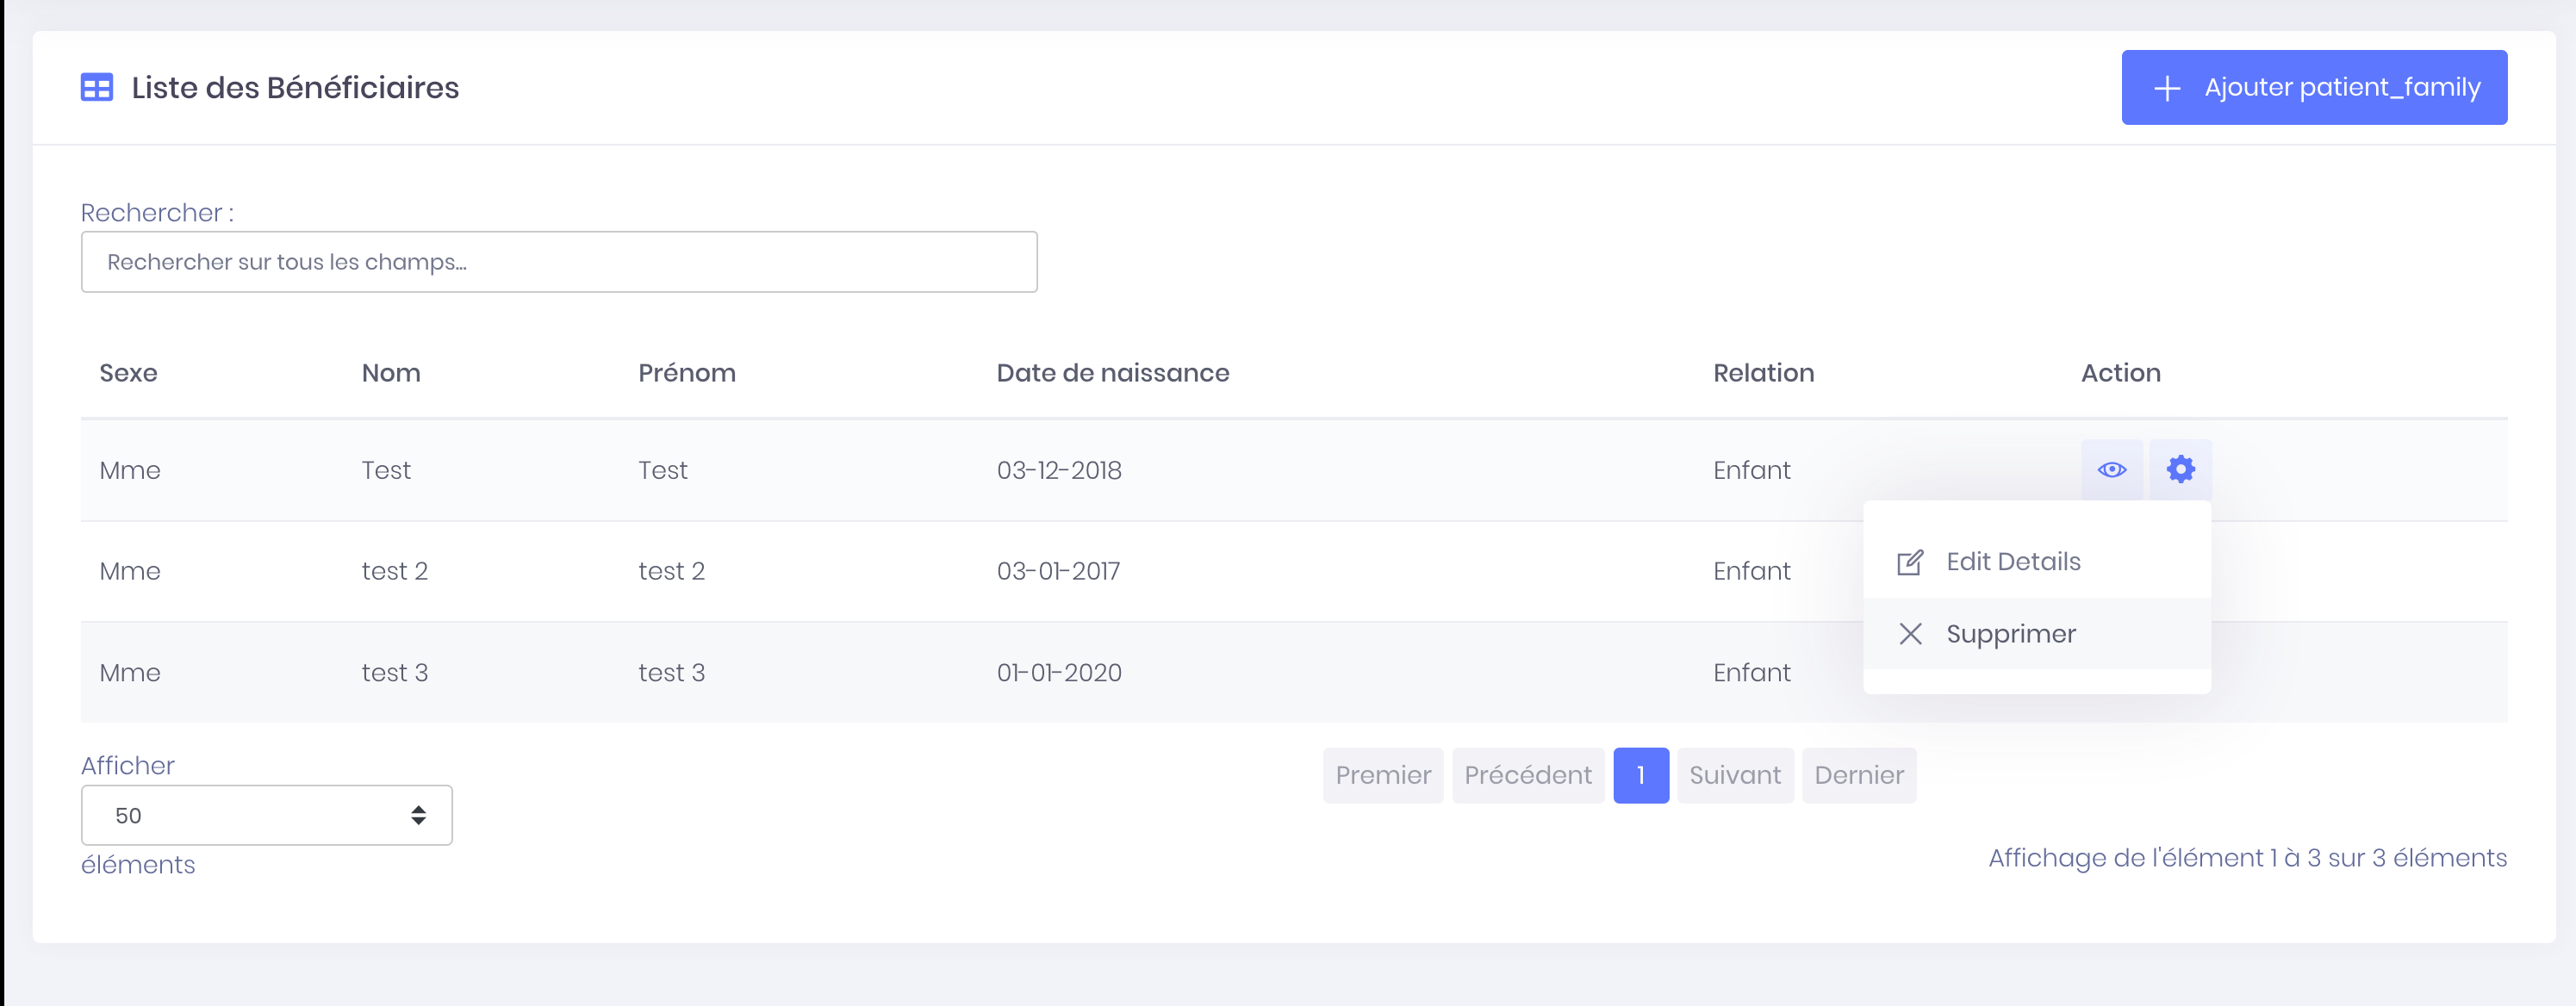
- And confirm the deletion by clicking on the button "Yes"
The nearest is now removed but you keep appointments recorded (past and future).
-
The account's relatives
Edit information of a close
Edit the near by connecting to the account
You can edit the information of a relative saved to your account. For that :
- Click on the top right menu button to bring up the main menu
- Click on Patient connection to access your account
- Click on the button "My relatives" top left
- Select the nearest you want to change
- Click the trimming then "Edit"
- Edit information about your nearest and click "Register"
The close of the information is now updated.
-
The account's relatives
Make an appointment for the near
Choose a niche appointment for the near
To make an appointment for a close, you just follow the same steps as making appointments for the account holder.
If you choose to make an appointment for a loved one, you must complete the identity information or by filling out the form, or by logging into your account to ovoir the list of your saved bénéficaires.
- Select "A relative" for the choice of beneficiary
- Complete the beneficiary information is not yet registered or find your list of beneficiaries by connecting first
Find all the stages of making appointments by clicking the link Choose and confirm an appointment slot.
-
The account's relatives
Taking appointments for several close
You can hang a visit to several nearby or multiple appointments for the same near.
Take an appointment for several close
Taking an appointment for several nearby is done in the same way as when several appointments are made to the account holder.
Take multiple appointments for the same close
Taking multiple appointments for the same close is performed the same way as when multiple appointments are made to the account holder.
Find all the steps of making several appointments by clicking the link Take several appointments.
-
The account's relatives
Confirm, move, cancel the appointment of a close
Actions appointment of a close
To confirm, move or cancel an appointment of a close, you just follow the same steps for confirmation, moving or canceling an appointment for the account holder.
Find all the confirmation steps, moving or canceling an appointment by clicking the link Appointments history.
Email & SMS notifications
-
Email & SMS notifications
Email waiting validation and validation email
Appointments made online
When your appointment is made, you receive an email defining the status of your appointment to the address associated with the account.
Even if you have passed all stages of taking an appointment and you're taken to your account, your appointment may be partially validated.
In every case you receive an email informing you of the status of your appointment.
Your appointment is validated
The email informs you that your appointment is validated; is that your appointment was approved automatically by the center and you will then receive further notifications before your appointment.
An appointment is validated automatically after taking appointment when it is judged simply by the center. It does not require validation by a secretary.
Each practitioner or director of a center defines itself examinations require validation or not.
When your appointment is approved, you receive your invitation at the same time.
Your appointment is awaiting validation
The email informs you that your appointment is pending approval; is that your appointment has been considered and is well recorded in the agenda of the practitioner but this requires verification by a secretary and you're likely to be called to verify some information including those noted on the prescription.
Once the appointment approved by the secretary, you receive a new email informing you that your appointment is confirmed and you will receive at that time your call.
You do not receive mail
If the appointment is correctly entered in your account under "My next appointments" is that it is well reflected in the agenda of the practitioner.
Remember to check :
- Your spam from your inbox. Email notifications can be placed in your spam folder
- That email address in your account in the section "My connection settings" Profile is correct
- The phone number saved in your account under "My connection settings" is up to date
If the appointment is not saved in your account under "My next appointments" is that it has not been registered in the agenda of the practitioner. You will need to repeat the steps of making appointments online or by contacting the center.
Appointments taken center
Your appointment is automatically validated
When you make an appointment directly in a center or from a practitioner, your appointment is automatically validated by the secretary who has you covered.
You receive notifications of appointment as well as if you had taken the appointment online, if the practitioner has enabled mail notifications and / or SMS, and the appointment is visible on your account.
If you do not receive notification but the appointment is visible on your account is that the practitioner has chosen to disable email notifications and / or SMS. You will receive at the time your notice in person.
If you do not receive notification and that the appointment is not visible in your account, is that the center does not have your email address and day phone number.
-
Email & SMS notifications
Email & SMS reminder and confirmation of appointment
Notifications reminder
If you have made an appointment more than a week before the scheduled time, you receive several emails a reminder.
Some return messages contain links to documents to complete or videos to watch :
- If there is an appointment for an MRI, you receive an email asking you to sign in to your account to complete the medical questionnaire.
- If a video is attached to the requested review, you receive an email inviting you to consult the explanatory video to prepare you best for the examination.
Confirmation of appointments made online or in a center or by telephone
When your appointment was validated and you received your notice, you must confirm your appointment so you receive 48 hours before the scheduled appointment an email and a text message asking you to confirm the .
To follow all the steps of the confirmation of an appointment, click the link Confirm an appointment.
You do not receive a confirmation notification
If you make an appointment less than 24 hours before the scheduled time and that the examination is considered easy (not requiring validation from a secretary), then it will automaiquement status "Confirmed".
If the appointment is not visible in your account under "My next appointments", is that it was not recorded in the agenda of the practitioner, so you do not receive confirmation notification.
-
Email & SMS notifications
Email appointments not honored
You missed your appointment despite confirmation
When you miss an appointment and confirmed that the practitioner says his side your unexcused absence, you automatically receive an email informing you of the siuation.
If this is the first time that this happens to you, you can always make an appointment with this doctor or other practitioners of Imagery.
However, if you earn more appointments not honored with one practitioner, you can not make an appointment online with the practitioner.
In this case, you can only make an appointment with the doctor by phone. If you want to access again in making appointments online, you must apply directly to the practitioner who is the sole manager of this option.
Caution :
The number of appointments not honored blocking taking appointments online depends on each practitioner.
For reasons of confidentiality and internal management practitioners, we do not interfere in the relationship between a patient and his physician. -
Email & SMS notifications
Email or SMS received by mistake
The notification email and / or SMS received is not for you
If you receive an email or reminder SMS that does not concern you (or your family), it is a mistake.
Have an account
If you've visited the practitioner concerned, this is probably a clerical error in the choice of the patient.
We invite you to contact the center by phone or through the complaints form available on your account to notify them that mistake.
If you have never visited the practitioner concerned, the appointment may be mistaken from your account if you let your open session from a workstation does not belong to you.
Remember to log out after each use of the site on a support that is not yours.
In both cases you can cancel the appointment from your account. You can follow the steps to cancel the appointment by clicking the following link : Cancel an appointment.
You do not have an account
If you've visited the practitioner concerned, this is probably a clerical error in the choice of the patient.
If you have never visited the dentist in question, it must is a typing error when entering the phone number or email address.
In both cases, please contact the center by phone to inform them that error and request deletion of your contact information or contact us.
A compléter éventuellement...
E-Convocation and reception terminal
-
E-Convocation and reception terminal
How to use my E-call
Access, download and / or print the convocation
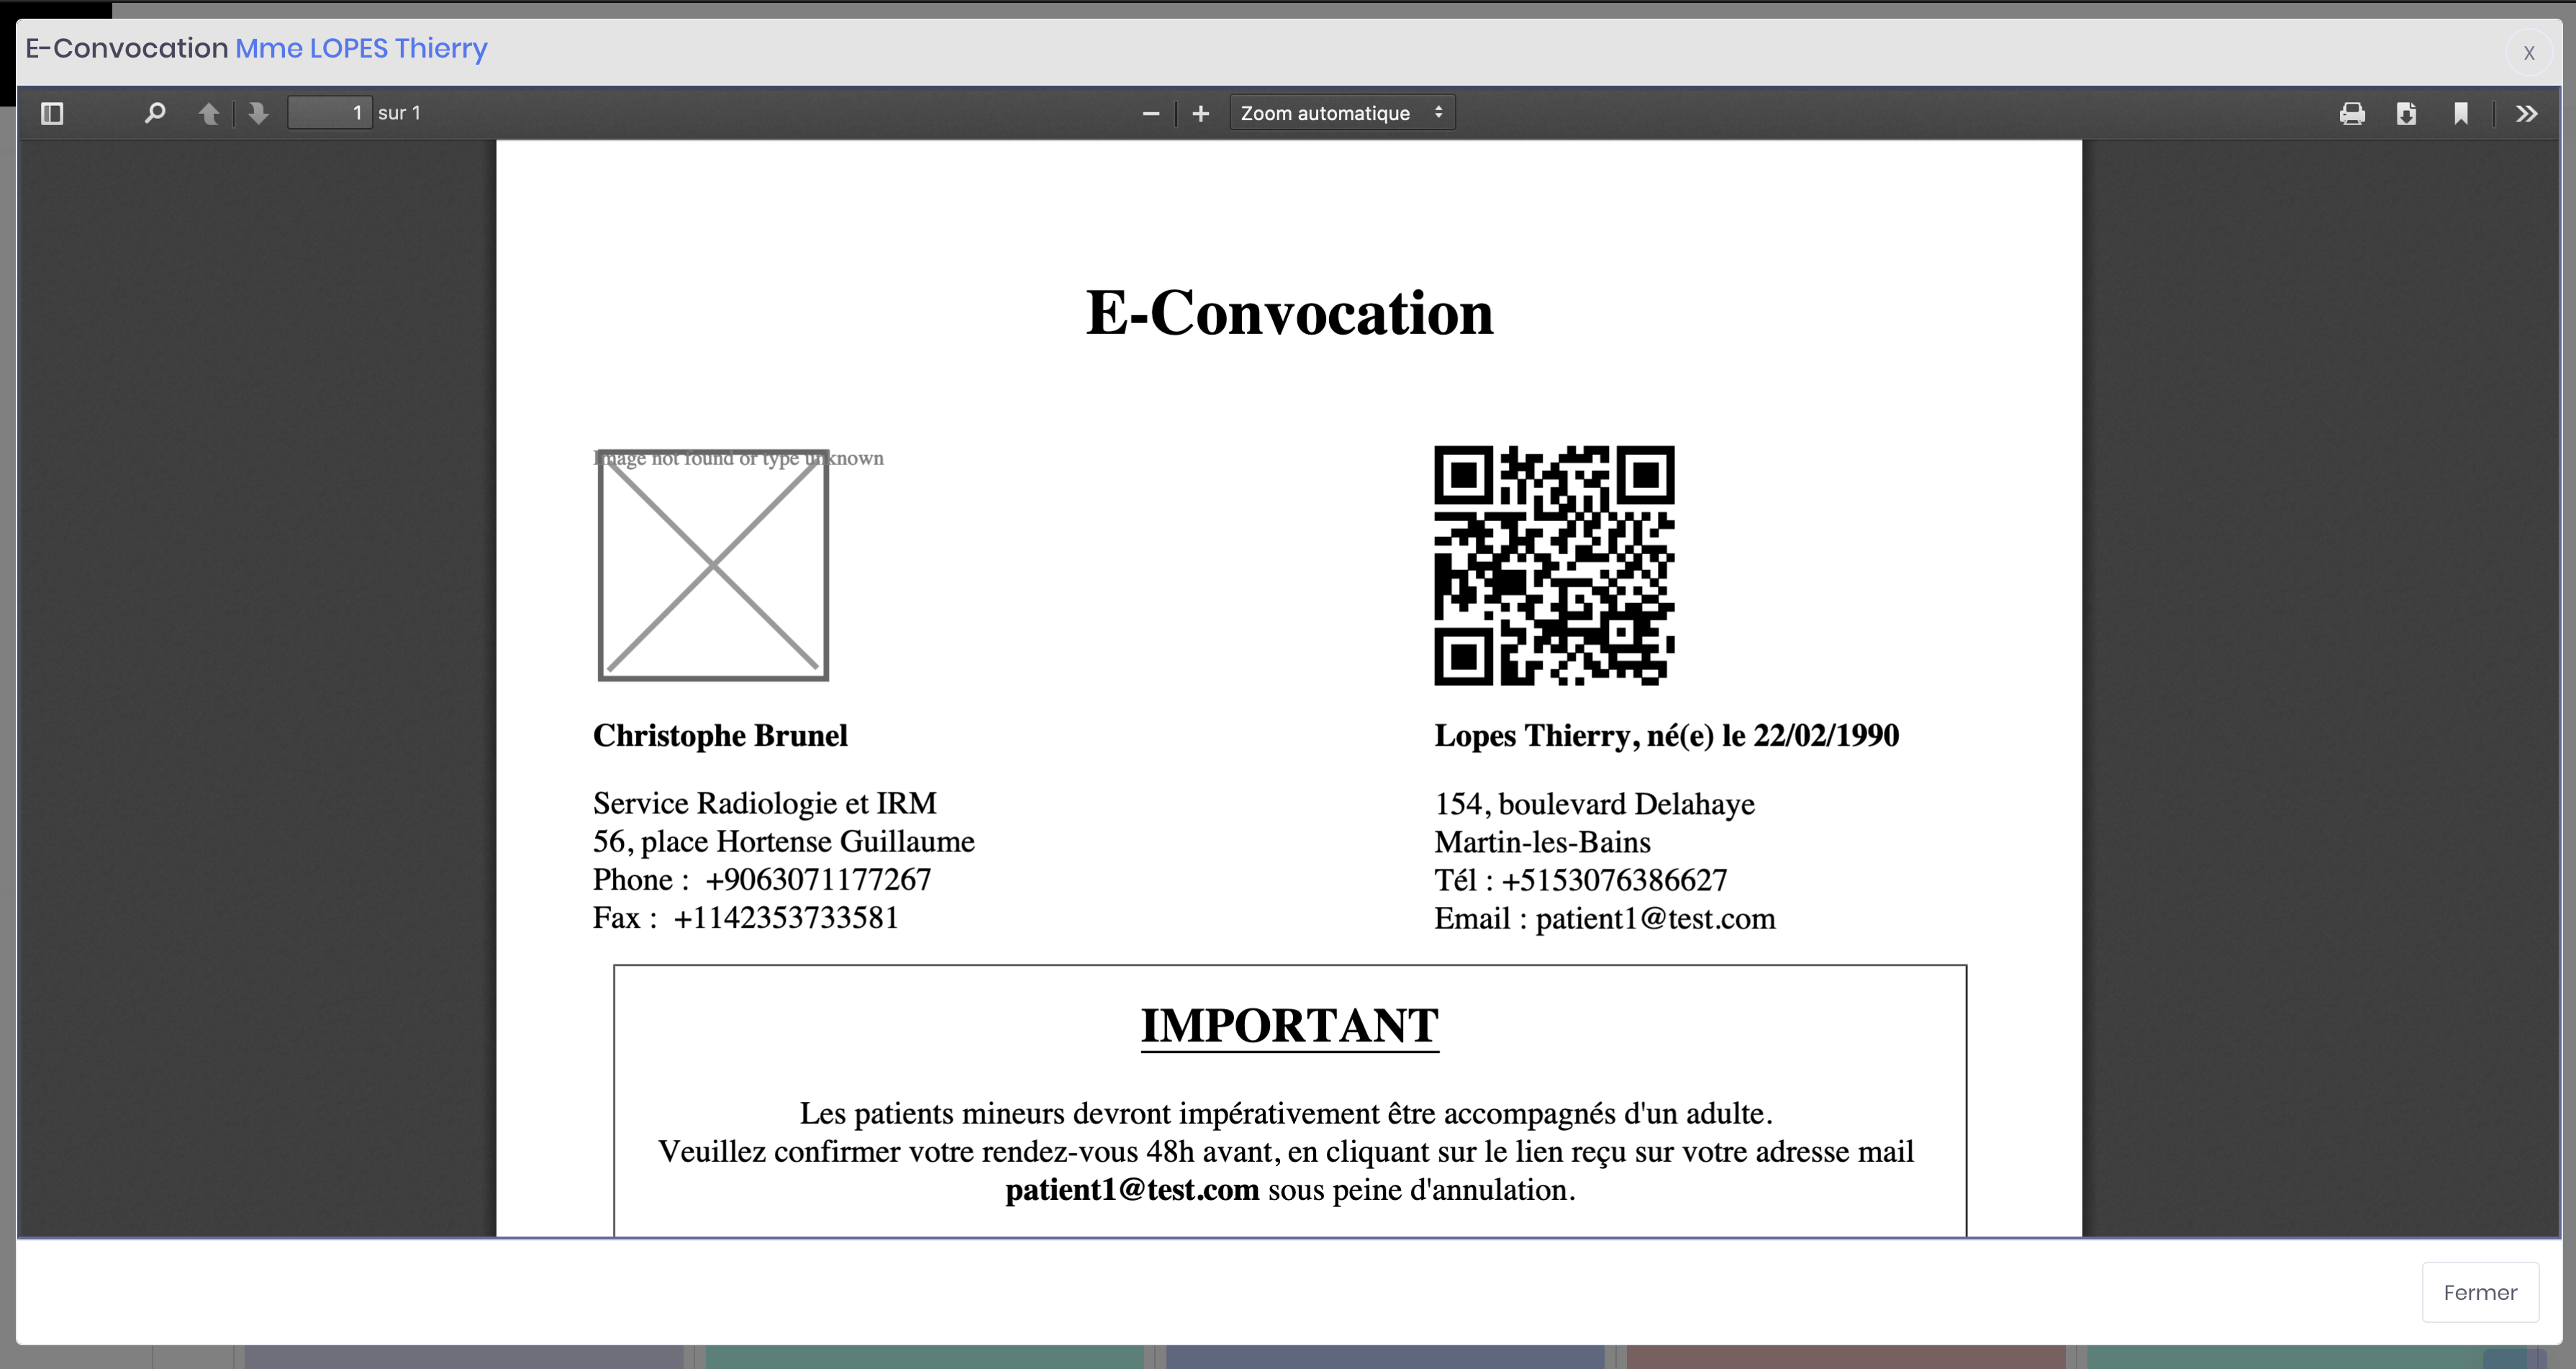
The E-Convocation
When you make an appointment and that it is validated, you receive on your mailbox and in your account a summons.
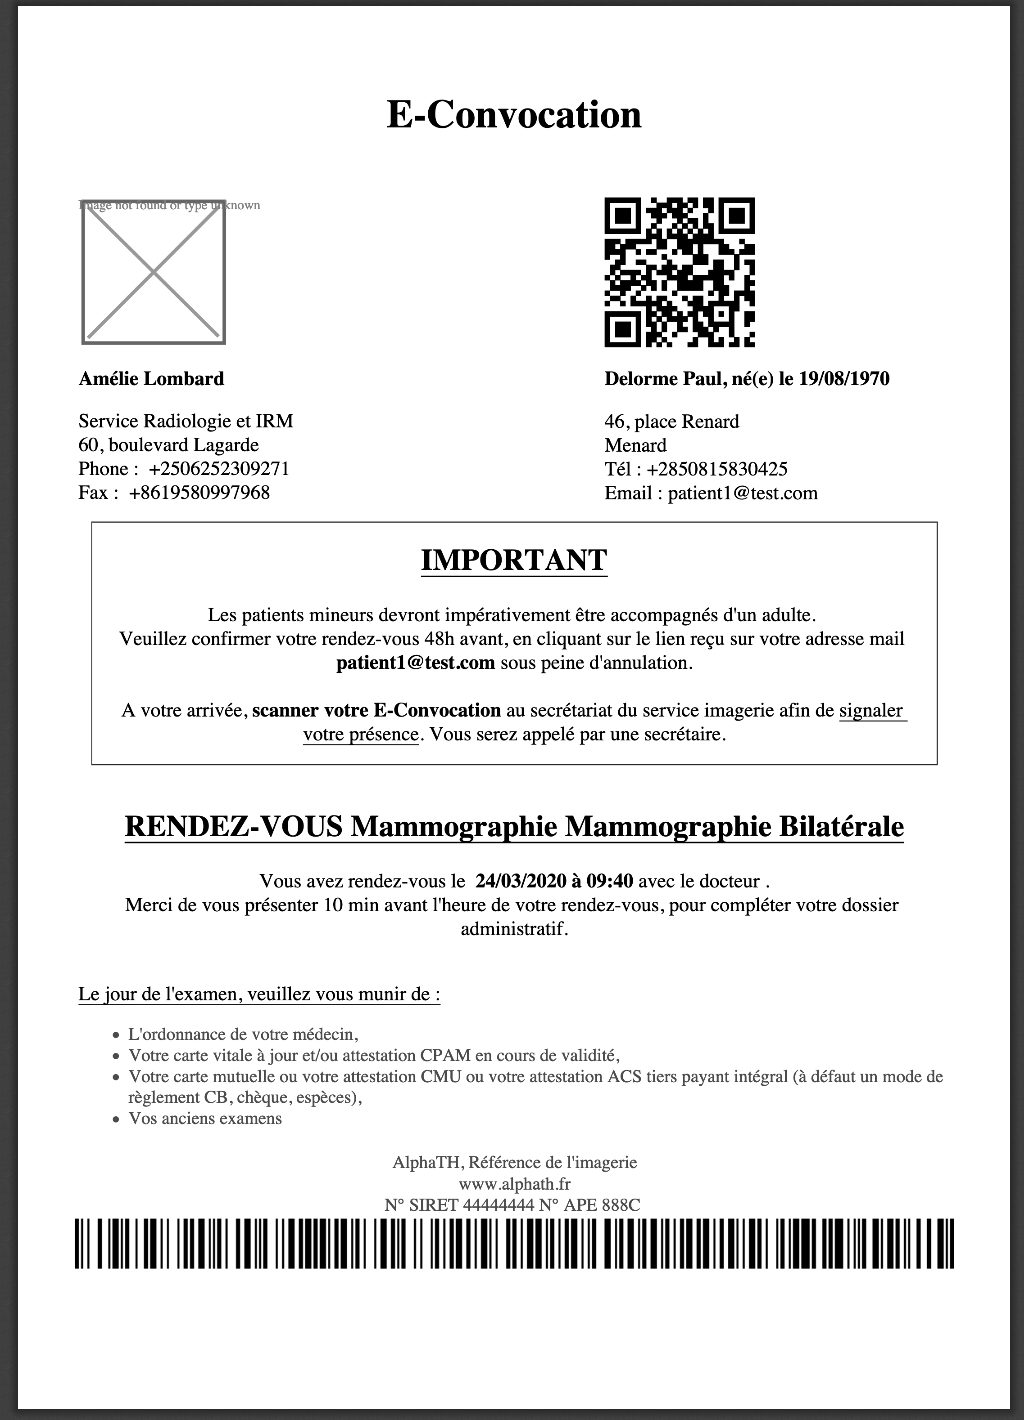
This notice contains all the important information taking appointments :
- Your identity (name, first name, date of birth ...)
- The place of appointment (Center name, address ..)
- The date and time of appointment.
- The title of the review
- The parts needed to check the file (Carte Vitale, mutual ...)
- The conditions necessary for the realization of the examination (Being sober, full bladder ...)
- a QRCode
It is important to obtain such a conference the day of the exam, it will facilitate your support to the secretariat.
Access the call by logging
- Click on the top right menu button to bring up the main menu
- Click on Patient connection to access your account
- Click on the button "My agenda" top left
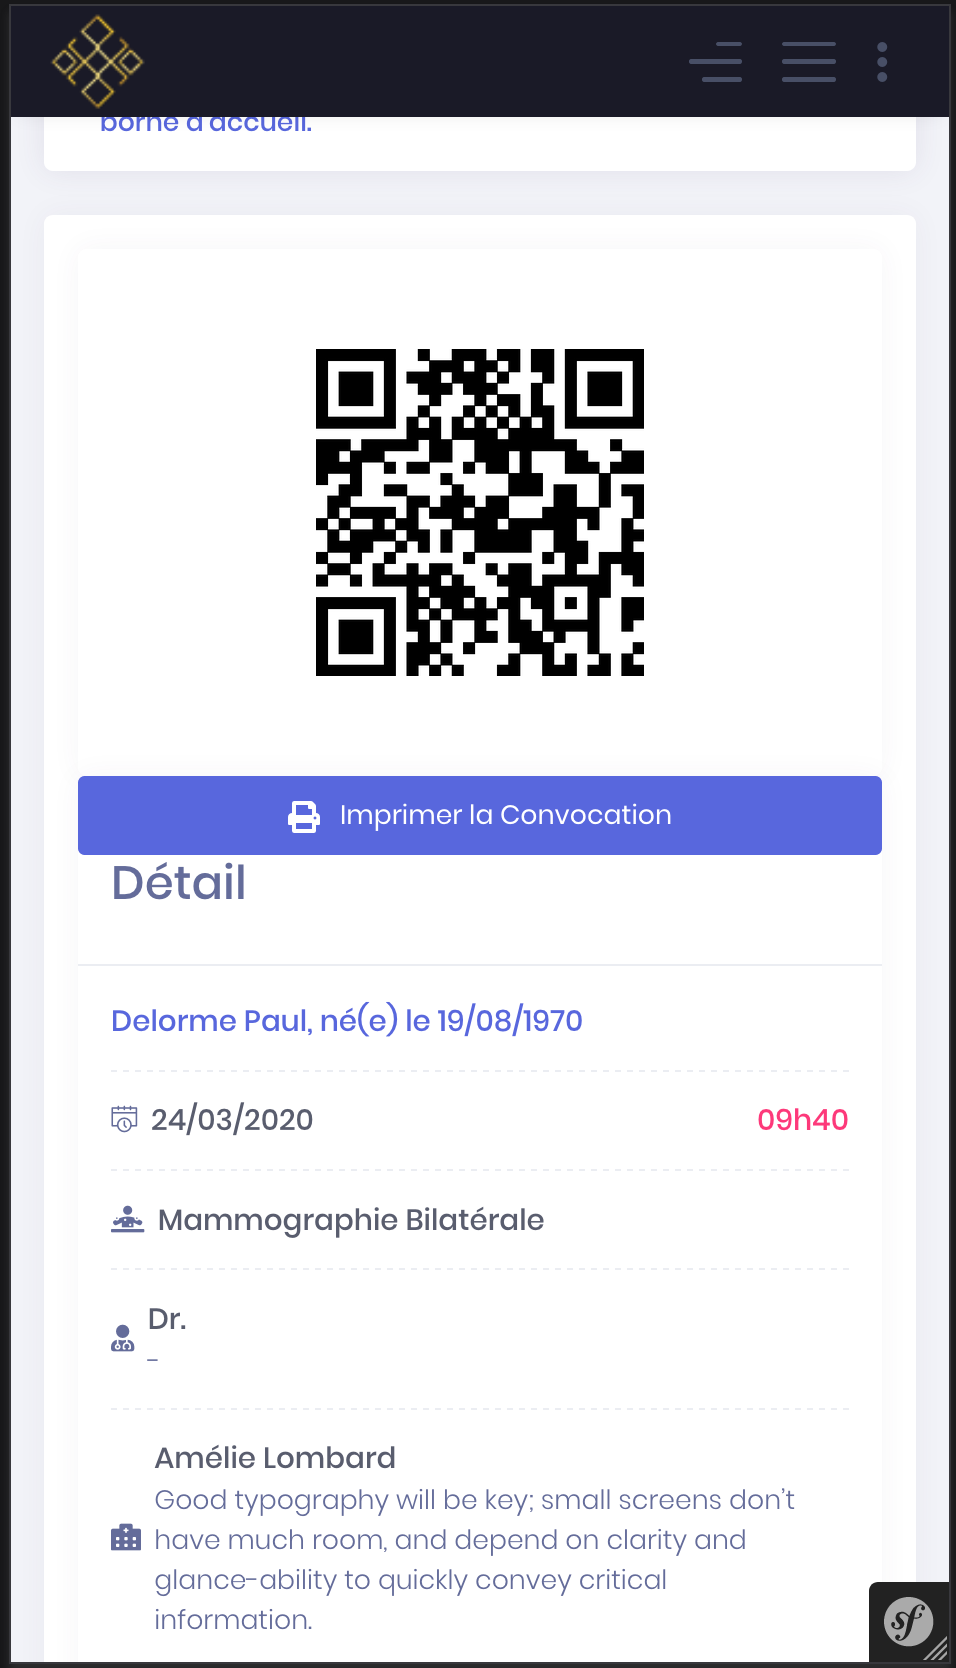
- In the section "My next appointments", Select the appointment in question and click the green button "E-Convocation" to view the details of an appointment and get your invitation in electronic format
- QRCode that appears contains all the detailed information in the paper version
- Then click the blue button "Print my convocation notice" for the preview of the print version
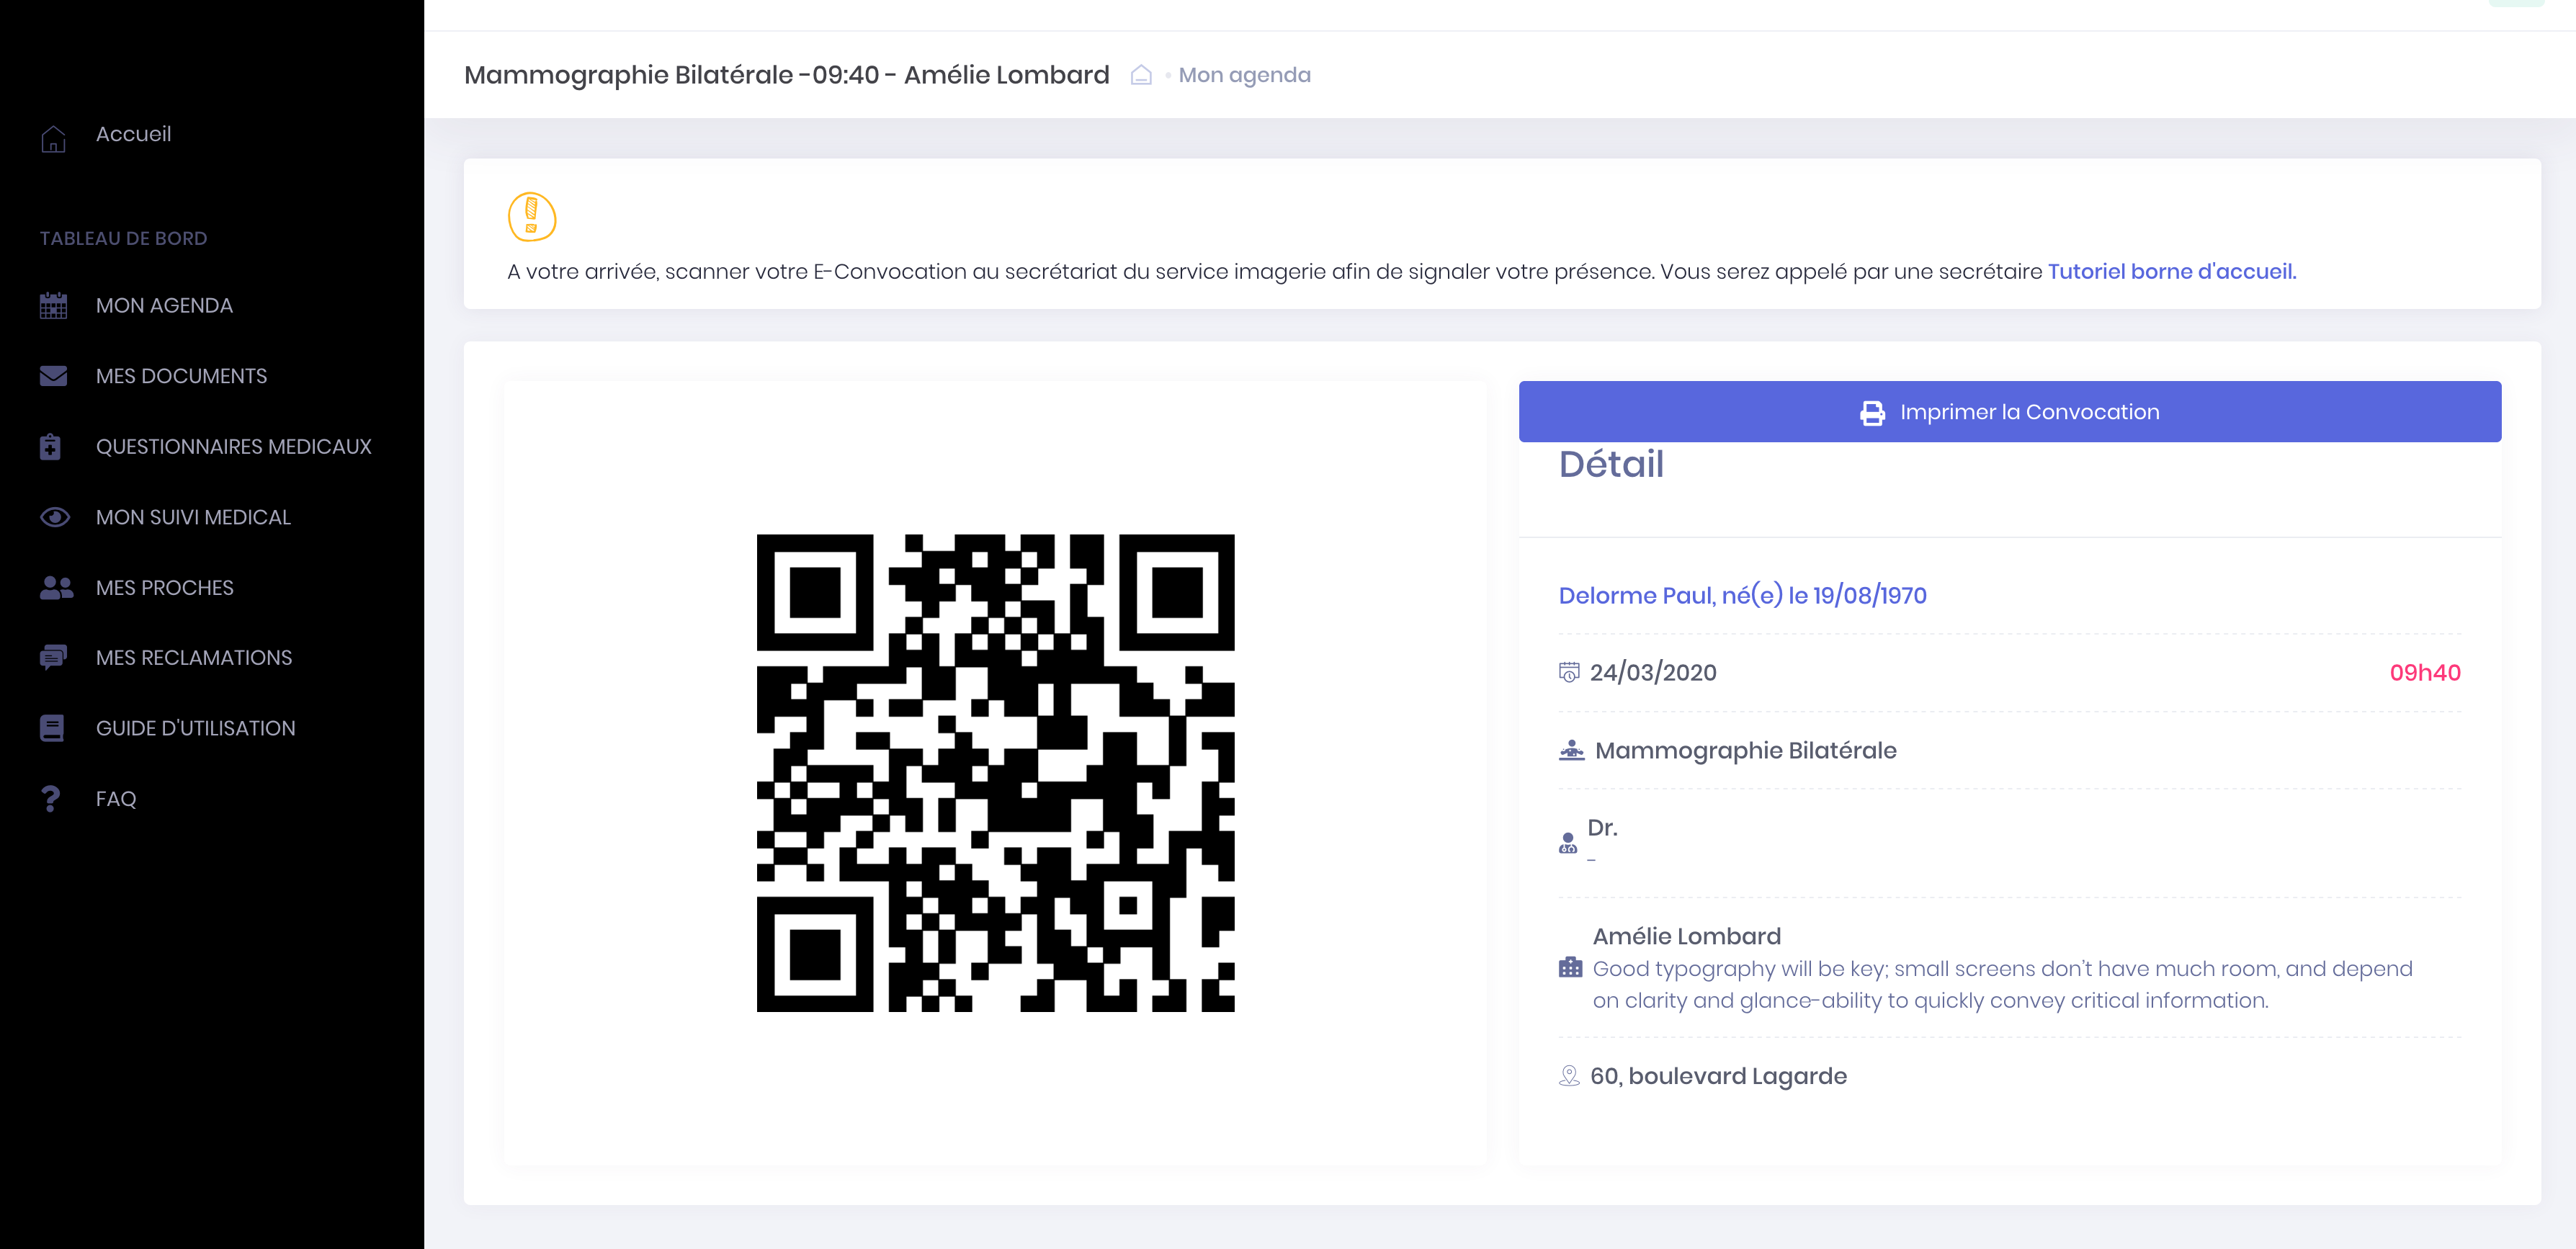
- Then click "Print" or "Download" located at the top right

How to use QRCode?
On the home terminal
When the center has a docking station, you can scan your invitation to your presence and get a ticket.
To do this place the QRCode on your paper or call directly from your phone on the QRCode reader and get your ticket.
A secretary will call you with the distributed number to your file.
Au secrétariat
Your call will also serve as the secretariat to quickly find your patient card or give you another appointment.
When you take a new appointment, the Secretary may use your QRCode to automatically integrate your data (name, first name, date of birth ...). This will include avoiding entry errors. Remember to update your personal information (from another phone number, email address ..) in order to properly receive notifications.
-
E-Convocation and reception terminal
QRCode linked to the account
Use my QRCode linked to the account
When you create an account Imagery, the platform creates a QRCode that allows you to securely transcribe your personal information.
You can use this QRCode by presenting a secretariat using our services to create a patient file for a new appointment.
Access by logging QRCode
- Click on the top right menu button to bring up the main menu
- Click on Patient connection to access your account
- Click on the button "Homepage" top left

Displays the summary page of your account.
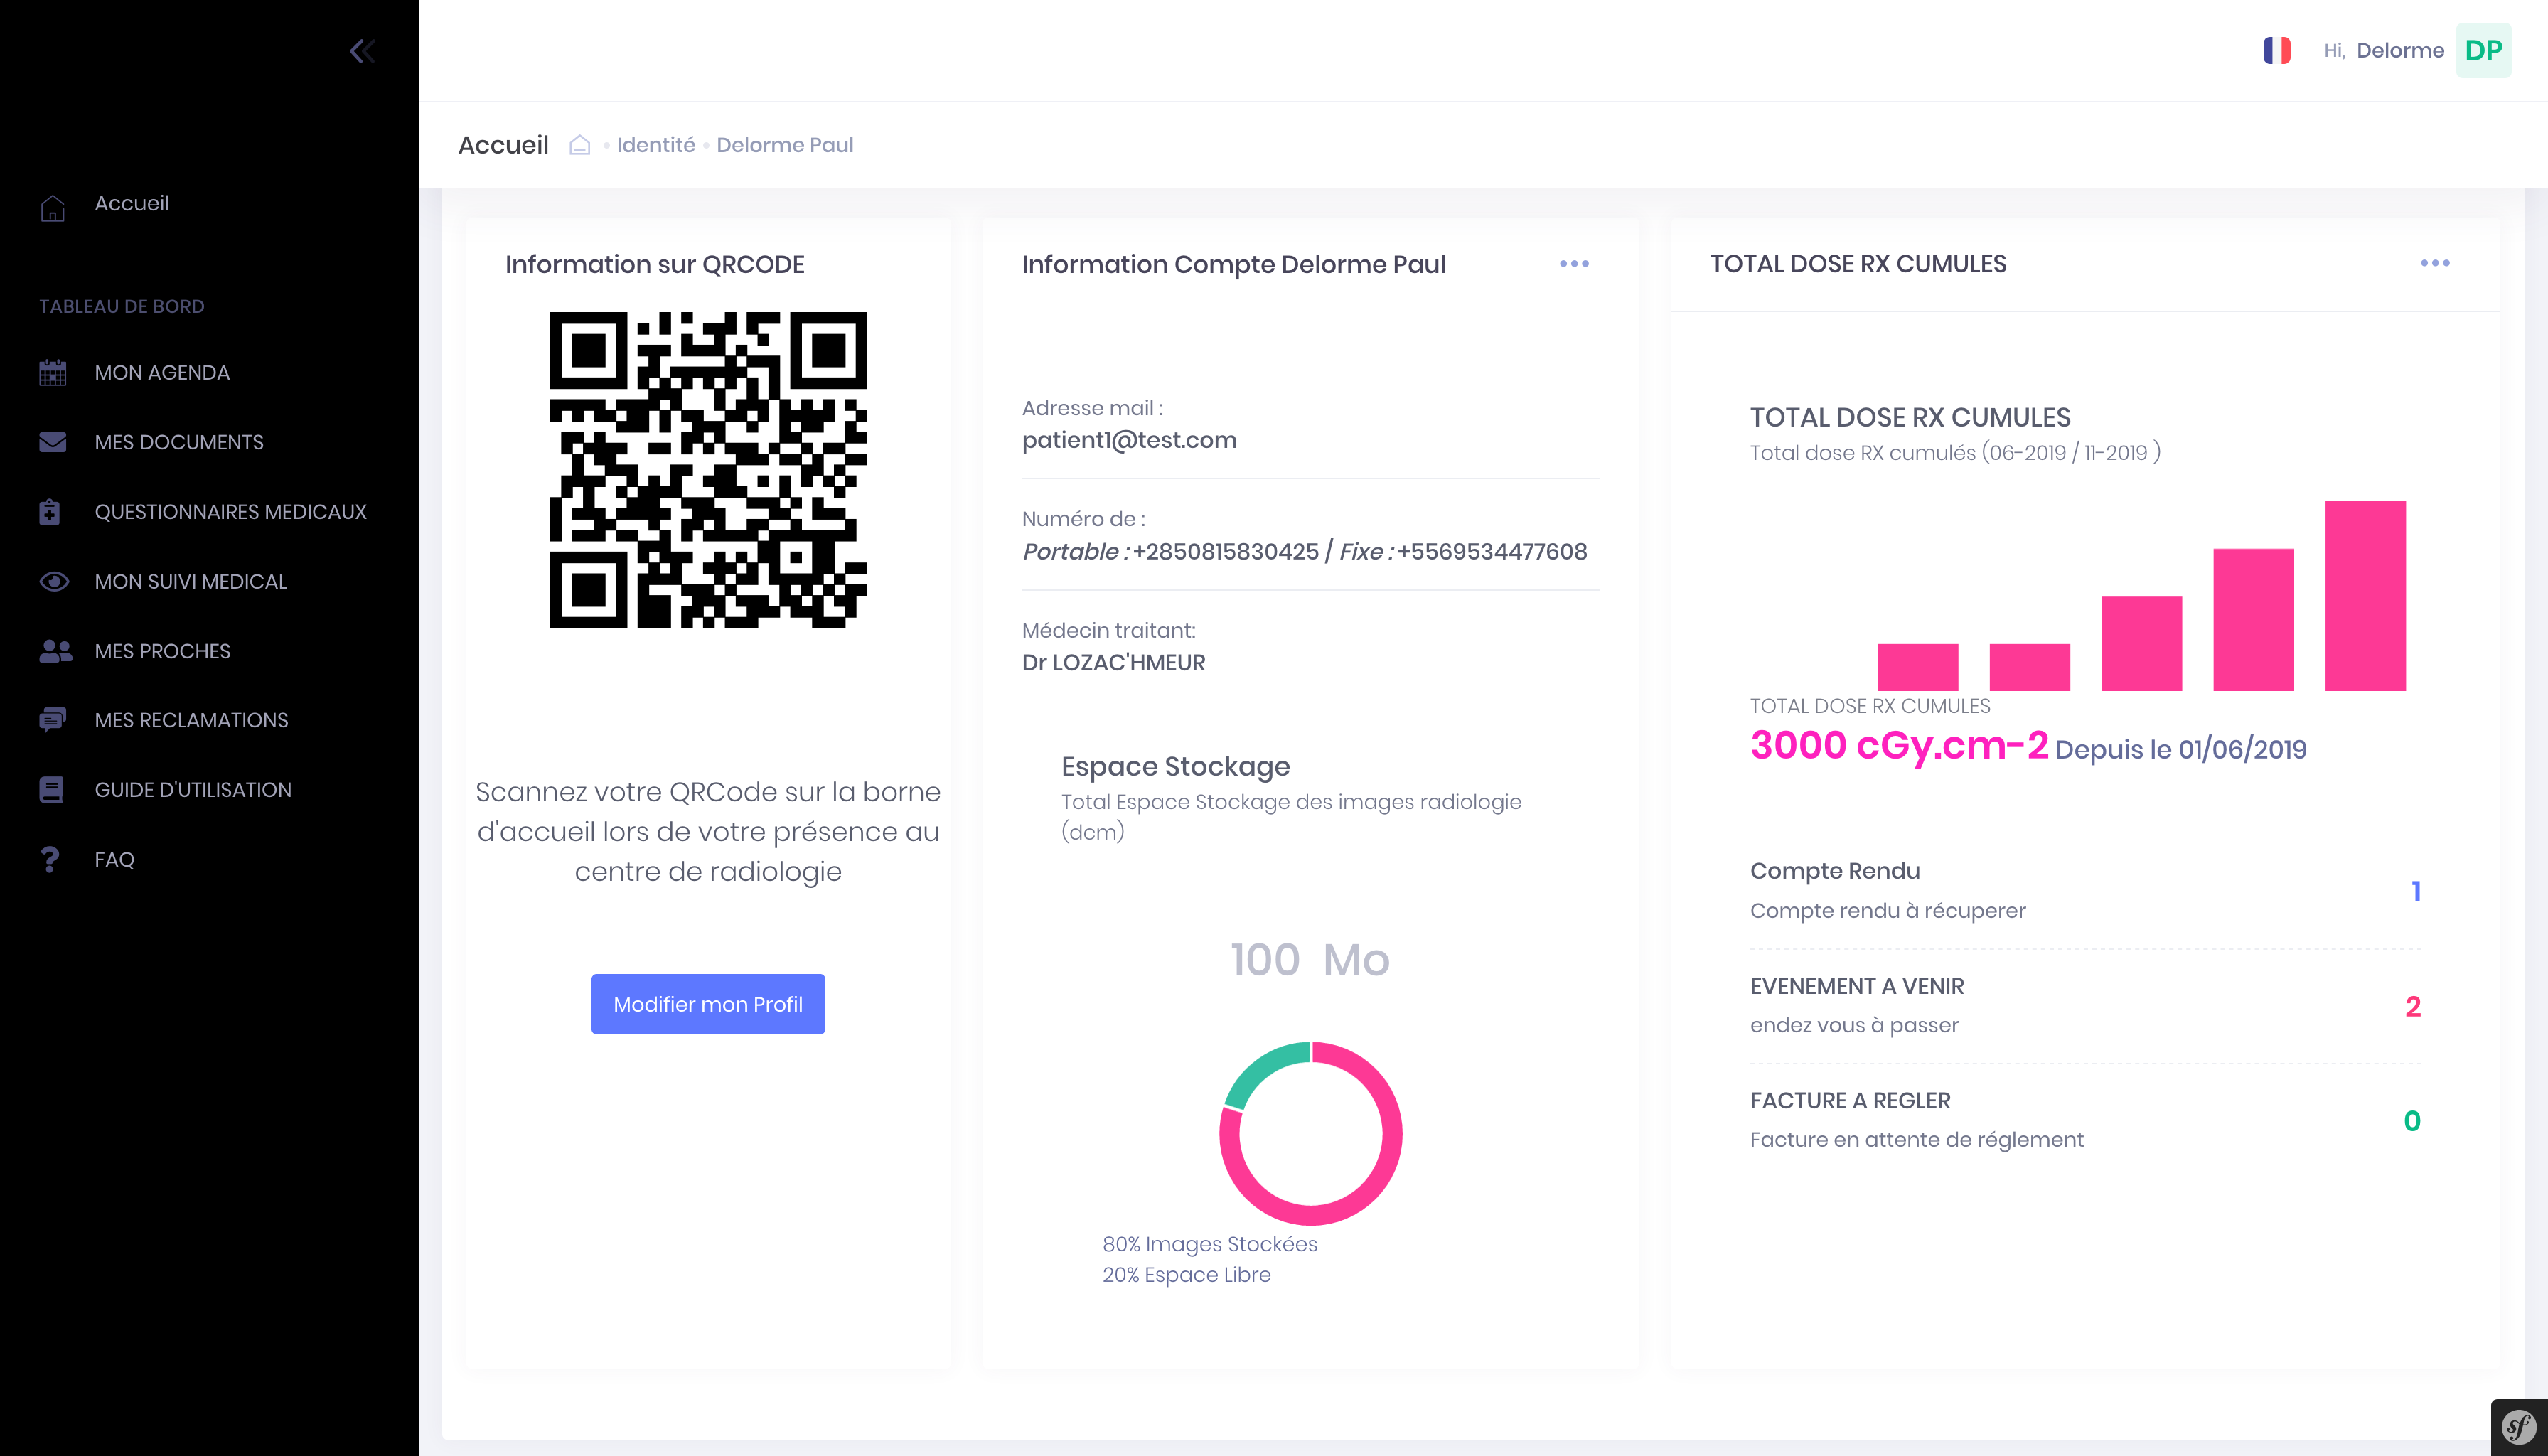
You find the following information :
- Your identity (name, first name, date of birth ...)
- your QRCode
- Your space for image storage
- Doses for irradiating examinations
- The tasks in ongoing and future
- The invoices awaiting settlement
If you want to use your QRCode to facilitate your support to the Secretariat and avoid entry error on your personal information, log on to your account on your phone and then present it to the secretary who will the scanner.
About Alphath
-
About Alphath
What Imagery
For patients
The Imagery platform has been designed to best meet your expectations, particularly in the field of medical imaging.
It includes a set of services essential to good patient care in this specialty.
So you can make an appointment online with a health professional 24/24 and 7/7. Algorithms have been developed to optimize the good decision appointment with for example the ability to take multiple appointments in a single dose according to the chosen terms.
With the platform, you can also find information about the different imaging techniques as well as videos permmettant you understand some taking sometimes binding load.
Aware that the language barrier is a barrier to access to services, the platform has been designed so that anyone can use non-French; which is why the site has been translated into several languages (and others are in progress).
And to facilitate its reading, speech synthesis (technology that allows a computer to read aloud texts) has been integrated.
Using the site is free to the patient.
For health professionals
For health professionals, the site Imagery is a software tool that allows them to offer you an appointment.
Each practitioner has free management of its agenda, which is why some will propose making multiple appointments and others do not.
The site allows any health care professional to be referenced even if he does not wish to be a partner of our decision-service appointment.
So when a health professional is listed on the Imagery platform but uses another system making appointments online, you will be redirected to the site competitor to make an appointment online. Otherwise you can also contact them by phone.
-
About Alphath
Use Imagery computer, smartphone and tablet
In progress...
-
About Alphath
Terms & Conditions and Privacy Policy
Before using the services of Imagery, please read the following texts :
Can't find the information you are looking for and would like more details ?